Crampons and ice axe are likely to be your first set of technical climbing equipment.
A good pair of crampons is more than just footwear. It is a piece of safety gear that prevents you from falling and sustaining serious injuries.
And like all technical equipment, you would want to stick with the more established brands. These should have good reviews over the years.
And it does not have to burn a hole in your wallet. I have found these crampons to be of exceptional quality for very reasonable prices.
Spending on a decent pair of crampons WILL save you money in the long run. They can last for years. And the last thing you need is for your cheap pair of crampons to break in the middle of your climb. You may end up needing to cancel your climb, wasting precious time and money.
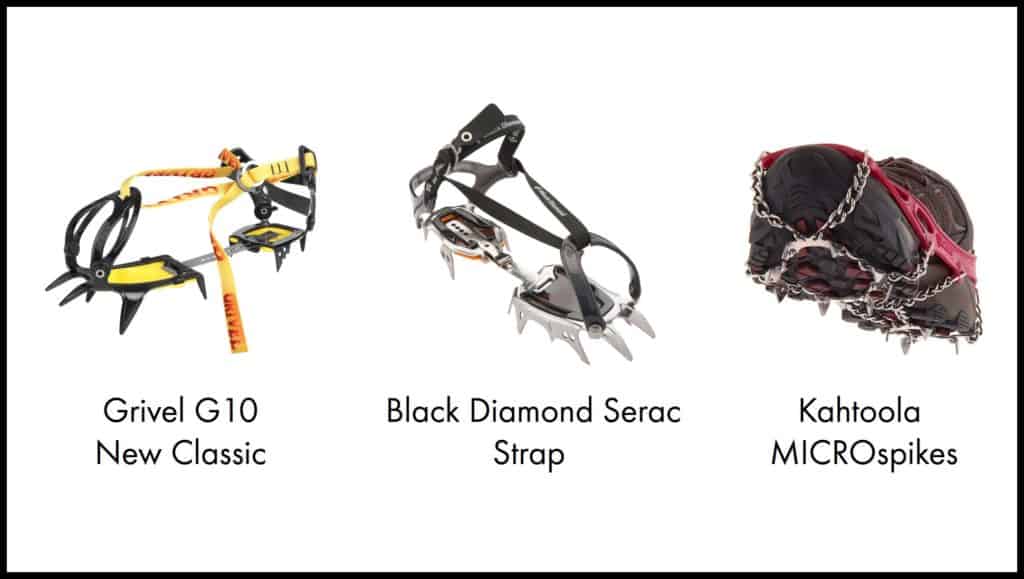
These Are My Top 3 Crampons For Hiking And Mountaineering
- Grivel G10 New Classic (click here to check the current price on Amazon): A favorite among the climbing community. This is the perfect pair to get started as you progress to winter climbs on moderate terrains.
- Black Diamond Serac Strap (click here to check the current price on Amazon): Another favorite for more serious climbers. If you are planning to climb on steep terrains, you can’t go wrong with the Serac.
- Kahtoola MICROspikes (click here to check the current price on Amazon): This is for easy winter hiking or people doing ultra-light backpacking. It is very light and comfortable to wear, making it popular among beginners. But it may not be suitable for more challenging hikes or climbs.
What Types Of crampons Do You Need?
Choosing a pair of crampons can be quite confusing because of the many different types out there.
But the most important thing you should know is the type of crampons you need. And these are the 2 main questions to ask yourself:
1. What type of activity are you doing — hiking or mountaineering?
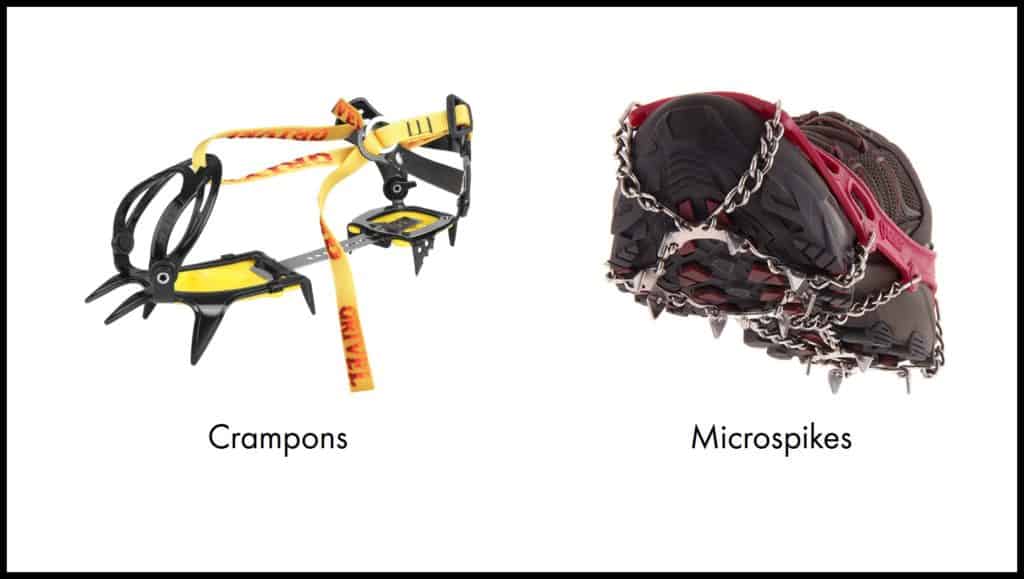
It is important to highlight here that microspikes and crampons are not the same things. You can sometimes microspikes for hiking but NOT for mountaineering.
2. Will the gradient be gentle or steep?
There are different types of crampons for different activities and boots. The steeper the gradient, the stiffer your crampons need to be.
Crampons are graded from C1 to C3.
- C1: Also known as strap-on crampons. Most flexible. Can be easily secured with most boots. For winter walking and glacier traverses (generally flat routes).
- C2: Also known as hybrid crampons. Stiffer than C1. Some might need to be secured to the heel welts of your boots. For winter climbing and alpinism (routes with some incline).
- C3: Also known as step-in crampons. Very stiff. Most need to be secured to the toe and heel welts of your boots. For steep icy slopes and technical routes.
Read more about boots grading and their compatibility with crampons.
Anatomy Of Crampons
It is useful to know the names of each part of your crampons.
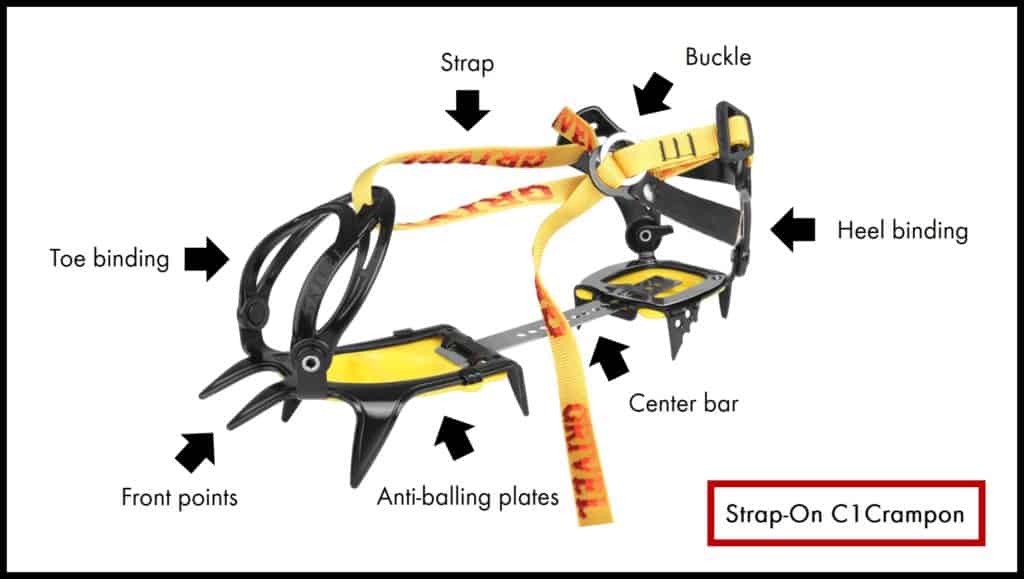
- Toe binding: This is to secure the crampons to the front of your boots.
- Strap: This is to tie and secure the crampons to your boots.
- Buckle: This is to secure the straps of the crampons.
- Heel binding: This is to secure the crampons to the front of your boots.
- Center bar: This connects the front and back of the crampons. You use the center bar to adjust the length of the crampons to fit your boots.
- Anti-balling plate: These prevent snow or ice from collecting under your crampons
- Front points: These are spikes at the front of your crampons to increase your tractions on steep terrains.
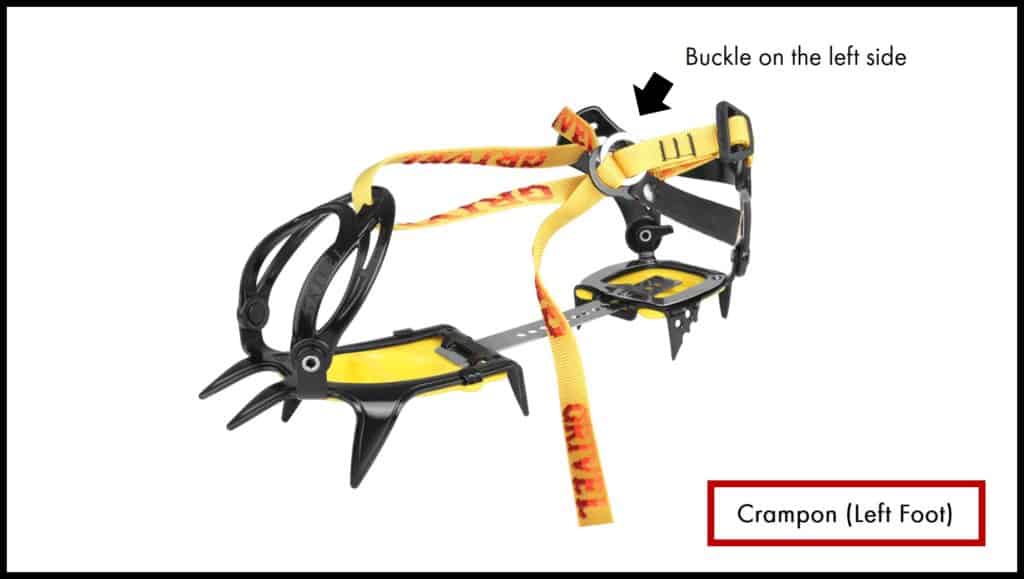
How To Differentiate Between The Left And Right Crampons
The easiest way to tell if a crampon is for your left or right foot is to check the location of the buckle. The buckle should always be on the outside of your foot. If the buckle is on the left, that crampon is for your left foot.
What Features Should I Look Out For?
Material
- Crampons are usually made of stainless steel or aluminum.
- Stainless steel is tougher and more durable. But they tend to be heavier.
Flexibility
- More flexible crampons are more comfortable to walk in. But they do not do well on steep terrains.
- Stiffer crampons are good for steep slopes. But they can be painful to walk in over long periods of time.
Number of points
- The number of spikes on the crampons usually range from 8 to 12.
- More spikes give you better traction. But they also mean more weight.
.
Anti-balling plates
- As mentioned earlier, these prevent snow or ice from collecting under your crampons. Too much snow or ice will reduce the traction of your crampons.
Why I Choose Grivel G10 New Classic For Mountain Climbing And Serious Hikes
- Comfort: A comfortable pair of crampons is especially important when you starting out. It can be uncomfortable and tiring when you are not used to a new piece of equipment. If you don’t get something comfortable, you may find yourself not putting it when you should. You end up putting yourself at risk.
- Semi-rigid: The G10 is flexible enough to be comfortable even after walking for long distance. And it is stiff enough to handle slopes of up to 30 degrees inclination. This is perfect for beginners and mountaineers not doing any challenging technical climbs.
- Easy to wear: The Grivel G10 New Classic only has one strap that you can loop around to secure and tighten your crampons.
- Lightweight: It is made of chromoly steel. This makes it lighter than a similar one made of normal steel. This reduces fatigue and leg strain.
- Durable: It is made of Chromoly steel which is tougher than normal steel. It is also corrosion resistant.
- Compatible with hiking boots: You don’t have to get a new pair of mountaineering boots to use this pair of crampons. It is flexible and fits well with my hiking boots. After a while, you won’t even realize you have 2 sets of footwear on.
- It has anti-balling plates: You won’t have snow or ice building up at the bottom of your crampons. You don’t have to worry about losing traction during your climb.
The Grivel G10 also offers a wider model for people with broader feet (click here to see on Amazon).
It also comes in 2 different types of binding systems:
- New Classic binding system: This system is great for beginners since it is very easy to use. It can be used with any kind of hiking boots.
- New-Matic binding system (click here to see the price on Amazon): This system takes up less space and is lighter. But the heel binding needs to be secured to the heel welt of your hiking boots.

But it is important to know that the Grivel G10 does not do as well on steep mountaineering routes. The front points are shorter and less aggressive. This makes it easier to walk with but less traction when cutting into ice on steep climbs.
Comparison at a glance: Grivel G10 New Classic Vs Black Diamond Serac Vs Kahtoola MICROspikes
| Grivel G10 New Classic | Black Diamond Serac Strap | Kahtoola MICROspikes | |
| Suitable for | – Hiking or climbing up snowy or icy terrains – Can handle up to 30 degrees slopes | – Climbing snowy or icy terrains which are steeper than 30 degrees | – Hiking on fairly flat surfaces – Also useful for hiking on muddy terrains or streams |
| Weight | 28.9 oz / 820 g | 30.3 oz / 860 g | 11 oz / 311 g |
| Size | Bulky | Bulky | Compact |
| Comfort | More comfortable than the Black Diamond Serac for walking | Less comfortable than the Grivel G10 for walking | Comfortable over long distances |
| Material | Chromoly steel | Stainless steel | Stainless steel |
| Flexibility | Semi-rigid | Semi-rigid | Very flexible |
| Number of points | 10 | 12 | 12 (⅜ in / 9.5 mm) |
| Compatibility | Can be used with hiking boots | Can be used with stiff hiking boots or mountaineering boots | Can be used with hiking boots |
| Anti-balling plates | Yes | Yes | No |
| Sizes | – One size: Fits boot size US 4 to 12 / EU 35 to 46 – A longer center bar needed for sizes bigger than 46 | -One size: Fits boot size US 5 to 12 / EU 36 to 46 – A longer center bar needed for sizes bigger than 46 | – Many sizes: Fits boot sizes US 5 to 16 / EU 36 to 49 |
| Check the latest price on Amazon | – Grivel G10 New Classic – Grivel G10 New Classic (Wide) – Grivel G10 New-Matic | Black Diamond Serac Strap Crampon | Kahtoola MICROspikes |
Crampons And Safety
Crampons prevent you from falling on icy or snowy terrains. Falling with a heavy backpack can lead to serious injuries. Not to mention any falling from height can be fatal.
Even if you can ascend a mountain without crampons, coming down may not be so easy.
In my personal experience, even the best pair of hiking boots loses most of its traction even on a thin layer of ice.
Without crampons, your speed and progress will be significantly slower. If you did not plan for a long trip, you risk losing daylight. you may also end up without shelter or enough food for your climb.
How To Adjust The Length Of Your Crampons?
Microspikes come in many sizes but crampons usually come in only one size.
Crampons have a center bar which you can adjust to change its size. You can also buy a longer center bar if the standard bar is too short.
This video shows how easy it is to adjust the center bar:
How To Put On Your Grivel G10?
As mentioned earlier, putting on the Grivel G10 New Classic is a breeze.
Just check it out here:
How To Maintain Your Crampons?
Lengthen the life of your crampons by keeping them in tip-top conditions.
- Clean them and dry them after each use. Even stainless steel are not immune to rusting. Rust will reduce the strength and durability of your crampons.
- Cover the spikes on the crampons with point covers so that they do not cut their own straps or damage other stuff or injure people.
- Walking and climbing on rocks will dull the spikes on your crampons. Sharpen them with a hand file.
- If the spikes are bent, try to straighten them where possible.
- Tighten any loose screws or rivets.
- Replace any worn or torn straps or buckles.
What Crampon Accessories Do You Need?
- Gaiters: To protect your lower legs and pants from getting cut by the crampons
- Replacement parts: These include center bars to adjust crampon flexibility, straps, screws etc
- Crampon cases: Shoe bags for crampons, usually made of tougher materials like nylon
- Point covers: Rubber covers to cover the sharp crampon points when not in use
Traveling With Your Crampons
If you are flying with your crampons, do note that most countries do not allow your crampons in carry-on bags. Check them in to avoid any issues.
You can read more about the restrictions in various countries here.