An ice axe is one of the most indispensable tools when you are doing winter climbs or alpine climbing. Before you go shopping for your ice axe, it is important to first learn more about its different uses. You will also need to know how to use it properly. This can help you decide on the type of ice axe you need.
So what are ice axes used for? An ice axe is primarily used to:
- Provide support and balance when walking over snow or ice. It will act as the equivalent of a hiking stick.
- Chop or cut steps into hard snow or ice when going up a gentle slope.
- Act as an anchor point when you are scrambling or climbing up a steep slope.
- Perform self-arrest or self-rescue.
- Create a T-Slot Anchor for belaying or rappelling.
Using an ice axe wrongly can be as dangerous as not using one. It has many sharp points that can cause injuries if you are not careful. Read on to learn more about how to use an ice axe properly in each of the situations mentioned above.
- Anatomy Of An Ice Axe
- What Is The Difference Between An Ice Axe And An Ice Tool
- Use Case #1: To Walk Or Hike
- Use Case #2: To Chop Or Cut Steps Into Hard Snow Or Ice
- Use Case #3: To Scramble Or Climb Up A Steep Slope
- Use Case #4: To Perform Self-Arrest Or Self-Rescue
- Use Case #5: To Build A T-slot Anchor For Belaying Or Rappelling
This is Part 5 of 5 of the Snow & Ice Climbing Mini-series:
Part 1: Compatibility Between Crampons And Hiking Boots
Part 2: Travelling With Your Crampons
Part 3: How To Use Your Crampons
Part 4: Knowing The Difference Between An Ice Axe And Ice Tool
Part 5: How To Use An Ice Axe
Anatomy Of An Ice Axe
But first, you need to know the names of each part of the ice axe.
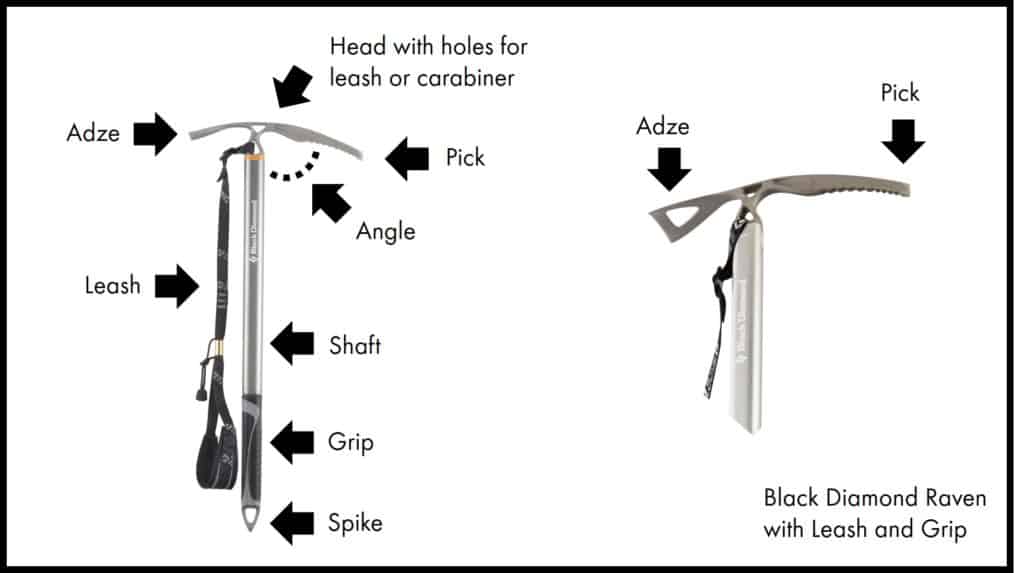
Head: This is the shorter part of the ice axe. On the head, you will find the adze on one end and the pick on the other.
Adze: This is the flat, wider end of the head.
Pick: This is the sharp end of the head.
Shaft: This is the longer section of the ice axe. On the shaft, you may have a grip which gives you more traction when you are holding the ice axe.
Spike: The spike is the sharp point at the end of the shaft. This provides traction in the snow or ice when you use the ice axe for walking.
Leash: Some ice axes come with a leash. For those that don’t, there’s usually an opening along the shaft for you to attach your own leash.
What Is The Difference Between An Ice Axe And An Ice Tool
An ice tool is a specialized form of ice axe that’s used for vertical ice climbing. An ice tool is typically shorter and more curved as compared to an ice axe.
You can find out more about their differences here.
| Looking for your first ice axe? Check out the review of my favorite ice axe for beginners here. |
Use Case #1: To Walk Or Hike
This is the most basic use for an ice axe. When you are walking on snowfields or gently inclined terrains, it can help with your balance. You will use it just like how you would use a hiking stick.
Using An Ice Axe To Walk Upslope
Here you can see how to use an ice axe for walking:
Step By Step Guide
- Hold the ice axe in an upright position. The shaft should be vertical with the spike on the ground.
- Wrap your fingers around the head. The shaft should be between your index finger and middle finger. It can also be between your middle finger and ring finger. You should not be holding only on the adze end or pick end of the head.
- If you are walking straight uphill, you can hold your ice axe in either hand. Which hand you use will depend on your preferred position for doing self-arrest. I’ll talk more about that later in the section below.
- Sometimes, if the slope is a bit steeper, it is easier to walk up in a zigzag manner (this is what you saw in the video). In such cases, one side of your body will be facing upslope while the other side will be facing downslope. You will need to hold your ice axe with the hand that’s facing upslope. So every time you make a turn on the zigzag, you will need to swap the ice axe to the other hand.

- To start walking, plunge the spike of the ice axe into the snow in front of you (but not directly in front of you. It will be on the side that you are holding the ice axe with).
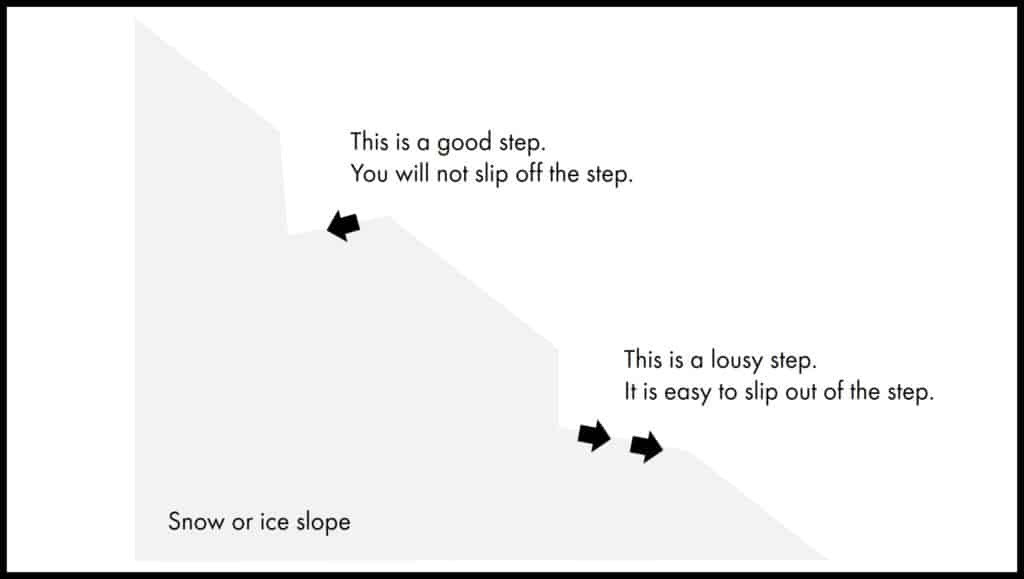
- When stepping into the snow, use your boots or crampons to create a step. It should be preferably at least half your shoe size. You don’t want to be making tiny steps that you have to practically tip toe on. Make sure that the steps cut into the slope at an incline so that it is more stable.
- Take a step (or two) until the ice axe is beside you.
- When you are creating the step with your feet, you will be relying on the ice axe for support and balance. So make sure the spike of the ice axe is firmly placed in the snow or ice. You don’t want your ice axe to slip when you are balancing on it.
- Once you are stable on both your feet, you can pull the ice axe out and plunge it in front of you again. Do not move your ice axe in mid-step. Do not move your ice axe if you are unstable on your feet.
- Always keep your ice axe in front of you on the slope. Plunge your ice axe into the snow in front of you. Walk until the ice axe is beside you. Do not walk beyond it. If you walk in front of your ice axe, you can easily lose balance when you are pulling out your ice axe from behind you.
- If you are walking in a zigzag and making a turn, you will need to change the hand that is holding the ice axe.
- When making a turn, make sure the ice axe is in front of you. Make a step that’s wide enough for both your feet. This is the step for you to make the turn. When both your feet are balanced on the wide step, you can change the hand that’s holding the ice axe. Remember that your ice axe should always be in your upslope hand.
- Using the new hand, you can move the ice axe forward again. Continue stepping just as you did before.
If you need a recap, you can see him making a turn and swapping the hand that’s holding the ice axe here:
| Insider tips:– If you are walking behind a guide or another climber, use the same steps that they have created. This will save you time and energy especially if the snow or ice is quite hard. – Take turns being the lead so that one person is not doing all the work. |
Using An Ice Axe To Walk Downslope
When walking downslope, the key difference is to keep your ice axe behind you.
You can either walk directly downslope or go sideways in a zigzag manner. You can see that here:
.
Step By Step Guide
- Plunge the spike of the ice axe into the snow beside you.
- When going down a slope, it is all the more important to get a firm footing before removing the ice axe. Use your heels to drive your weight into the snow. Keep your toes pointed up to add more weight and stability to your steps. The step should be preferably at least half your shoe size. You don’t want to be making tiny steps that you have to practically tiptoe on.
- Take a step (or two) until the ice axe is behind you.
- Once you are stable on both your feet, you can pull the ice axe out and plunge it in beside you again. Do not move your ice axe in mid-step. Do not move your ice axe if you are unstable on your feet.
Use Case #2: To Chop Or Cut Steps Into Hard Snow Or Ice
For use case #1 above, the snow or ice has to be quite soft. You can use your boots or crampons to create steps as you go.
Sometimes, the ice may be too hard. Or you may not be wearing crampons and you find that boots cannot provide the grip that you need to move up the slope. You will then need to use an ice axe to chop out steps into the ice.
When you are using your ice axe to cut steps, you are no longer using it as a hiking stick. So you need to cut steps that are wide and stable enough for you to stand on.
You can see how to do that here:
Step By Step Guide
- Hold the ice axe by the shaft.
- You shouldn’t be bending over too much to cut the step. If you are, move your hand more towards the spike end of the shaft.
- When chopping steps, you should not be facing upslope. Turn your body sideways such that you dominant hand is on the upslope side.
- You will be using the adze end of the head to chop the ice. Swing the ice axe towards the ice, using the adze like a mini scoop to scoop out the ice to the back. The swing should be running parallel along the side of your body. In this way, you will not get hit by the ice axe when you are swinging.
- The key thing is here is cut a step into the snow without damaging the snow around it. If the snow or ice is loosened all around the step, you will just slide backward when you step up.
- You will need to chop a few times to break up the hard surface. Once that’s broken, you can use your boots to deepen or widen the step. The step should be wide enough for both your feet.
- Step up with the feet that’s facing upslope. When that foot is firmly planted, step up with your downslope feet.
- Ideally, every step that you chop is wide enough for both your step. If you would like to save some time and energy, you can alternate between steps. This means that one step will be wide enough for both feet, while the next step is wide enough for one foot, and so on. The narrower step will always be for your upslope feet. When you are supporting yourself mainly on your upslope feet, you can chop the next step. You must never chop a step when your weight is mainly on your downslope feet.
Use Case #3: To Scramble Or Climb Up A Steep Slope
When the slopes become too steep for walking, you will need to climb up using your hands and feet.
For vertical ice climbing, you need to use a shorter ice tool. But if you are dealing with a slope that’s at a 45 degree incline, you can use an ice axe to help you climb.
Depending on the condition of the snow, you will use different techniques.
Using An Ice Axe To Scramble Or Climb Harder And Firmer Snow
Here’s how you can do it:
Step By Step Guide
- When you are on this steep incline, you will be on your fours. You will be moving the same way you will be when climbing a vertical wall.
- One of your hands will be holding the ice axe. You have to use the pick to dig into the snow to act as an anchor point.
- There are 2 ways to hold the ice axe here
- Method 1: Hold the ice axe by the head. When holding the head, your thumb and the adze should be facing you. The pick will be facing away from you. The shaft should be somewhat parallel to your forearm. You can see it in the video above at 1:20.
- Method 2: Hold the ice axe by the shaft just below the head. The adze should be facing you and the pick will be facing away from you. You can see it in the video above at 1:27.
- Use the ice axe with your dominant hand. Since you only have 1 ice axe, you will not have much grip on the snow with your other hand.
- Plunge the pick end of the ice axe into the snow ahead of you. The shaft should be resting on the slope. Make sure it’s secure and you have a firm grip on the ice axe.
- Move your feet one by one. Make sure you have a solid footing for each foot. You will not be able to use your ice axe to chop steps for your feet here. So make sure you have proper steps for both your feet before removing the ice axe to make the next move. You don’t want all your weight to be resting on just the ice axe.
- Once your feet are stable, move your ice axe again to a higher position.
You can do the same thing in reverse for going down steep slopes. Make sure your have the pick of the ice axe firmly plunged into the snow before stepping down.
This method of descending is slower and takes more energy. Only use this method is you are not comfortable with descending any other way.
You can see that in action here:
Using An Ice Axe To Scramble Or Climb A Thick Layer Of Soft Snow
You can see this in the video above at 1:50.
Step By Step Guide
- Hold the ice axe in an upright position.
- Hold the ice axe at the head with both hands. You should have one hand on the adze and one hand on the pick. The spike should be facing down.
- Plunge the ice axe deep into the snow. The shaft should be going vertically into the snow.
- Push the ice axe in as deep into the snow as you can, until it hit fairly hard snow.
- Once the ice axe is firmly anchored, move your feet up one by one.
- Make sure you have a stable footing. Then remove the ice axe and plunge it upslope.
As you can see, this method takes a lot of work. You are going to get worn out very quickly.
Use Case #4: To Perform Self-Arrest Or Self-Rescue
A slip or fall here and there in unavoidable on ice. This is especially so when you are going down a slope.
It is important to stop your fall as quickly as possible. This will prevent you from gaining too much speed or getting spun into an awkward position. The faster you are falling, the less likely you can get into a good position to perform a self-arrest. An ice axe is unlikely to stop a high-speed fall and you may even lose the grip on your ice axe or get injured from trying.
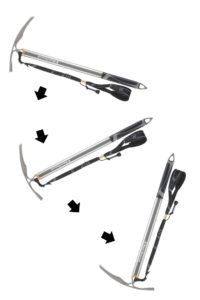
Performing A Self-Arrest When You Are On Your Front (Ideal Position)
Here you can see how to make a self-arrest and how to hold your ice axe in anticipation of a slip or fall:
Step By Step Guide
- In an ideal self-arrest position (if there is such a thing!), you will be sliding down the slope with your legs first. You will also be facing inwards towards the slope. This is what you saw in the video above.
- When you are using your ice axe as a hiking stick, it doesn’t really matter if the adze or pick is facing the front. As you can see in the video, it depends on how smoothly you can get your ice axe from the walking position to the self-arrest position. You should try out the various positions with both your hands and figure out what works best for you.
- Hold the head of the ice axe with one hand. Your thumb and the adze will be facing you. The pick will be facing away from you.
- Your other hand will be holding the lower end of the shaft, near the spike.
| Insider tip: It is important that you can perform a self-arrest with either of your hands holding the head of the ice axe. In an emergency situation, you will not have time to swap your ice axe between your hands. |
- Make sure both hands are firmly gripping the ice axe before you do the self-arrest. If you are only holding onto the ice axe with one hand, you may lose your grip on it. The impact from stopping your fall will also be transferred to just that arm. In the worse case scenario, you may even dislocate your shoulder, elbow or wrist.
- To perform the self-arrest, use both of your hands to plunge the pick of the ice axe into the snow. Once it is plunged in, keep adding pressure to the head of the ice axe. Looking down at the head of the ice axe also helps to add more weight. Do not attempt to remove the ice axe from the snow.
- Keep the ice axe close to your chest area. The head of the ice axe should be around your collarbone. This allows you to exert more force into the pick to stop your fall.
- You have to stop your fall with your ice axe first and not with your feet. Keep your feet lifted by raising them back towards your butt. If your feet catch something that stops your fall before your ice axe, you may find yourself flipping. And you end up sliding down the slope head first!
- When your fall is slow enough, you can use your feet to bring yourself to a complete stop.
Unfortunately, many of your falls are probably not going to be in an ideal position to make a self-arrest. You cannot make a self-arrest if you are on your back or sliding down head first. You need to quickly get your legs downslope and your body inwards facing the slope.
If you are rolling or tumbling down the slope, stop yourself by spreading your arms and legs out like a starfish.
Performing A Self-Arrest When You Are On Your Back
Here’s what to do if you are sliding downslope on your back:
Step By Step Guide
- Hold the ice axe the same way as you would during a normal self-arrest — one hand on the head with the pick facing out, the other hand on the spike end of the shaft.
- The ice axe should be diagonal across your chest e.g. the head at your right collarbone, the spike end of the shaft at your left hip area.
- Keep the ice axe close to your chest area.
- As you are sliding down the slope, turn your body towards the side where the head of the ice axe is. Turn until you are facing inwards towards the slope.
- Once you are back in the ideal self-arrest position, you can stop yourself fully as per the steps described above.
Performing A Self-Arrest When You Are On Your Front But Sliding Head First
Here’s what to do:
Step By Step Guide
- Hold the ice axe the same way as you would during a normal self-arrest — one hand on the head, one hand on the spike end of the shaft.
- The arm holding the head of the ice axe should be stretched straight out to your side at your shoulder level.
- What you want to do here is to drag the pick of the ice axe along the surface of the ice or snow.
- Keep your eyes focused on the head of your ice axe. This will angle your body slightly to one side so that you can start to turn the right way around.
- As the pick drags along the snow, keep your weight on the head of the ice axe. As you hang on to the ice axe that’s dragging in the ice, the momentum will carry your legs downslope.
- Continue to apply more and more pressure to the pick of the ice axe until your legs are downslope.
- Once you are back in the ideal self-arrest position, you can stop yourself fully as per the steps described above.
Performing A Self-Arrest When You Are On Your Back And Sliding Head First
Here’s what to do:
Step By Step Guide
- Hold the ice axe the same way as you would during a normal self-arrest — one hand on the head, one hand on the spike end of the shaft.
- What you want to do here is the drag the pick of the ice axe into the snow at your hip level.
- You will need to use your core muscle here. Try to lift your head and shoulders off the snow. Focus on the head of the ice axe. This will angle your body slightly to one side so that you can start to turn the right way around.
- As the pick drags along the snow, keep your weight on the head of the ice axe. Keep your arms in tension instead of straightening them out. As the ice axe slow your speed down, the momentum will carry your legs downslope.
- Once you are back in the ideal self-arrest position, you can stop yourself fully as per the steps described above.
Use Case #5: To Build A T-slot Anchor For Belaying Or Rappelling
You can also use an ice axe as a T-slot anchor for belaying or rappelling.
Belaying is useful to support beginner climbers who are not very confident on a steep slope. Or you may find yourself in a terrain where the slopes are steep and short. In such cases, you may not have enough time to stop yourself with a self-arrest before you fall off an edge. A belay is a necessary safety precaution here.
You can also use the anchor for rappelling. If you don’t want to descend a section on foot, you can choose to rappel down. Some people like to rappel for fun, it is an entire sport by itself!
Here’s how you can build a T-slot anchor with your ice axe:
Step By Step Guide
- Find a good area for setting up your anchor. The harder the snow, the better. If there is a thick layer of soft snow, stomp on the surface until you reach the firmer snow beneath.
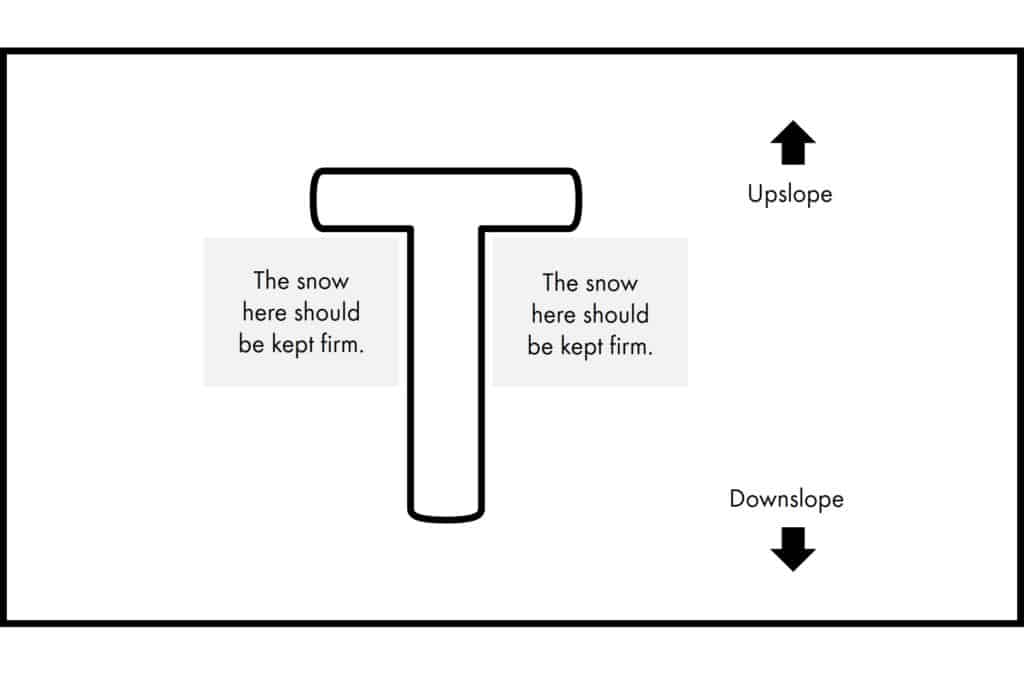
- First, trace out the letter T. The vertical part of the letter T should be pointing downslope. The horizontal part of the letter T is where you axe will go. Make sure it is long enough.
- Dig the T-shaped hole in the ice.
- When cutting out the T shape, avoid disturbing the ice or snow around it. This will weaken the ice and the support for your anchor.
- Dig at least 30 cm (12 inches) deep. The softer the snow, the deeper you need to go.
- Using a clove hitch, attach the belay material (usually a sling) to the shaft of the ice axe. The clove hitch should be somewhere in the middle of the shaft or slightly closer to the head.
- Place the ice axe into the horizontal part of the letter T. The pick should be facing down into the ice. The belay material or sling should be placed in the vertical part of the letter T.
- Press the ice axe firmly into the snow. Stomp on it if you have to. For even more support, you can backfill the horizontal part of the letter T with ice. Stomp on the ice as well. Use ice that is further upslope from where you have dug the hole.
- Tug on the sling in the direction of where the force will be. Make sure your ice axe remains firmly in place and does not move.
- You can then use the T-slot anchor to do a direct belay or attach yourself to it and do a body belay. You can see both methods in the video above at 4:00.
- If you are belaying on a very steep slope, you should also dig a trench or a bucket seat that you can sit in. You can see how to do that here.
| Looking for your first ice axe? Check out the review of my favorite ice axe for beginners here. If you are also looking for a set of crampons, these hiking boots compatible ones are a good pair to start with. |
This is Part 5 of 5 of the Snow & Ice Climbing Mini-series:
Part 1: Compatibility Between Crampons And Hiking Boots
Part 2: Travelling With Your Crampons
Part 3: How To Use Your Crampons
Part 4: Knowing The Difference Between An Ice Axe And Ice Tool
Part 5: How To Use An Ice Axe
This article is intended to provide general information. No article or video can replace qualified instruction, practice and experience. Your safety is your responsibility.