I remember my first time using crampons. I had no idea there was a proper way to use the crampons for walking or climbing. I was going for a glacier hike and all that the guide taught us was how to put them on. Most of us ended up stumbling around. Some had their pants caught on the crampon spikes and a few still slipped and fell. Back then, I blamed the crampons for not working as it should. But later I realized that we were simply not using them properly.
So how should you use crampons for walking and climbing? There are 3 techniques for walking and climbing with crampons:
- French Technique (Flat-Footing): For gentle to moderate slopes
- German Technique (Front-Pointing): For steep slopes
- American Technique (a combination of Flat-Footing and Front-Pointing): For steep slopes
This is Part 3 of 5 of the Snow & Ice Climbing Mini-series:
Part 1: Compatibility Between Crampons And Hiking Boots
Part 2: Travelling With Your Crampons
Part 3: How To Use Your Crampons
Part 4: Knowing The Difference Between An Ice Axe And Ice Tool
Part 5: How To Use An Ice Axe
Types Of Crampons
Let me just give you a quick introduction to the different types of crampons.
There are 3 types of crampons:
- Strap-on / hinged crampons: These are the lightest and most flexible type of crampons. They are rated C1.
- Hybrid/ semi-rigid crampons: These are more rigid than the strap-on crampons. They are rated C2.
- Step-in/ rigid crampons: These are the stiffest and heaviest type of crampons. They are rated C3.
When using a rigid pair of crampons, you will also need a pair of boots with stiff soles. You can read more about crampons and their compatibility with boots here.
Looking for a pair of crampons that are suitable for beginners? Check out a review of my favorite crampons here.
How To Put On Crampons
The design for each type of crampons above is different. Putting them on is also slightly different.
You can learn how to put on each type of crampons here.
Crampons And Ice Axes
Most of the time, crampons are used together with ice axes or ice tools.
You can learn the basics of using an ice axe here.
And here’s my review of 2 excellent ice axes to get you started.
.
Save this handy reminder to Pinterest!
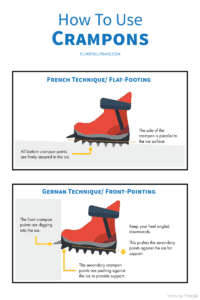
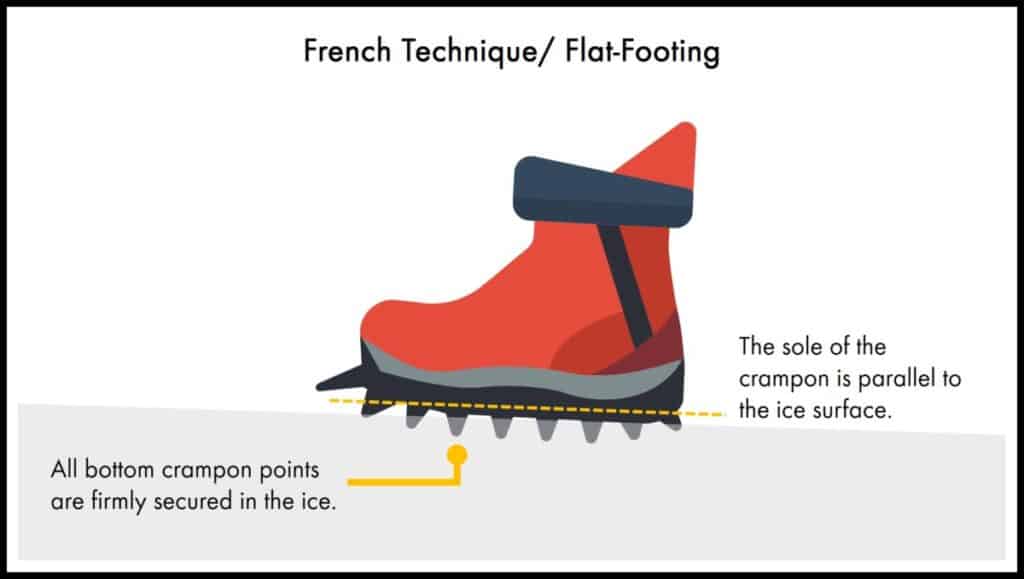
Technique #1: French Technique/ Flat-Footing
The French Technique, also known as flat-footing, makes use of all the points on the crampons to grip on the snow or ice surfaces.
It is the easiest and most efficient technique to use for gentle to moderate slopes.
It is most suitable for ice and hard snow. Such conditions will allow more crampons points to grip onto the surface. If the snow is soft, the crampon points will not have sufficient grip.
When flat-footing, you will be using your thigh muscles the most.
Here’s how you can use the flat-footing technique for ascending and descending.
Step By Step Guide For Ascending
- Always remember to keep your feet about hip-width apart. This prevents the crampon points from catching on your pants or crampon straps.
- When taking a step, make sure that the sole is parallel to the ice surface. You have to firmly plunge all the bottom points of the crampons into the ice.
Ascending On Gentle Slopes From 0° To 15°
- On very gentle slopes, the technique is quite similar to how you normally walk.
- But instead of landing on your heel or toes first, you have to land your entire foot into the ice at the same time. You will need to flex your ankles a bit to do this.
- Your ankles need to be flexible to keep the soles of the crampons parallel to the ice surface. If your boots are quite stiff around the ankles, you can loosen the laces around the ankles. Check that it is comfortable to flex your feet up and down.
- When landing your foot, stomp down firmly to make sure the crampon points are secure on the ice. You don’t have to stomp too hard. This wastes energy.
You can see this in the video below at 0:45.
Ascending On Gentle Slopes From 15° To 30°
- As the slope becomes a bit steeper, you may it harder to flat-foot without straining your ankles.
- To ease the strain, you need to change the way you walk. Adopt the duckwalk position by rotating the front of both your feet slightly outwards. Keep your knees slightly bent.
- You don’t have to flex your ankles as much in the duckwalk position. Remember to land your entire foot into the ice at the same time.
Ascending On Moderate To Steep Slopes From 30° To 60°
Flat-footing is tough for slope steeper than 45°. It is almost impossible for slopes steeper than 60°.
- When the slope gets steeper, you will strain your ankles even in the duckwalk position.
- So instead of walking straight uphill, turn your body to one side and ascend diagonally up the slope
- When the slope is moderately steep, you may only need to turn your body about 30° to 45° to the side. However, as the slope steepens, you have to turn your body more and more. This will ease the strain on your ankles and knees. On very steep slopes, you may be almost facing downhill.
- The challenge here is to keep your feet parallel to the ice surface. Your feet have to be rotated downhill. This may not feel natural at first.
| Look out! It is important to land your entire foot into the ice at the same time. One common mistake is for climbers to land on the outer edges of their crampons. This is extremely unstable and you can lose your footing and fall. |
- Ascending a slope diagonally is similar to climbing up a flight of stairs sideways.
- Start off from a position of balance — your uphill foot is in front of and above the downhill foot.
- Move your downhill foot in front of and slightly above your uphill feet. Your legs are crossed in this position.
- Make sure you are stable on both feet. Then, uncross your legs by moving the new downhill foot slightly above and in front of the other foot.
| Look out! When ascending diagonally, make sure that you center your body over both your feet. Do not lean your body uphill or downhill. This may cause the crampon points to twist out of the ice. |
You can see this in the video below at 1:15.
Step By Step Guide For Changing Direction During A Diagonal Ascent
- Start off from a position of balance — your uphill foot is in front of and above the downhill foot.
- Move your downhill foot in front of and about the same elevation as your uphill foot.
- Turn your uphill foot to face the new direction. The fronts of both your feet are now facing outwards. If the uphill foot feels unstable in the new position, front-point to get a better grip (see the front-pointing section below).
- Move the downhill foot in front of and above the uphill foot. You are now facing the new direction.
Step By Step Guide To Get Into The Rest Position
Good news!
If you need a break, the French Technique has a rest position. If you are climbing a steep slope, always look out for some flatter areas for resting.
- Turn your body to the side.
- Start off from a position of balance — your uphill foot is in front of and above the downhill foot.
- Move your downhill foot up and beneath your butt. Face the foot straight downhill.
- Make sure to plant the entire foot firmly into the ice at the same time.
- Sit down on the feel of that foot.
- Make sure all the crampon points of your other foot are also firmly secured in the ice.
Step By Step Guide For Descending
Descending with the French Technique is pretty similar to ascending.
- Again, keep your feet about hip-width apart.
- Make sure to keep the sole of your crampons parallel to the ice surface. With each step, plunge all the bottom points of the crampons into the ice firmly.
Descending On Gentle Slopes From 0° To 15°
- On very gentle slopes, the technique is quite similar to how you normally walk.
- Flex your ankles to make sure that you are landing your entire foot into the ice at the same time.
- Again, it is important for your ankles to be flexible. Descending is probably easier on your ankles than ascending.
- When landing your foot, do a slight squat over your foot to push the crampon points into the ice. This makes use of your body weight to secure your crampons in the ice.
Descending On Gentle Slopes From 15° To 30°
- As the slope becomes a bit steeper, you may it harder to maintain your balance.
- Spread your feet wider apart for better stability.
- Keep your knees slightly bent. Don’t lean back too far. Make sure you center your body over your feet to help push the crampon points into the ice.
- Your thigh muscles will be doing most of the work.
You can see this in the video below at 3:56.
Descending On Moderate To Steep Slopes From 30° To 60°
- When the slope becomes even steeper, you will need to descend diagonally.
- Descending diagonally is the same as ascending diagonally.
- Instead of walking straight downhill, turn your body to one side.
- Again, remember to keep your feet parallel to the ice surface. Your feet have to be rotated downhill.
- Descending a slope diagonally is like climbing down a flight of stairs sideways.
- Start off from a position of balance — your uphill foot is in front of and above the downhill foot.
- Move your uphill foot in front of and below your downhill feet. Your legs are crossed in this position.
- Make sure you are stable on both feet. Then, uncross your legs by moving the new uphill foot below and behind the other foot.
Step By Step Guide For Changing Direction During A Diagonal Descent
When you need to change direction during a diagonal descent, do the same thing you did for a diagonal ascent.
When changing direction, make sure you are turning towards the uphill direction. If you turn towards the downhill direction and lose your balance, you will end up falling down the slope.
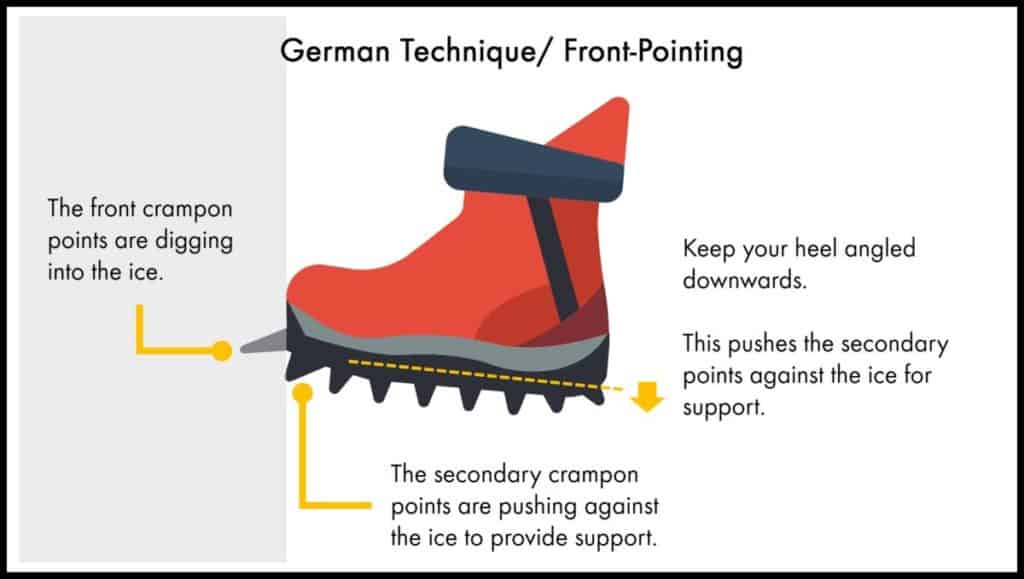
Technique #2: German Technique/ Front-Pointing
The German Technique, also known as front-pointing, makes use of the 2 front-points and 2 secondary points on the crampons.
For slopes that are steeper than 45°, front-pointing is easier than flat-footing. For slopes steeper than 60°, flat-footing on its own is almost impossible. You will need to use the front-pointing technique or the American Technique (see below).
Front-pointing is most suitable for hard ice and snow. Front-pointing relies on the support of only a few crampon points. These points need to be well supported by the ice or snow.
If there is soft snow covering a hard layer of ice, it is also easier to use front-pointing than flat-footing. The front points can plunge through the top soft layer more easily.
When front-pointing, you will be using your calf muscles the most. Your calf muscles are much smaller than your thigh muscles. This is why front-pointing is a lot more tiring than flat-footing.
| Important! You need boots with very stiff soles for front-pointing. Your weight is loaded on the front of your crampons. A stiff sole will make it easier for you to keep your feet perpendicular to the ice. When the sole is not as stiff, you will need more effort by your calf muscles to keep your feet in place. It will be impossible to front-point with boots that have very flexible soles. |
Step By Step Guide For Ascending
- Before you start front-pointing, try to determine the amount of force needed to kick the front-points into the ice to secure a foothold. Ideally, you should get a good foothold with only 1 kick. Once your front-points are in, avoid moving your foot around. This weakens the surrounding ice.
| Look out! – Kicking too hard will waste a lot of your energy. – Kicking too many times at one location will break up the ice and make it hard to get a secure foothold. |
- Make sure that your foot goes straight into the ice. If your foot is rotating outwards, the crampon points may be twisted out of the ice.
- Keep the sole of the crampons perpendicular to the ice. Angle your heel slightly downwards. This will push the secondary points of the crampons against the ice to give you better stability.
- Bend your knees slightly to reduce strain on your calf muscles.
| Look out! If your heel is angled upwards, your feet will be in a slight tiptoe position. The secondary points will not be pushing against the ice. The front-points may even be dislodged from the ice. This also causes more fatigue on your calf muscles. Insider tip: It can be difficult to assess whether your heels are in the right position. The best way is to secure yourself to a top rope anchor and practice while you are on belay. Get an experienced climber to check if your footwork is right. |
You can see this in the video below at 1:35.
Step By Step Guide For Descending
Descending with the German Technique is the same as ascending, only in reverse.
You can see this in the video below at 4:23.
Descending with the front-pointing technique can be more secure than flat-footing. You are facing uphill when front-pointing and are less likely to fall down the slope. It is also useful when you are retreating from a route.
However, descending with the front-pointing technique is less common for the following reasons:
- Front-pointing is much harder going down than coming up. If you step too low, your heel will be higher than your foot. This will cause the front-points to be dislodged.
- It is harder to see the route.
For very steep routes, it is common for climbers to rappel down instead.
Technique #3: American Technique/ Combination Of Flat-Footing And Front-Pointing
The American technique is a combination of flat-footing and front-pointing.
It combines the best of both worlds — front-pointing is faster and easier while flat-footing is less tiring.
There is no fixed way to combine flat-footing and front-pointing.
You can front-point with one foot while flat-footing with the other. And when the foot that is front-pointing gets tired, swap to flat-footing. The other foot will then change to front-pointing.
You can also vary your technique based on the ice conditions:
- When you see a flat spot or ledge, it is a good spot to change to flat-footing.
- Flat-footing is more secure on harder surfaces such as frozen snow, a layer of ice over snow and soft or crumbly ice. Such conditions will allow more crampons points to grip onto the surface.
- Front-pointing is better when the top surface is soft such as having a layer of soft snow over ice or hard snow. The front-points can plunge through the soft layer easily to grip onto the harder layer underneath.
Step By Step Guide For Ascending
Follow the steps listed above for flat-footing and front-pointing.
You can see the combination in the video below at 2:18.
| Looking for a pair of crampons that are suitable for beginners? Check out a review of my favorite crampons here. If you are also looking for an ice axe, check out the review of my favorite ice axe for beginners here. |
Video Demonstrations
You can check out the 3 techniques in this video below.
0:45: Ascending a gentle slope with flat-footing technique
1:15: Ascending a moderate slope diagonally with flat-footing technique
1:35: Ascending a steep slope with front-pointing technique
2:18: Ascending a slope with American technique
3:56: Descending a gentle slope with flat-footing technique
4:23: Descending a steep slope with front-pointing technique
This is another great video showing the flat-footing and front-pointing techniques:
3:45: Ascending a gentle slope with flat-footing technique
4:33: Ascending a moderate slope diagonally with flat-footing technique
5:44: Descending a gentle slope with flat-footing technique
6:52: Ascending a steep slope with front-pointing technique
8:08: Descending a steep slope with front-pointing technique
Practicing The Techniques
You may find walking and climbing with crampons unnatural at first.
It is important to practice these techniques before you go for a long hike or climb.
Some tips for your practice:
- Get an experienced climber to go with you. It is impossible to check if you are using the techniques correctly on your own.
- Start on gentle slopes. Get your flat-footing basics right by starting on flat grounds or gentle slopes.
- Use a belay on steeper slopes. Steep slopes can be very intimidating for a beginner. When you are on belay, you can focus on your footwork instead of worrying about falling.
- Wear a helmet. In the beginning, you may take a few falls before getting the hang of using the crampons. Wearing a helmet may give you more confidence and security during your practice.
| Planning for a climb? Check out these highest mountains that beginners can climb: – 56 Highest Climbs in the US – 56 Highest Climbs in Europe – 74 Highest Climbs in Asia – 27 Highest Climbs in North America – 20 Highest Climbs in South America – 18 Highest Climbs In Africa |
This is Part 3 of 5 of the Snow & Ice Climbing Mini-series:
Part 1: Compatibility Between Crampons And Hiking Boots
Part 2: Travelling With Your Crampons
Part 3: How To Use Your Crampons
Part 4: Knowing The Difference Between An Ice Axe And Ice Tool
Part 5: How To Use An Ice Axe
Save this handy reminder to Pinterest!
This article is intended to provide general information. No article or video can replace qualified instruction, practice and experience. Your safety is your responsibility.