Are you taking a belay test soon and wondering how to pass your belay certification? Learning how to belay is an important skill for any climber. Many climbing gyms will ask to see your belay certification or do a test before you are allowed to belay.
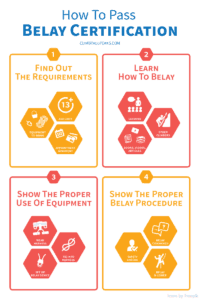
How to pass a belay certification? You can pass your belay certification on your first try with these 4 simple steps:
- Find out the certification requirements
- Learn how to belay
- Show the proper use of equipment
- Show the proper belay procedure
Passing a belay certification can be quick and easy with the right preparation. This article covers what you need to know from start to finish. Follow the steps and make sure you don’t miss out on anything!
But belaying is more than just passing a test. It is a core part of climbing safety. A belayer who doesn’t know what he is doing is a danger to everyone.
This is Part 2 of 5 of the Learn To Belay Mini-series:
Part 1: How To Belay With An ATC
Part 2: How To Pass A Belay Certification Test
Part 3: How To Belay A Heavier Climber
Part 4: How To Belay From Above
Part 5: How To Set Up Top Rope Anchor
Save this cheatsheet to Pinterest!
Step #1: Find Out The Certification Requirements
The belay certification process may be different in different countries and gyms. So to avoid any surprises, do your homework beforehand!
Once you have decided where to take your belay certification test, find out all the information below.
What Is The Age Limit?
Some climbing gyms have a minimum age requirement for belayers.
This is typically around age 13 to 15. It varies from gym to gym.
How Is The Test Conducted?
Check the climbing gym’s website or talk to the climbing staff. Find out how the test will be carried out. And if there are any particular things that the instructors look out for during the test.
If possible, it is good to observe other climbers taking a belay certification test at the gym.
What Belay Device Is Being Used?
The ATC and Grigri are common belay devices used in many climbing gyms. Some gyms may insist on using a specific one for the belay certification. Others may even test you on both belay devices.
The setup for the ATC and Grigri are slightly different. There are also some differences in the belaying techniques as well.
Find out which belay device is used for the test. The last thing you want to use a device you are not familiar with during the certification test.
What Equipment Do You Need To Bring/ Rent?
Don’t worry if you do not have your own climbing equipment. Most climbing gyms provide the belaying equipment or offer rental for them.
Check with the gym what equipment you need to bring for the certification. If you do not have any, confirm that you can rent them from the gym.
Here’s a list of the equipment you may need:
- Climbing rope: provided by climbing gym
- Belay device: check if provided by climbing gym
- Locking carabiner: check if provided by climbing gym
- Harness: bring your own or check if you can rent
- Climbing shoes: bring your own or check if you can rent (you may not need this for belaying)
- Helmet: bring your own or check if you can rent (you may not need this for belaying)
What Administrative Stuff Do You Need To Know?
Find out how to arrange for your belay certification test. Do you need to make an appointment or just walk in for the test?
Do you need to arrive a certain amount of time before the test for a briefing?
If you are a minor, do you need your parents to sign any forms?
And how much does the belay certification cost? When do you pay for it? What are the payment methods?
Step #2: Learn How To Belay
Now that you have signed up for the certification test, it’s time to actually learn how to belay.
Take Lessons
If you are a beginner, you should take introductory climbing lessons at the gym.
It is likely that a belay certification test is included as part of the introductory lessons.
It is always good to take your lessons and belay certification test at the same climbing gym. You will know the instructors’ expectations and what they are looking out for.
Learn From Other Climbers
If you do not have the budget for climbing lessons, you can also learn from a more experienced climber.
Learn From Videos, Articles Or Books
There are many resources out there — videos, blogs, and books teaching people how to belay.
However, belaying is not something you can learn in theory. These can be a good introduction but you still need someone to guide you through a practical session.
Do not assume you know everything after watching a video! It is important to practice the techniques in real life.
When practicing how to belay, make sure you have a more experienced climber watching you. Do not put another climber at risk!
Practice, Practice, Practice
Maybe you already know how to belay but haven’t been belaying for some time.
Don’t neglect to practice belaying a couple of times before going for your test.
You do not want to find out how rusty you are during the test!
Step #3: Show The Proper Use Of Equipment
As part of the certification test, you will need to know how to use all the equipment properly. The instructor may also test you on the different parts of the equipment. So make sure you know what each part is called and what are their functions.
Harness
Putting on your harness may seem quite straightforward. But it’s easy to make small, silly mistakes if you are nervous during the test.
Make sure you know the different parts of the harness and how to put it on correctly.
Anatomy Of A Harness
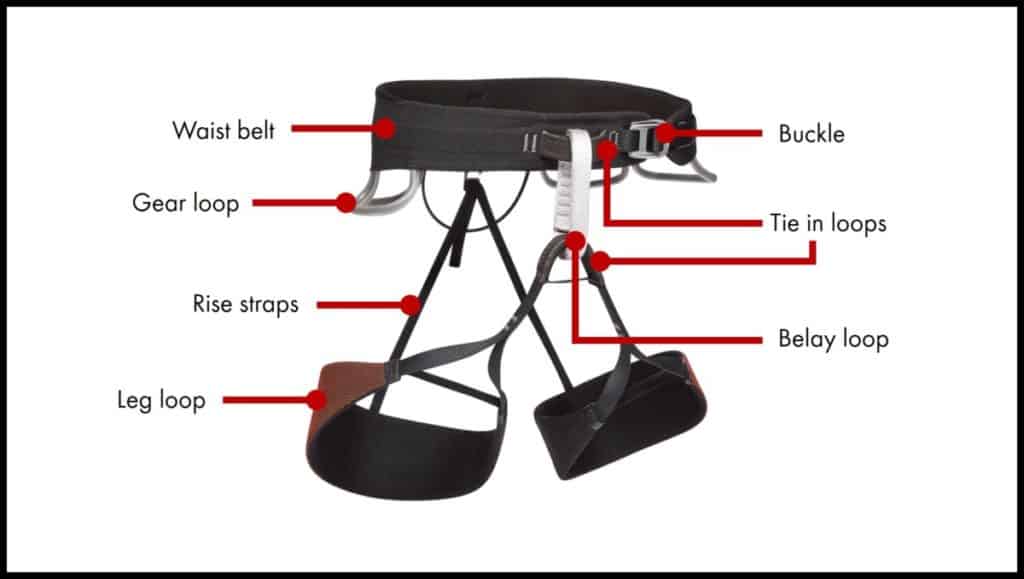
Waist belt: As its name implies, this is the part of the harness that goes around your waist. There are 1 or 2 buckles on the waist belt that you can use to adjust the fit.
Gear loops: These loops are used to carry your climbing gear such as carabiners and quickdraws. Do not ever use them to attach yourself to a belay device or anchor point.
Leg loops: The leg loops go around your upper thigh. Some leg loops may have buckles to adjust the fit, but not all have them.
Tie-in loops: There are 2 tie-in loops on the front of your harness. 1 is at the center of your waist belt. The other is leading up from the 2 leg loops. The 2 tie-in loops are connected by the belay loop (see next item). Before climbing, you tie yourself into a rope using the tie-in loops. The rope has to be looped through both tie-in loops. This will distribute your weight and add redundancy during a fall. The tie-in loop is only used to tie in the climbing rope. Do not pass a carabiner through the loops and use that for belaying. Belaying should be done through the belay loop.
Belay loop: The belay loop connects the 2 tie-in loops. This is the strongest point on the harness. During a belay, you will use a locking carabiner to secure the belay device to your belay loop. You should not tie any rope to the belay loop. This will damage the belay loop and cause faster wear and tear.
Rise straps: These are straps connecting the waist belt and leg loops.
How To Put On A Harness
Check the condition of the harness. It is always good practice to check the condition of your harness before every climb or belay. Check that there are no frays or damages especially on the belay loop and tie in loops. Check that the buckles are not rusty or broken.
Put on the harness. Pass each leg through the leg loops like you are putting on pants.
Check the fit. Make sure that your harness fits snugly around your waist and legs.
Check the buckles. Make sure you have double backed on the buckles on your waist belt and leg loops. Double back means passing the strap through the buckle once, folding it back and passing it through the buckle again. This prevents the strap from loosening and coming apart during use. Not every harness is the same. Some harnesses may not have buckles on the leg loops. And some newer harnesses have buckles that lock automatically. These do not need to be double backed.
Ropes
How To Tie-in To The Rope As A Climber
Though this section applies to the climber, you will also need to know how to tie these knots. You will be tested on this during the certification test.
What the climber needs to do:
- Tie the climber’s end of the rope to your harness using a Figure 8 Follow Through Knot.
- Some gym may also require that you back up the Figure 8 Follow Through Knot with a Double Fisherman’s Knot.
Before every climb, the belayer needs to check that the climber has tied the knots correctly.
.
Check that the rope is tied to your harness using the tie-in loops and NOT the belay loop. Make sure that the climbing rope passes through both tie-in loops.
Belay Device
Anatomy Of ATC
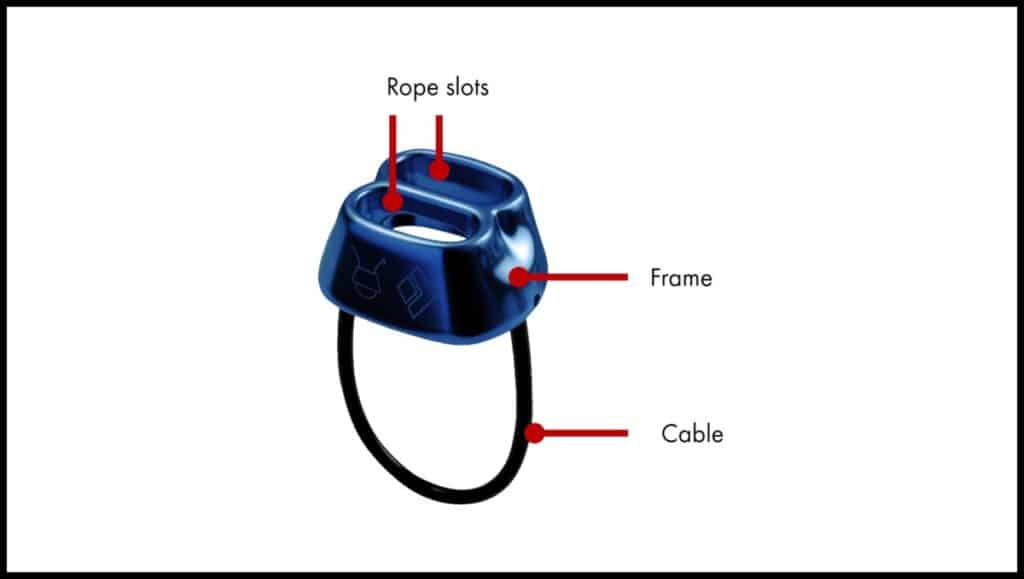
Frame: This is the main body of the belay device. Some ATCs have a regular side and a high-friction side. The high-friction side has grooves to increase friction for braking.
Rope slots: Most ATCs have 2 openings to pass the rope through. When belaying with a single rope, you just use any one of the rope slots.
Cable: This is a loop of wire connected to the frame. It is not load-bearing. Its main purpose is to keep the belay device in place during a belay.
There are different types of ATCs in the market. Read about them here and find out which one will be used in the certification test.
How To Set Up A Belay With An ATC
Find out how to set up a belay with an ATC here.
Anatomy Of A Grigri
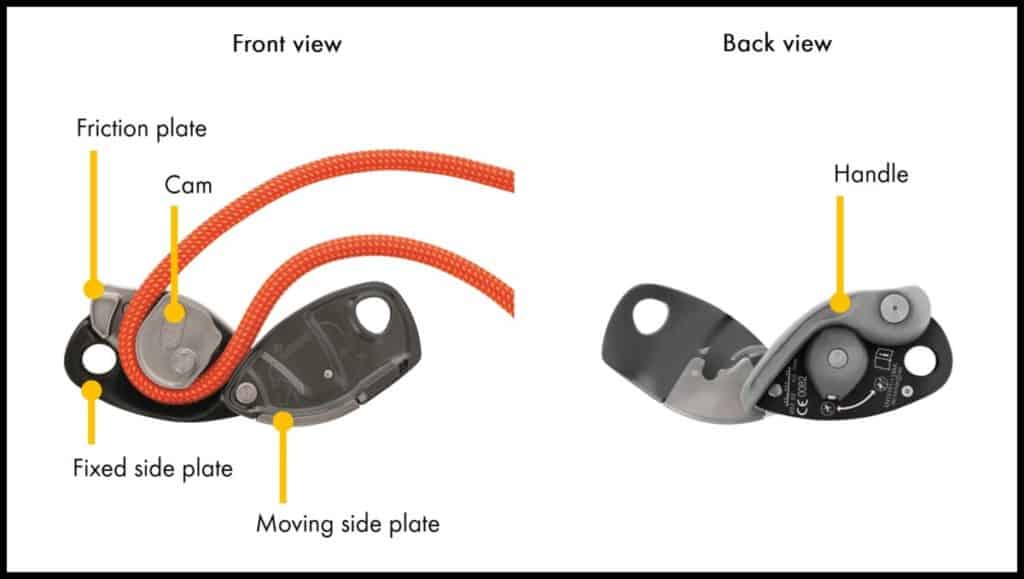
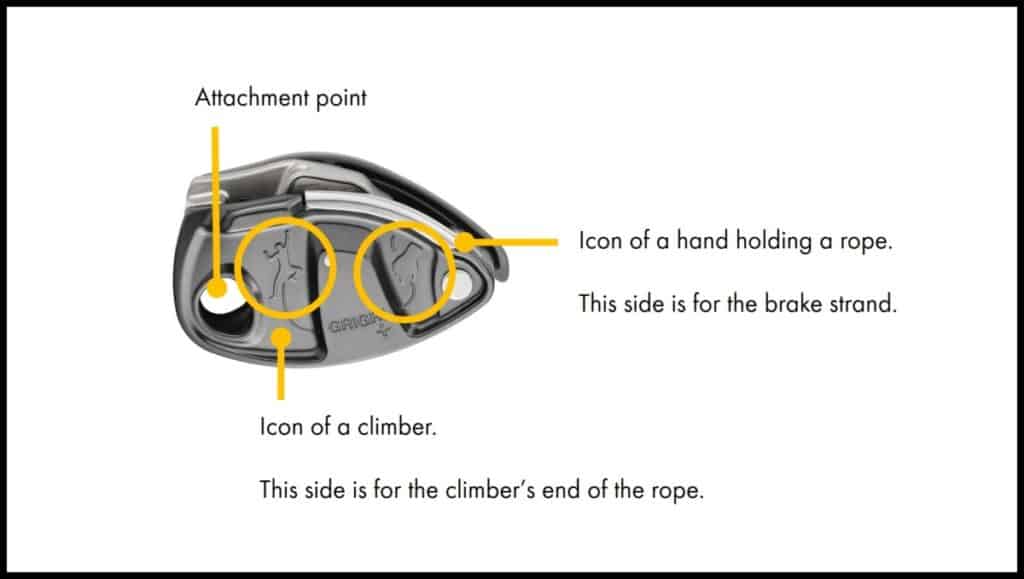
Moving side plate: This is the side of the Grigri which you open up to insert the rope.
Fixed site plate: This is the side of the Grigri with the cam.
Cam: You loop the rope around the cam.
Friction plate: This creates friction on the rope to assist with braking.
Handle: This is a lever to release the locking mechanism when you are lowering the climber.
Attachment point: This is an opening for attaching the Grigri to the carabiner.
Symbols: There are icons on the Grigri to show you the correct way to insert the rope.
How To Set Up A Belay With A Grigri
- Open the Grigri.
- Take a bight of rope. Loop it around the cam in the Grigri. Follow the icons on the Grigri to make sure the climber’s strand and brake strand are in the right direction.
- Close the Grigri.
- Give a quick hard pull on the climber’s strand of the rope. The Grigri should lock and stop you from pulling the rope.
- Clip the locking carabiner through the attachment point on the Grigri.
- Then clip the locking carabiner to the belay loop on your harness. Make sure that the carabiner gate is on the opposite side of your brake.hand.
- Lock the carabiner.
- At the end of the brake strand, tie a stopper knot. This closes the system and prevents the end of the rope from passing through the belay device.
Here you can see how to set up a belay with the Grigri (watch from 0:15):
Step #4: Show The Correct Belay Procedure
Confirm Belay Commands With The Climber
Communication between the belayer and the climber is important.
There are many standard belay commands. But these are the basic ones you should know for the certification test.
luckywins.org. Sweet Bonanza 1000 https://sweetbonanza1000-demo.com/ free play.
Before starting the climb:
| Who says it | Command | Meaning |
| Climber | On belay? | Do you have me on belay? |
| Belayer | Belay on. | I have taken in all the slack in the rope and I am ready to belay. |
| Climber | Climbing. | I am starting to climb. |
| Belayer | Climb on. | I am ready to belay. |
During the climb:
| Climber | Slack | I need some slack in the rope. |
| Belayer | NA | Put out some slack on the rope, wait and see if the climber asks for more. |
| Climber | Up rope | There is slack in the rope, pull it in. |
| Belayer | NA | Pull in the slack on the rope, wait and see if the climber asks for more. |
| Climber | Tension | I am resting on the rope, pull in all the slack. |
| Belayer | NA | Pull in all the slack on the rope, tighten your grip. |
| Climber | Climbing. | I am ready to continue climbing. |
| Belayer | Climb on. | I am ready to belay. |
After the climb:
| Climber | Ready to lower | I am done climbing, you can lower me now. |
| Belayer | Lowering | I am lowering you down. |
| Climber | Off belay | I have reached the ground, I don’t need the belay anymore. |
| Belayer | Belay off | I have stopped belaying. |
Perform Safety Check With The Climber
Before starting the climb, the climber and belayer will need to cross-check each other’s setup.
For the belayer:
- Check that the climber has put on the harness correctly.
- Check that the buckles on the harness are doubled back.
- Check that the climber has tied in the ropes correctly to the 2 tie-in loops.
- Check that the Figure 8 Follow Through Knot is correct.
- Check that the Double Fisherman’s Knot is correct.
For the climber:
- Check that the belayer has put on the harness correctly.
- Check that the buckles on the harness are doubled back.
- Check that the belayer has attached the locking carabiner to the belay loop.
- Check that the carabiner is locked.
- Check that the belay device is set up correctly.
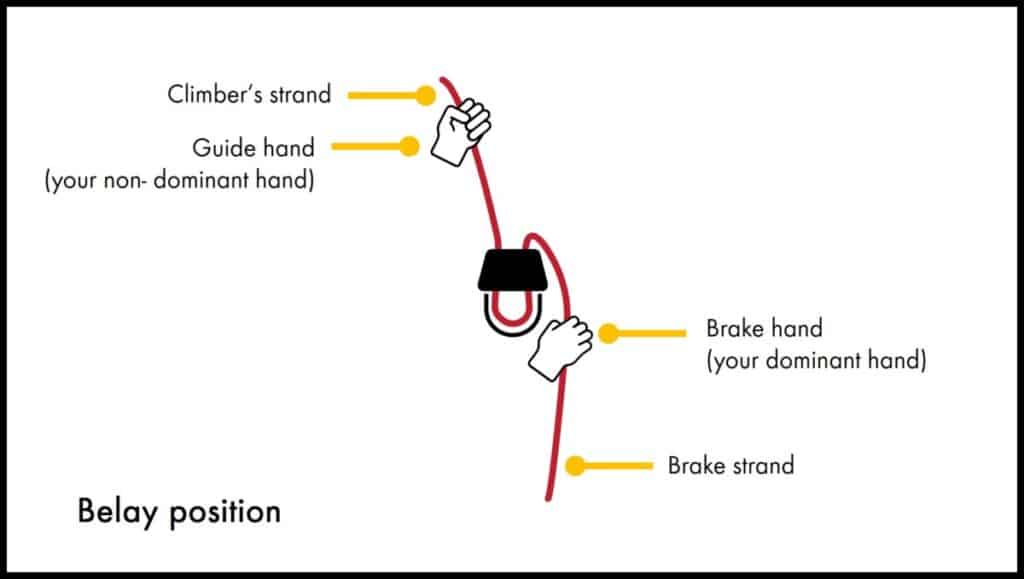
Get Into Belay Position
- To start belaying, your brake hand (this is usually your dominant hand) should be holding the end of the rope that’s not leading to the climber (I’ll call this the brake strand).
- Your other hand (the guide hand) will be holding onto the end that’s leading to the climber (I’ll call this the climber’s strand).
- Make sure there is minimal slack in the rope from the climber to your belay device.
Belay with the PBUS Technique
You will use the same PBUS belay technique for both the ATC and Grigri.
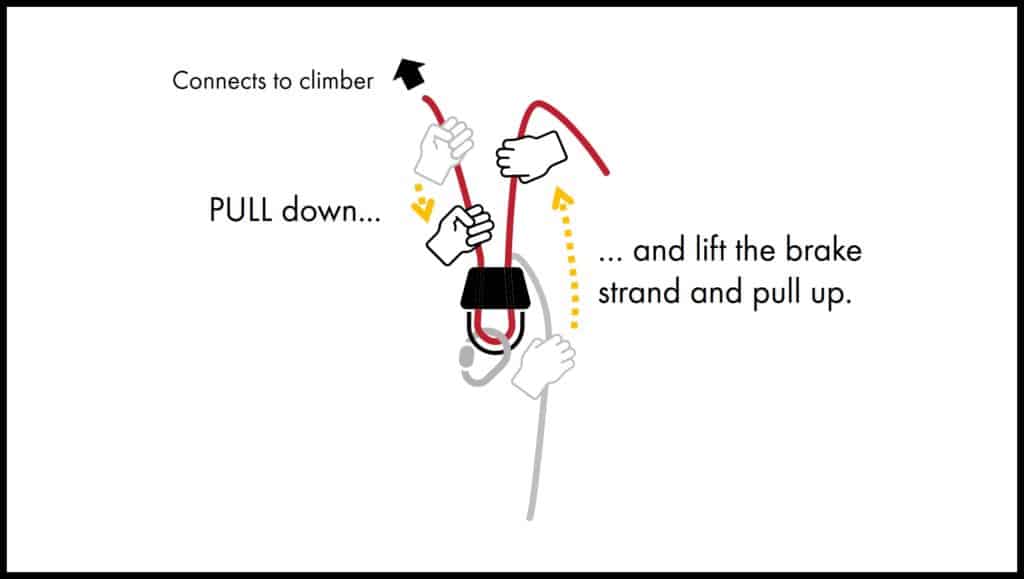
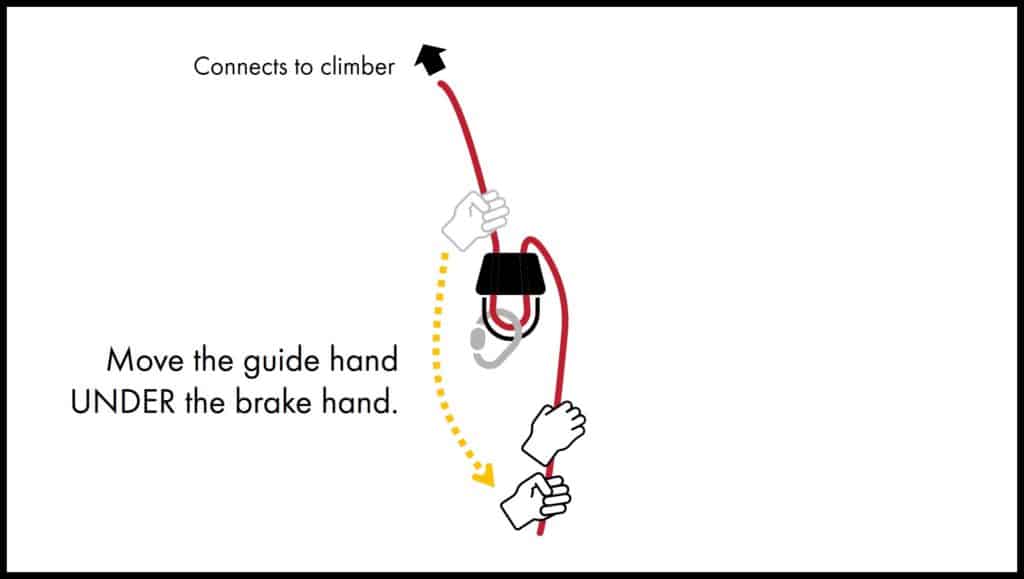
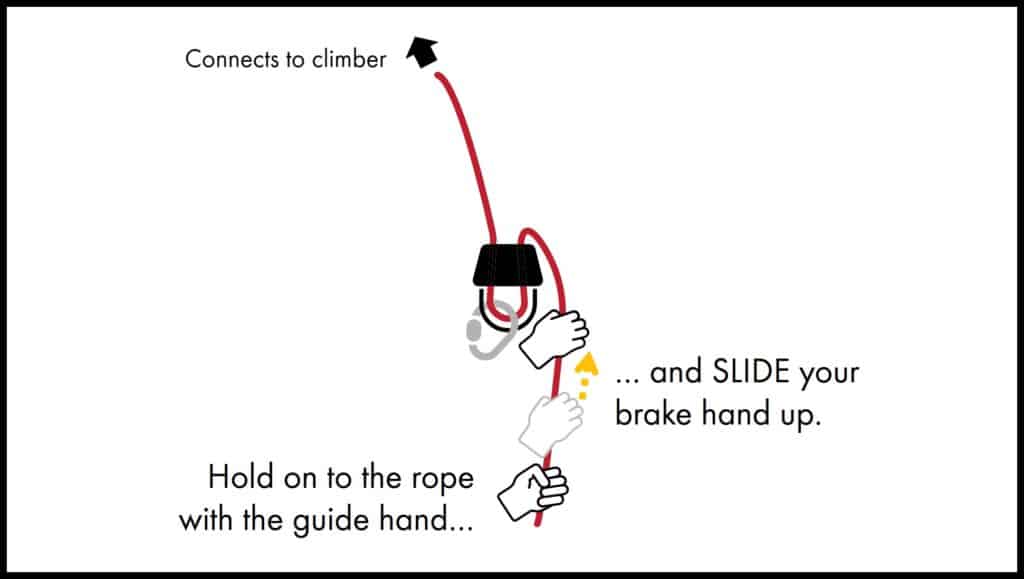
PBUS stands for Pull, Brake, Under, Slide.
- PULL: Pull the climber strand towards the belay device with your guide hand. Pull the brake strand away from the belay device with your brake hand. This takes in slack from the climbing rope.
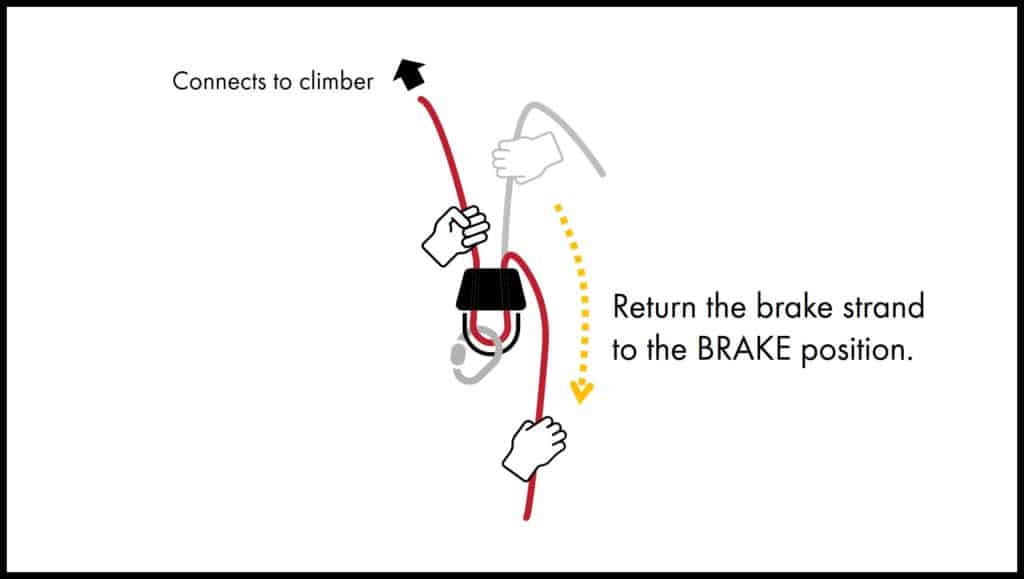
- BRAKE: When your guide hand reaches the belay device, return the brake strand back down into the braking position. This brakes the rope.
- UNDER: Shift your guide hand from the climber’s strand to the brake strand. Place it under your brake hand.
- SLIDE: Hold on to the rope with your guide hand. Keeping your brake hand around the rope, slide it up close to the belay device. DO NOT take your brake hand off the rope at any point.
- Repeat the PBUS steps to continue belaying.
| Important: – NEVER EVER take your hand off the brake strand. This is an immediate fail. – Always keep your eye on the climber when belaying. This allows you to react faster when the climber falls. – Take in the slack in the rope as fast as possible. The rope should not have any slack at all times. – If the climber is climbing quite fast, you have to do the PBUS steps quickly to take in the slack. |
Here you can see how to belay with an ATC:
Here you can see how to belay with a Grigri (watch from 4:50):
Because the Grigri is a self-braking belay device, many belayers rely completely on the braking mechanism. They skip the Brake, Under and Slide steps mentioned above.
Is that a good idea? Manufacturers of self-braking belay devices always tell users to keep their brake hand on the brake strand. The self-braking feature is a good backup. But it should not replace a proper belay technique.
So by that same logic, it is not wise to skip any of the PBUS steps.
The PBUS technique is a safe way to belay with any belay devices. It is important to get your foundations right before taking any shortcuts.
Here’s a negative example! You can see an example of that shortcut here (watch from 0:50):
Catch The Climber During A Fall
During the test, the instruction will ask the climber to stage a fall. You need to be able to catch the fall.
- Move your guide hand below your brake hand on the brake strand.
- Grip the brake strand with both hands tightly to stop the fall.
- Sit back on your harness quickly. This makes use of your body weight to stop the fall.
- Stay in this position until your climber regains his balance on the wall.
- The climber should let you know he is ready to continue by shouting “Climbing!”.
- Reply with “Climb on!”.
Lower The Climber
Lowering with An ATC
Find out how to lower with an ATC here.
Lowering with A Grigri
- Hold the rope in the brake position with your brake hand.
- Use your guide hand to slowly pull the handle on the Grigri until you feel resistance. This releases the locking mechanism slightly and you will feel your climber lowering.
- Do not pull the handle all the way back. This releases the locking mechanism completely. If the climber is lowering too fast and you are losing control, release the handle completely. This returns the Grigri to its lock position.
- Let the rope slide through your brake hand slowly.
Here you can see how to lower a climber with a grigri (watch from 0:40):
There you have it! Good luck with the certification test! Climb safe!
This is Part 2 of 5 of the Learn To Belay Mini-series:
Part 1: How To Belay With An ATC
Part 2: How To Pass A Belay Certification Test
Part 3: How To Belay A Heavier Climber
Part 4: How To Belay From Above
Part 5: How To Set Up Top Rope Anchor
Save this cheatsheet to Pinterest!
This article is intended to provide general information. No article or video can replace qualified instruction, practice and experience. Your safety is your responsibility.