Belaying is a critical skill that every climber has to learn early on. There are different types of belay devices and the belay technique may be slightly different for each one. This article covers how to belay with an ATC.
Belaying with an ATC involves knowing how to:
- Set up the ATC belay device
- Belay with the PBUS Technique
- Lower the climber with the ATC belay device
There are currently different variations of the ATC in the market. To avoid confusion, let’s look at each one of them.
This is Part 1 of 5 of the Learn To Belay Mini-series:
Part 1: How To Belay With An ATC
Part 2: How To Pass A Belay Certification Test
Part 3: How To Belay A Heavier Climber
Part 4: How To Belay From Above
Part 5: How To Set Up Top Rope Anchor
What Is An ATC?
ATC stands for Air Traffic Controller. It is a type of tubular aperture belay device.
The ATC was initially a specific belay device developed by Black Diamond. It has since become so popular and its design has been replicated by other brands.
Nowadays, belay devices with this specific design are all referred to as ATC.
Variations Of The ATC
Over the years, the design of the ATC has evolved and there are now different variations in the market.
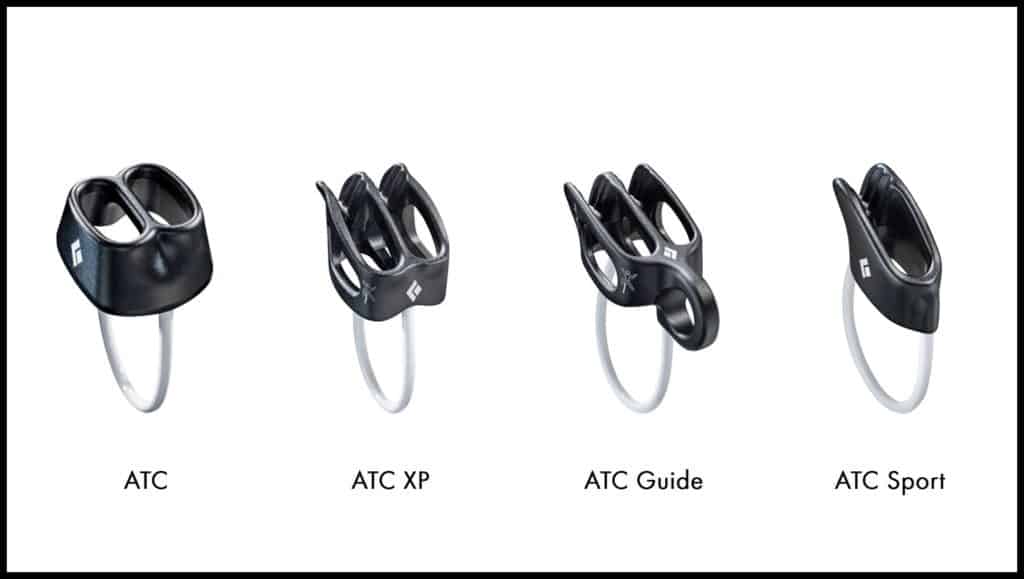
Black Diamond ATC XP
XP refers to Extra Power.
Belay devices like the Black Diamond ATC XP have grooves added to one side. When the brake strand is used on the side with the grooves, it provides more friction for braking the rope.
Black Diamond ATC Guide
Black Diamond has another belay device known as the ATC Guide. While the ATC and ATC XP are tubular aperture belay devices, the ATC Guide is an aperture-style self-braking belay device.
Like the ATC XP, it also has grooves to increase friction for a belay.
The ATC Guide has an additional attachment point. This is secured directly onto an anchor point for doing a direct belay. This configuration is referred to as using the “Guide Mode” of the ATC. In this configuration, the ATC is also able to apply a self-braking force on the rope.
Another common aperture-style self-braking belay device is Petzl’s Reverso.
Black Diamond ATC Sport
The Black Diamond ATC Sport is another type of tubular aperture belay device.
Unlike the other ATC variety which have 2 rope slots, the ATC Sport only has 1 rope slot. It is mainly used for sports climbing.
Other Belay Devices
There are many other belay devices apart from those mentioned here. Here is a good overview of the different belay devices.
Anatomy Of An ATC
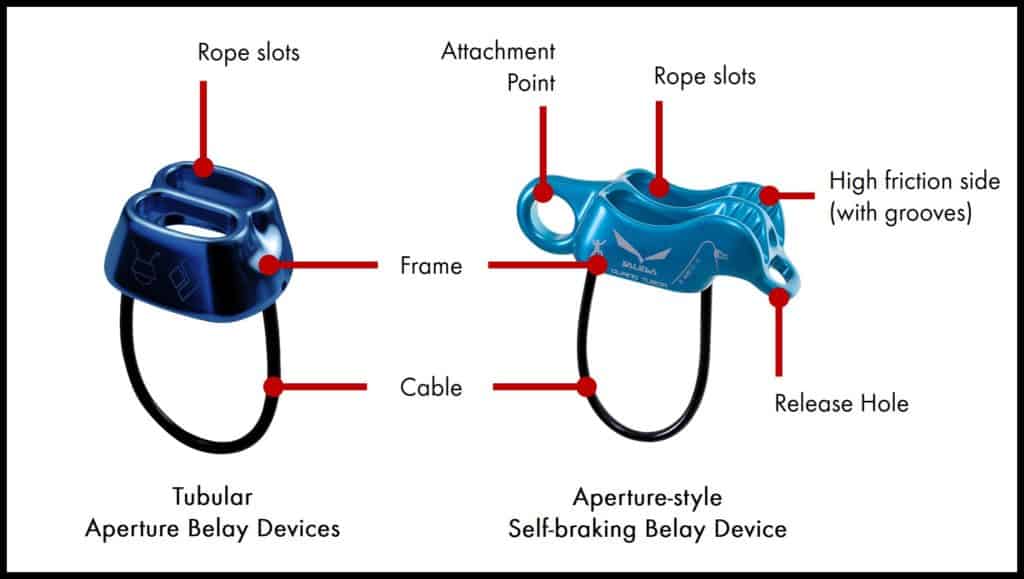
Frame: This is the main body of the belay device.
Rope slots: These are the openings in the belay device to pass the ropes through. Most ATCs have 2 rope slots which allow them to belay half or twin ropes. When belaying a single rope, you can use any one of the rope slots.
Cable: This is a loop of wire connected to the frame. It is not load-bearing. Its main purpose is to keep the belay device in place during a belay.
Attachment point: This is an opening for attaching the belay device to the anchor point for a direct belay. You can see this only on the ATC Guide (or equivalent).
Release hole: This is an opening to insert a carabiner for lowering a climber. You can see this only on the ATC Guide (or equivalent).
Lucky Lady Charm rtp i deluxe na luckyladycharm.net/hr/ - provjerite!.
ATC Symbols
For some ATCs, you will see some information printed on their frames. The information shows the rope direction and diameter.
Rope Direction
For the regular ATC, the design is symmetrical and it doesn’t matter how you slot the ropes into the belay device.
For ATCs that have a regular side and a high friction side, the icons on the frame will show how to slot the rope in.
The side with the grooves is the high friction side while the smooth side is the regular side.
The recommended way to use the ATC Guide is to have the brake strand on the high friction side.
On the high friction side, you will typically see an icon of a hand holding onto a strand of rope.
The regular side will be the rope going to the climber. You will typically see an icon of a person climbing.
The high friction side is useful in several situations:
- When you are belaying with thinner ropes which has lower friction.
- When you are belaying a climber that is heavier than you.
In some cases, if you are using a thicker rope, you may find the friction too high on the high friction side. You can use the ATC on the opposite direction, with the brake strand on the regular side. It is no different from belaying with a regular ATC.
Rope diameters
Some ATCs can only be used with ropes of a certain range of diameters. The compatible rope sizes will be printed on the frame as well.
Save this cheatsheet to Pinterest!
How To Belay With An ATC
This article will cover top rope belaying.
In top rope belaying, the climbing rope runs from the belayer’s belay device to the anchor point at the top of the climb and back down to the climber’s harness. This is the setup you will see in indoor climbing gyms. Every climber will start off with learning top rope belaying.
All the ATC variations mentioned above can be used for top rope belaying.
If you want to learn more about belaying a climber from above, check out these 3 methods here.
Equipment for the belayer
- 1 ATC
- 1 locking carabiner
- 1 harness
- 1 helmet
Step By Step Guide
Setting Up The Belay
- Put on your helmet and harness.
Make sure all the buckles are doubled back (if required) and tightened.
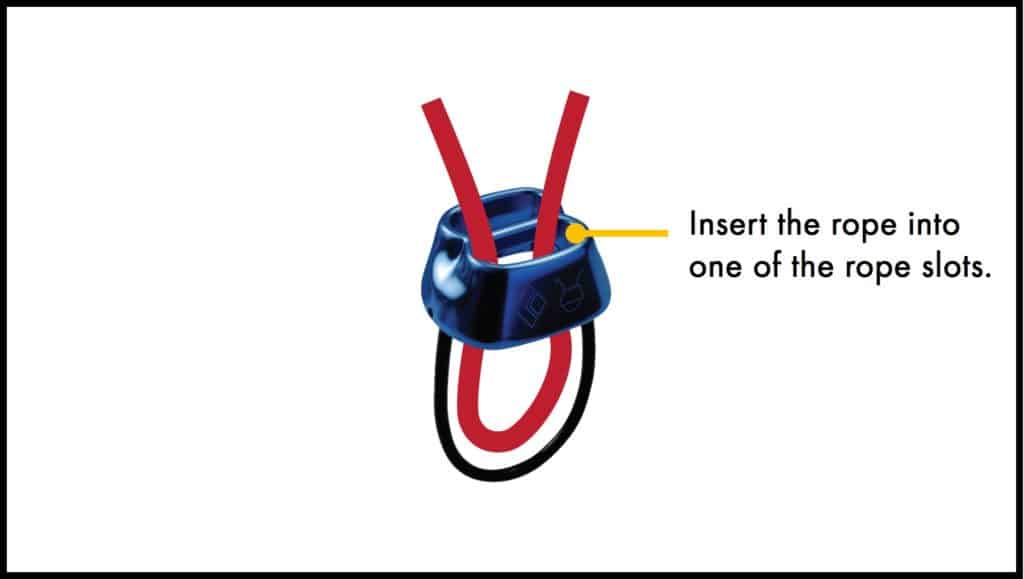
- Take a bight of rope. Insert it into one of the rope slots in the ATC.
You can use either slot. If you are using an ATC with a high friction side, make sure that the brake strand is on the side that you prefer (depending on your situation).
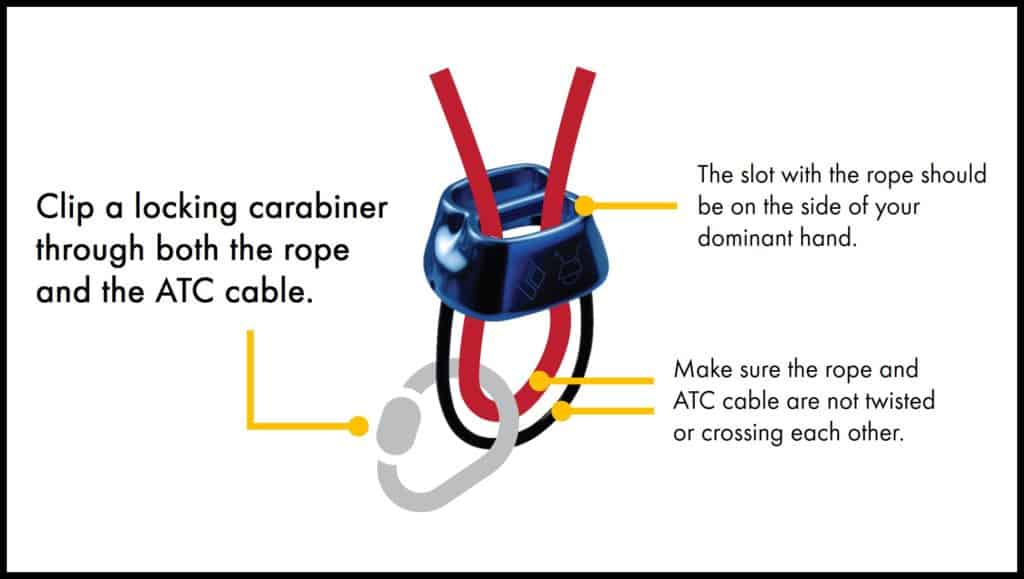
- Clip the locking carabiner through both the bight of rope and cable.
The rope should be running parallel to the ATC cable. To prevent damage to the cable, the rope should not be twisting or crossing it.
.
- Then clip the locking carabiner to the belay loop on your harness.
-
- Make sure that the carabiner gate is on the opposite side of your brake.hand.
- The rope slot where the rope is passing through should be on the side — of your dominant hand.
- The rope that is going to the climber should be on the top of the belay device. The brake strand will be at the bottom.

- Lock the carabiner.
- At the end of the brake strand, tie a stopper knot.
This closes the system and prevents the end of the rope from passing through the belay device.
Getting Into Belay Position
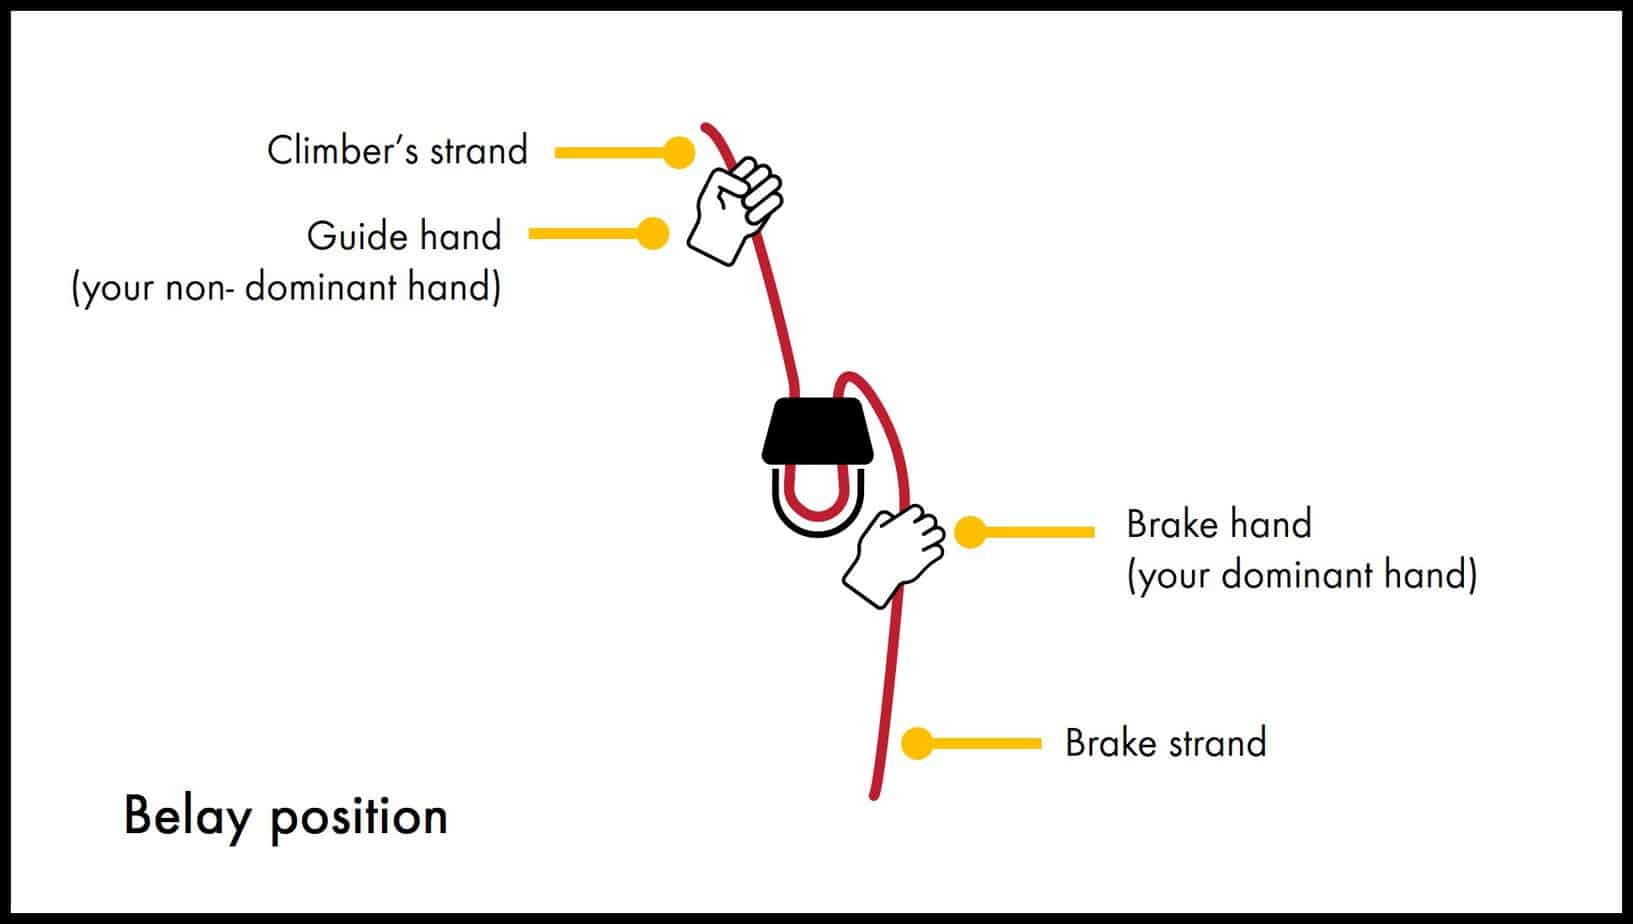
- To start belaying, your brake hand (this is usually your dominant hand) should be holding the end of the rope that’s not leading to the climber (I’ll call this the brake strand).
- Your other hand (the guide hand) will be holding onto the end that’s leading to the climber (I’ll call this the climber’s strand).
- Make sure there is minimal slack in the rope from the climber to your belay device.
During a belay, the angle between the climber’s strand and brake strand changes from 0 degrees to 180 degrees.
At 0 degrees, there is minimal friction and no braking force at all. You will find yourself in this position when you are taking in slack in the rope.
At 90 to 180 degrees, more braking force is generated. The brake position is at 180 degrees. When the climber falls, the belayer has to immediately get into the brake position to stop the fall.
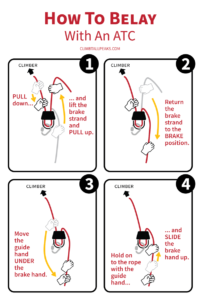
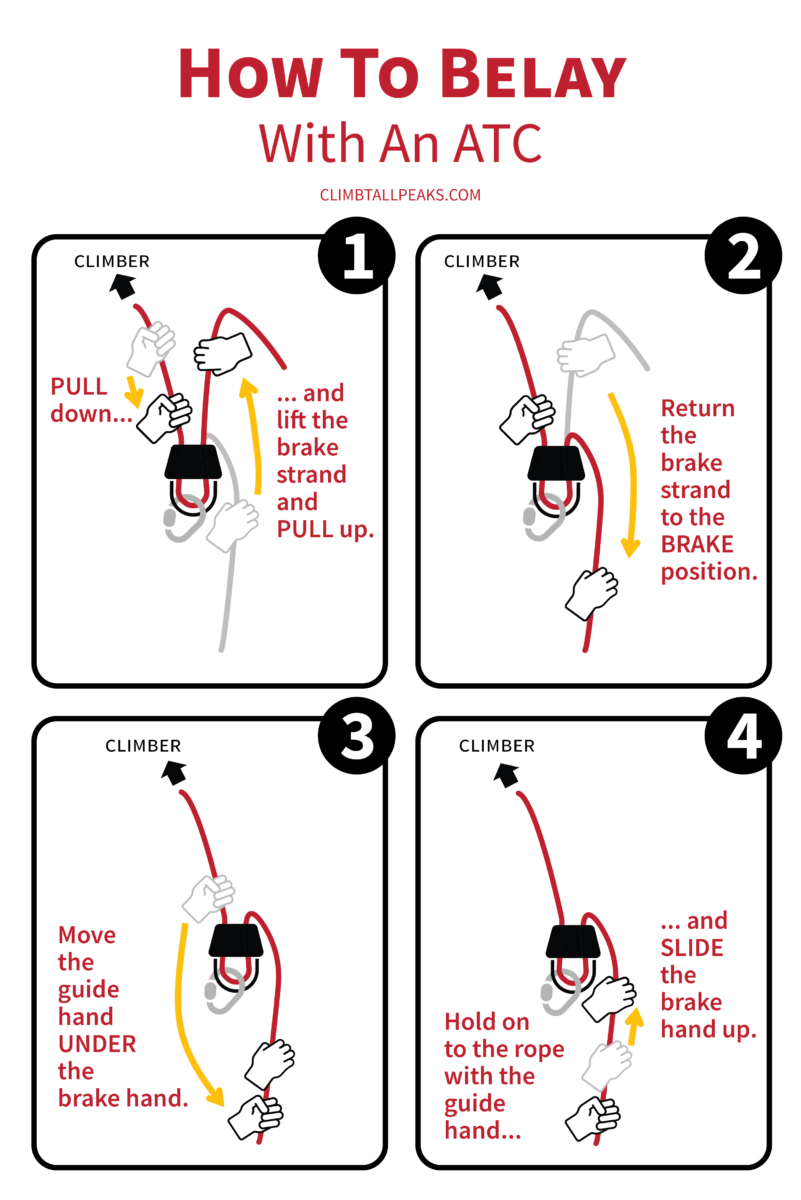
Belaying with the PBUS Technique
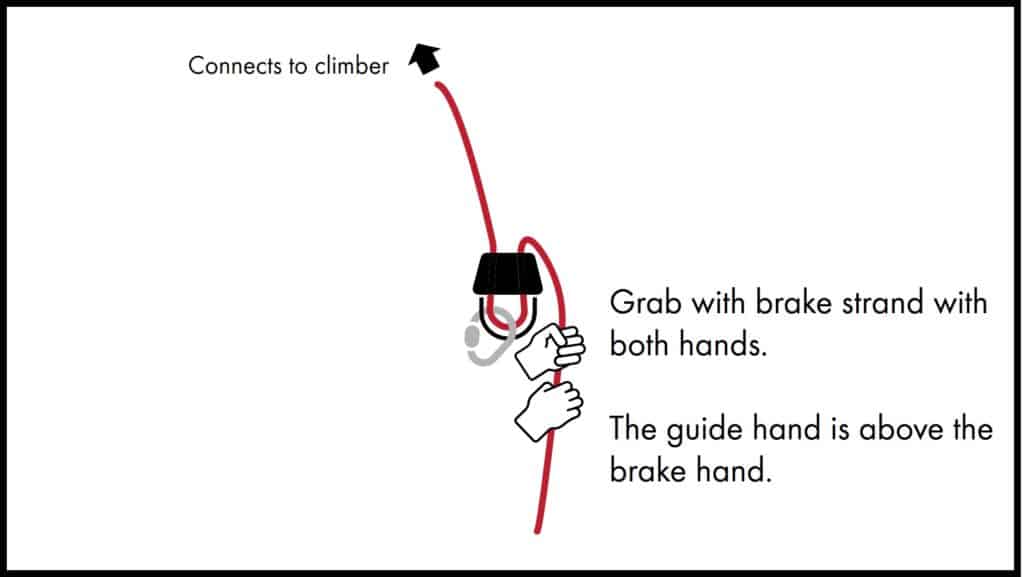
- Pull: Use your guide hand to pull the climber strand towards the belay device. At the same time, your brake hand pulls the brake strand away from the belay device. This takes in slack from the climbing rope.
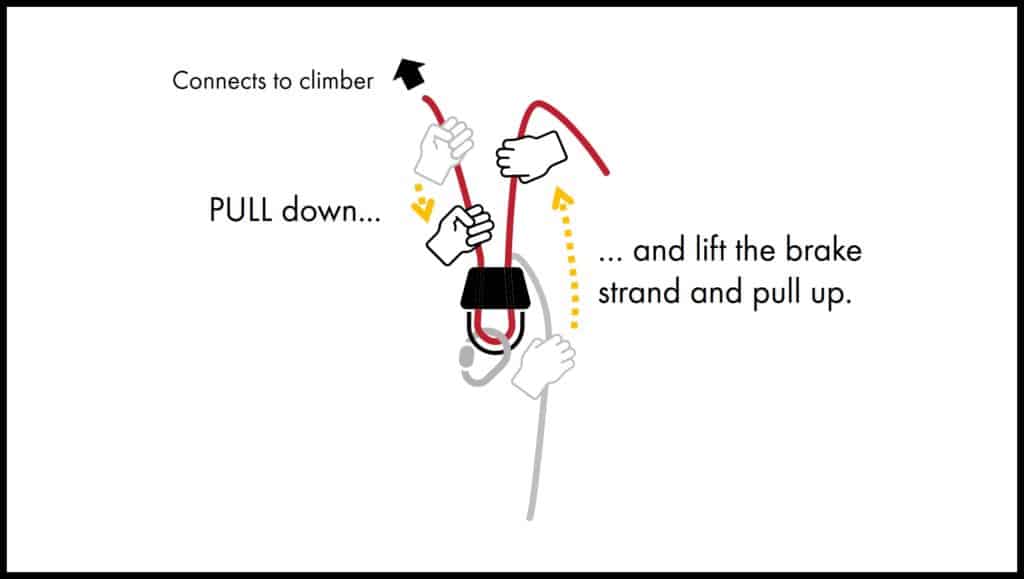
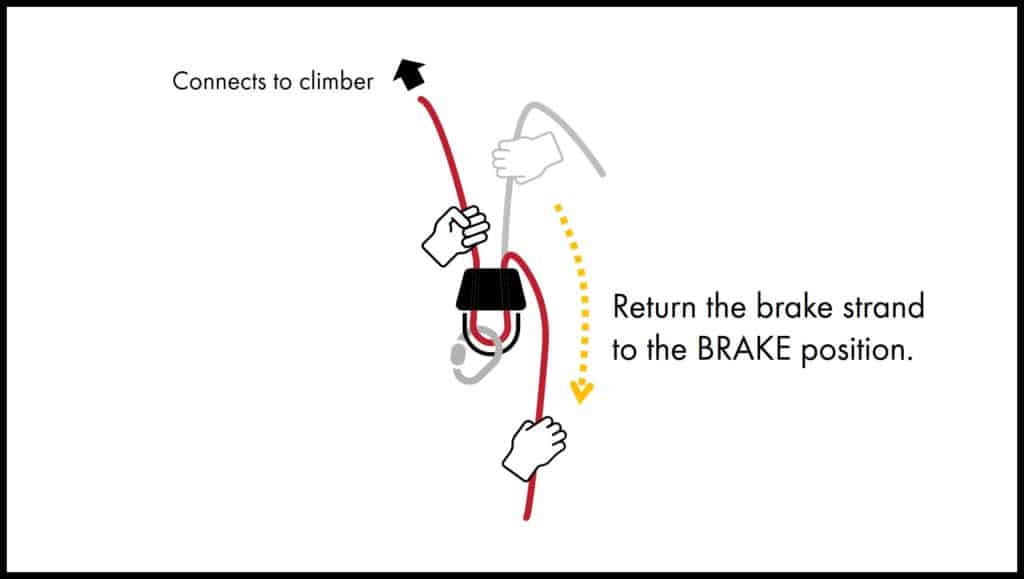
- Brake: When your guide hand reaches the belay device, pull the brake strand down into the braking position. This brakes the rope.
- Brake: When your guide hand reaches the belay device, pull the brake strand down into the braking position. This brakes the rope.
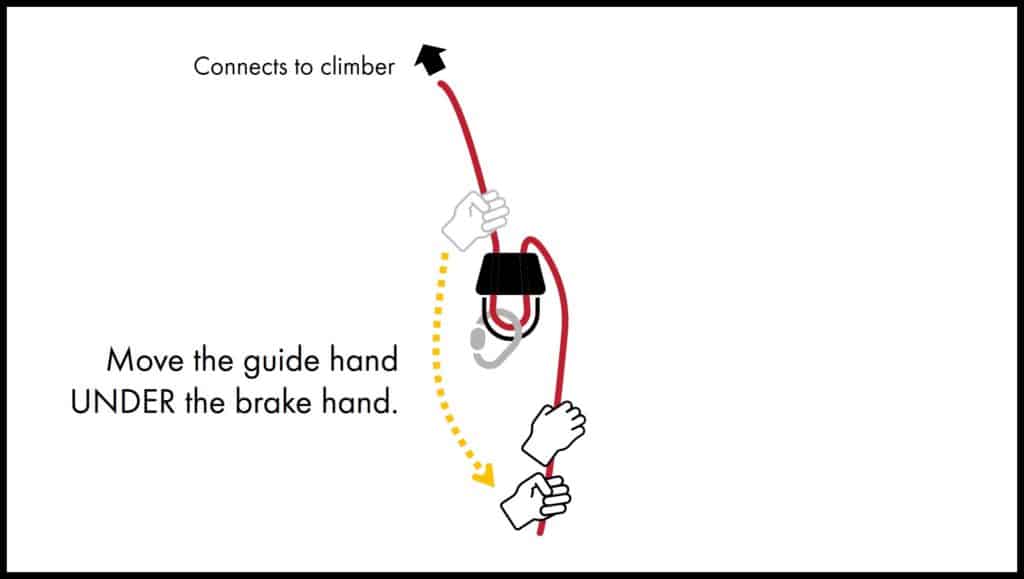
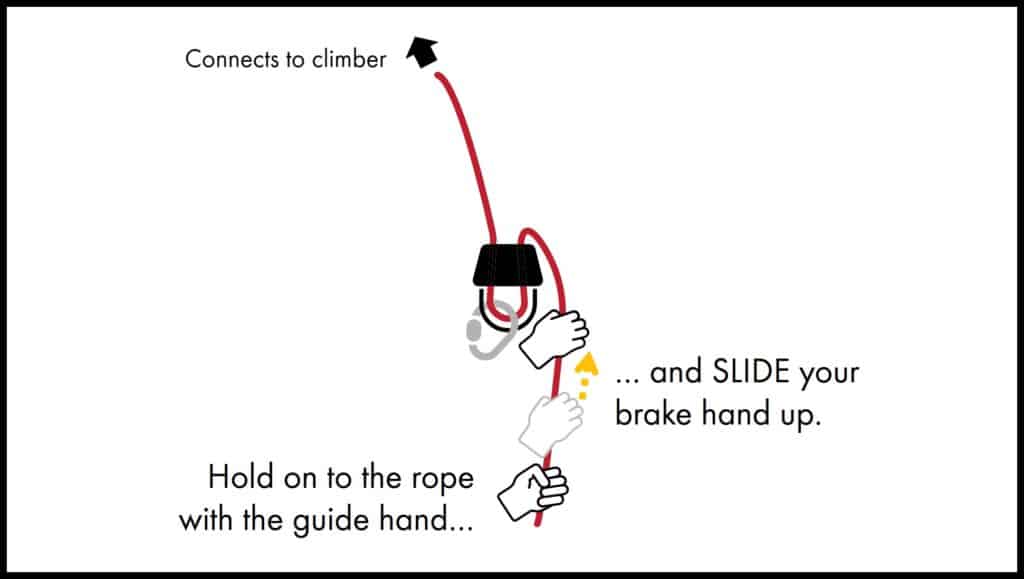
- Slide: Without letting go of the rope, slide your brake hand up close to the belay device.
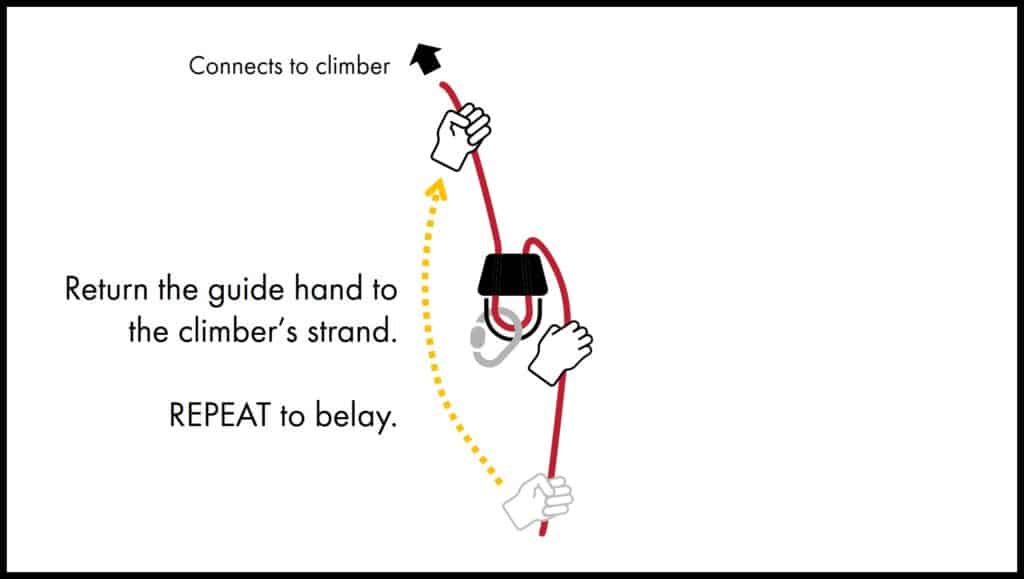
- Repeat the PBUS steps to continue belaying.
When top rope belaying, the rope should not have any slack at any moment.
If the climber is climbing quite fast, you have to do the PBUS steps quickly to take in the slack. It is crucial that you never take your brake hand off the rope.
Here you can see how to belay with an ATC:
Lowering With An ATC
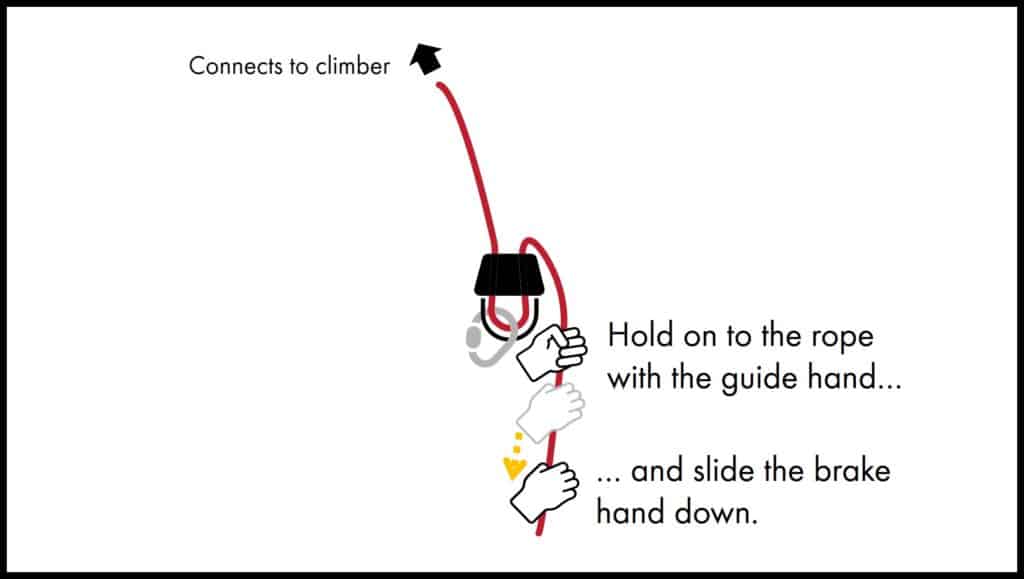
- Making sure that the rope is in brake position, grab the brake strand with both your hands. Your guide hand should be closer to the ATC and your brake hand should be below your guide hand.
- Holding the rope with your guide hand, slide your brake hand down the rope, away from your guide hand.
- To lower the climber, loosen the grip on your guide hand slightly. Slowly move your brake hand back closer to your guide hand. The weight of the climber will pull the rope through the belay device.
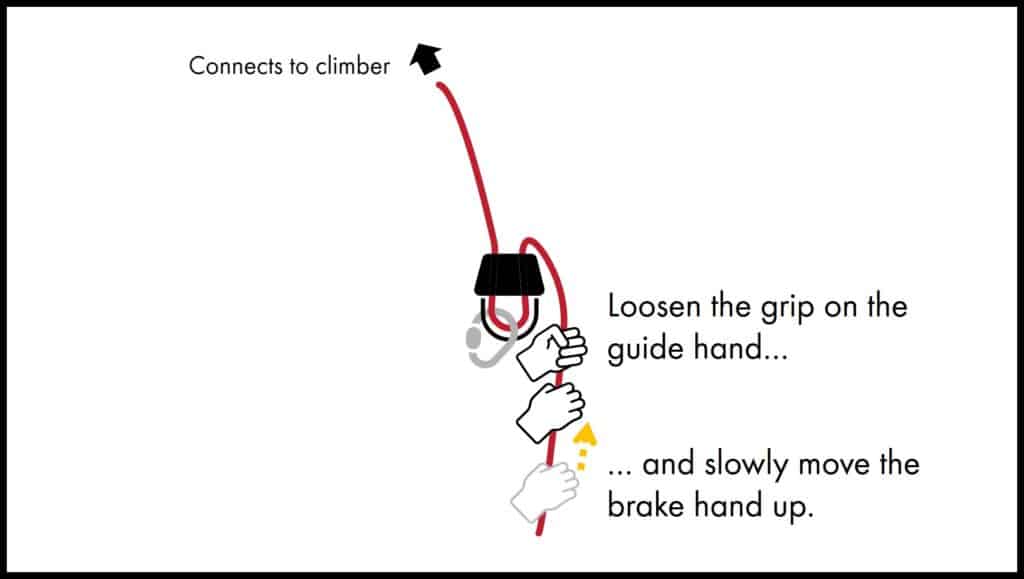
- Continue to lower by repeating steps 2 and 3.
This is Part 1 of 5 of the Learn To Belay Mini-series:
Part 1: How To Belay With An ATC
Part 2: How To Pass A Belay Certification Test
Part 3: How To Belay A Heavier Climber
Part 4: How To Belay From Above
Part 5: How To Set Up Top Rope Anchor
Save this cheatsheet to Pinterest!
This article is intended to provide general information. No article or video can replace qualified instruction, practice and experience. Your safety is your responsibility.