Knowing how to belay from above is an important skill for a climber.
When the lead climber reaches the top, he needs to belay up the climber who was belaying at the bottom. This is also known as belaying the second (i.e. the second climber).
When doing a multi-pitch climb, which is a long climb that is split up into sections, the climbers may take turns being the lead climber. Thus, they will also take turns belaying from above.
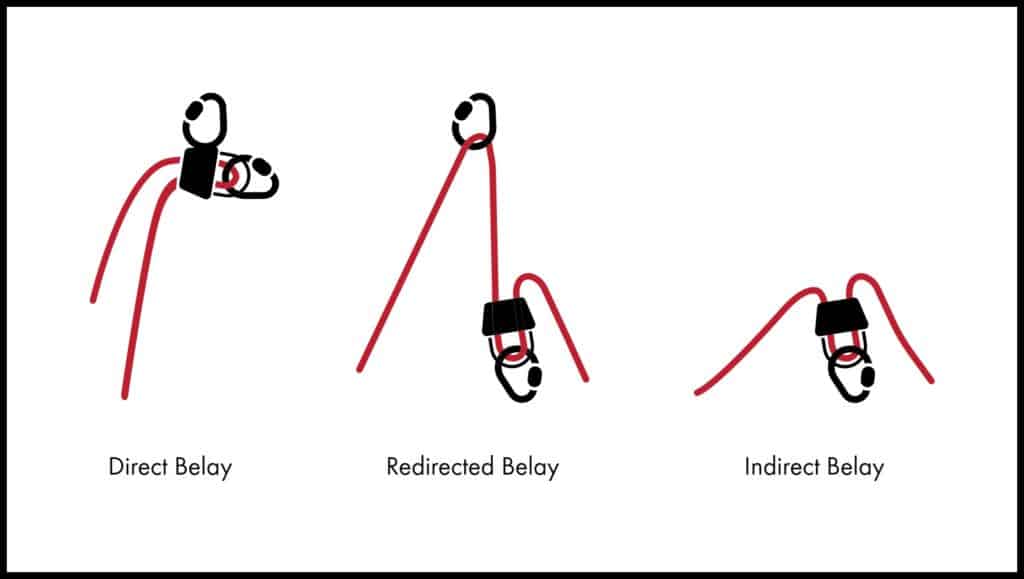
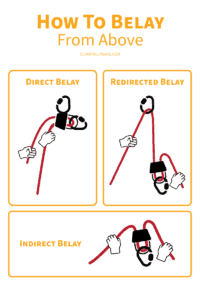
3 Methods Of Belaying From Above
There are 3 methods of belaying from the top.
- Direct belay – this is the recommended method by climbing schools today
- Redirected belay – this is the method used for many years and is still common today
- Indirect belay
These 3 methods differ in how the belay devices are being set up and how the belaying is done.
But before learning about each method, let’s first talk about belay devices.
This is Part 5 of 5 of the Learn To Belay Mini-series:
Part 1: How To Belay With An ATC
Part 2: How To Pass A Belay Certification Test
Part 3: How To Belay A Heavier Climber
Part 4: How To Belay From Above
Part 5: How To Set Up Top Rope Anchor
What Belay Device To Use?
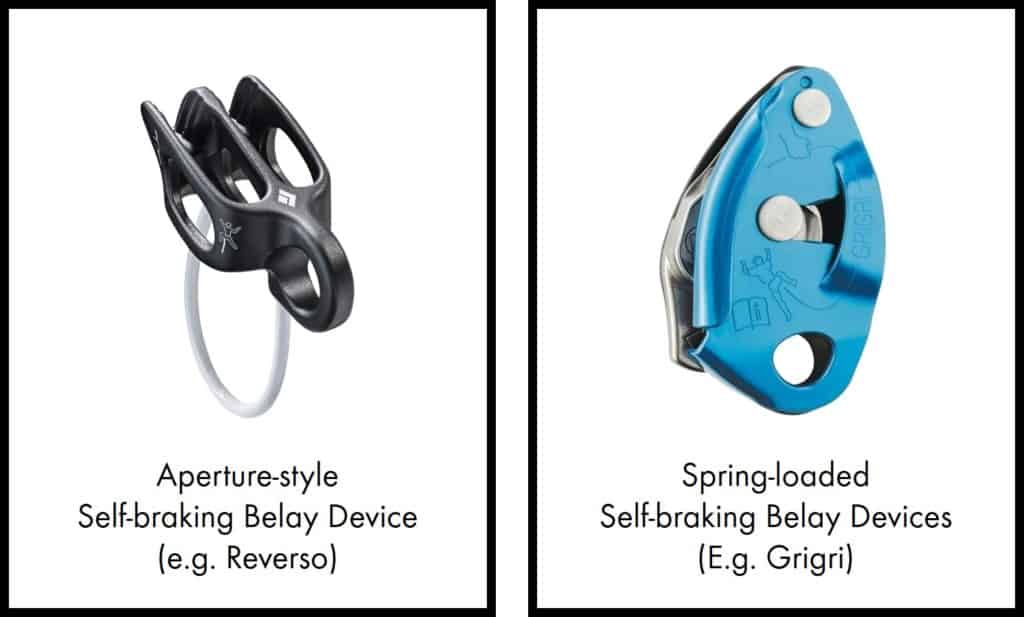
There are a few different types of belay devices:
.
- Aperture belay devices
- Slot plate
- Tubular e.g. ATC
- Figure 8
- Self-braking belay devices
- Aperture-style e.g. ATC Guide (this is different from the ATC) and Reverso
- Spring-loaded e.g. Grigri
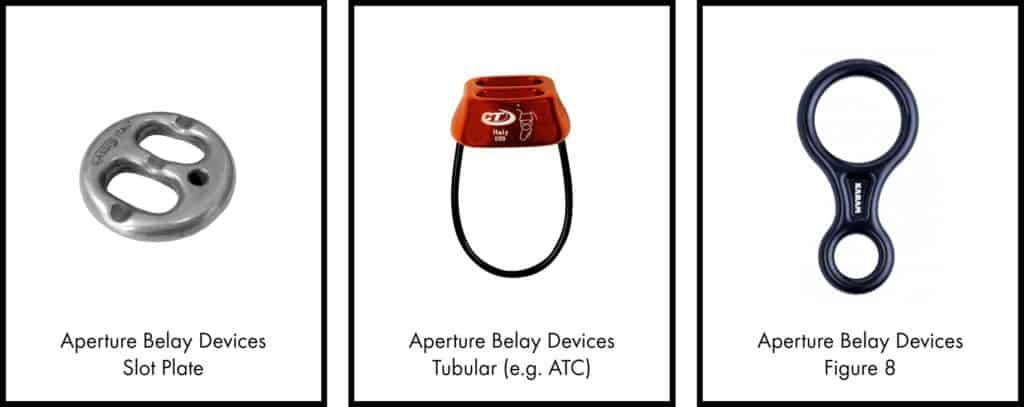
Aperture belay devices simply provide an opening for a loop of rope to pass through.
Self-braking belay devices have an internal mechanism that will stop on the ropes during a fall.
You can do a direct belay with a self-braking belay device but not an aperture belay device.
You can do a redirected or indirect belay with an aperture belay device or a self-braking belay device.
Here’s a quick comparison of the pros and cons of using each of these belay devices:
| Pros | Cons | |
| Aperture devices | The climber can be easily lowered. | – The belay device does not stop a fall. This relies completely on the belayer’s brake hand. This is more tiring for the belayer. – If the belayer loses consciousness in an accident, the belay fails. – Lowering the climber relies fully on the strength of the belayer. |
| Aperture-style self-braking devices | – The belay device helps to stop a fall. This is less tiring on the belayer. – If the belayer loses consciousness in an accident, the belay device can still brake a fall. | Since the belay device auto-locks in one direction, it can be difficult to lower the climber. |
| Spring-loaded self-braking devices | – The belay device helps to stop a fall. This is less tiring on the belayer. – If the belayer loses consciousness in an accident, the belay device can still brake a fall. – The belay device has a release mechanism for the rope and you can lower the climber easily and smoothly. | More costly than the other belay devices. |
Anatomy Of A Belay Device
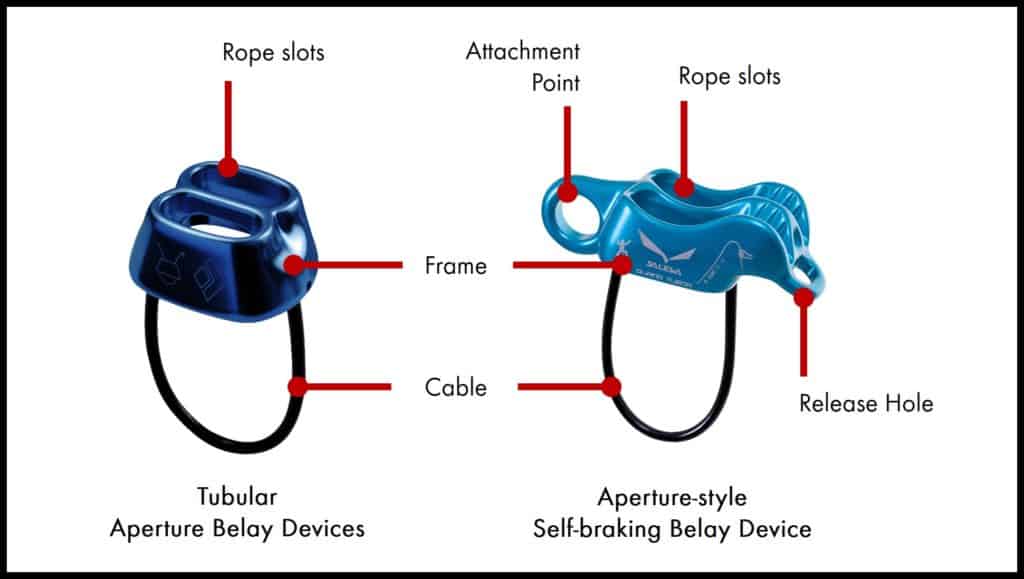
Frame: This is the main body of the belay device. An aperture-style self-braking belay device has a regular side and a high-friction side. The high-friction side has grooves to increase friction for braking.
Rope slots: These are the openings in the belay device to pass the ropes through.
Cable: This is a loop of metal cable connected to the frame. You can see this on tubular aperture belay devices and aperture-style self-braking belay devices.
Attachment point: This is an opening for attaching the belay device to the anchor point for a direct belay. You can see this only on aperture-style self-braking belay devices.
Release hole: This is an opening to insert a carabiner for lowering a climber. You can see this only on aperture-style self-braking belay devices.
Important: The guides below are for general information only. You should check the manufacturer’s specifications on the proper use of the belay device. They may vary from brand to brand, model to model.
Save to handy reminder to Pinterest!
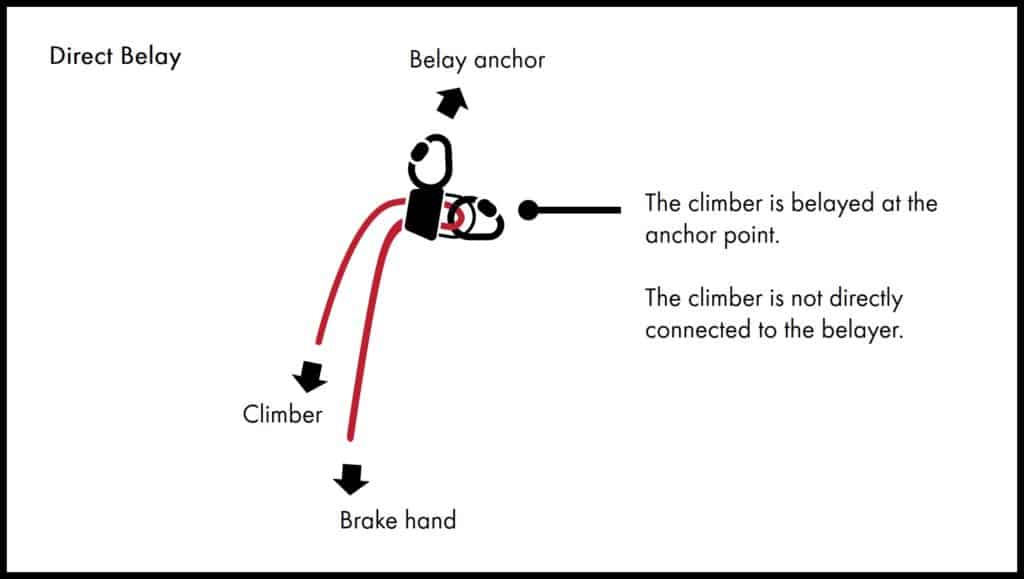
Method #1: Belaying From Above Using A Direct Belay
In the direct belay method, the belay device is secured directly on the belay anchor. The belayer is not attached directly to the belay device.
This is the recommended method by many climbing schools today.
Step By Step Guide Using An Aperture-style Self-braking Belay Device (E.g. ATC Guide Or Reverso)
- Tie the end of the rope onto your harness’s belay loop with a Figure 8 Follow Through Knot.
- Clip a locking carabiner into the belay anchor point.
- Secure yourself into the locking carabiner with a clove hitch. Lock the carabiner. Check that you have enough space to move around.
- There will be quite a bit of slack in the rope from the anchor point to your climber. Collect this excess by forming a stack of rope near your feet. Do this until there is minimal slack in the rope. This is where you set up your belay device.
- Clip a locking carabiner through the attachment point on the belay device.
- Clip the locking carabiner into the belay anchor. Lock the carabiner.
- Taking the strand of the rope that is going to the climber, make a bight.
- Make sure that the end of the rope that is going to the climber is on the top of the bight. Slot the bight of rope through any one of the rope slots of the belay device.
- Take another locking carabiner. This should preferably be an oval-shaped carabiner. It will allow the rope to run more freely. Clip the carabiner through the bight of rope and the cable on the belay device. Lock the carabiner. Make sure the rope is running over the spine of the carabiner and not the gate.
- Pull on the climber’s end of the rope. The self-braking belay device should lock down on the rope. If you can pull the rope easily on the climber’s end, you have inserted the bight of rope into the belay device wrongly.
- To start belaying, your brake hand (this is usually your dominant hand) should be holding the end of the rope that’s not leading to the climber (I’ll call this the brake strand). Your other hand will be holding onto the end that’s leading to the climber (I’ll call this the climber’s strand).
- Your brake hand should be high, close to the belay device. Your other hand will be lower.
- As the climber comes up, you take in the slack on the rope by pulling the brake strand away from the belay device. This motion will pull your other hand close to the belay device.
- Without releasing the rope, slide your other hand back down the climber’s strand. Hold onto both the climber’s strand and brake strand with this hand.
- Without releasing the rope, slide your brake hand back up the rope close to the belay device. Release the brake strand of the rope in your other hand.
- Continue the belay by repeating steps 13 to 15.
- Even when using a self-braking belay device, you should always keep your brake hand on the rope.
Here you can see how to do a direct belay with an aperture-style self-braking belay device (the ATC Guide is being used here):
Here you can see a close up of how to do a direct belay with an aperture-style self-braking belay device (the Petzl Reverso is being used here):
Here you can see how to do a direct belay with a spring-loaded self-braking belay device (the Grigri is being used here):
Pros Of Using The Direct Belay Method
- The belayer is not connected directly to the climber. The belay has more freedom to move about. The belayer can also get out of the belay more easily in an emergency.
- Applies less force on the anchor (1:1) as compared to the redirect belay (2:1)
- It is easier for the belayer to belay 2 climbers at the same time.
Cons Of Using The Direct Belay Method
- This belay method is different from how the belay is done when the belayer is below the climber. A belayer will need to familiarize himself with this method.
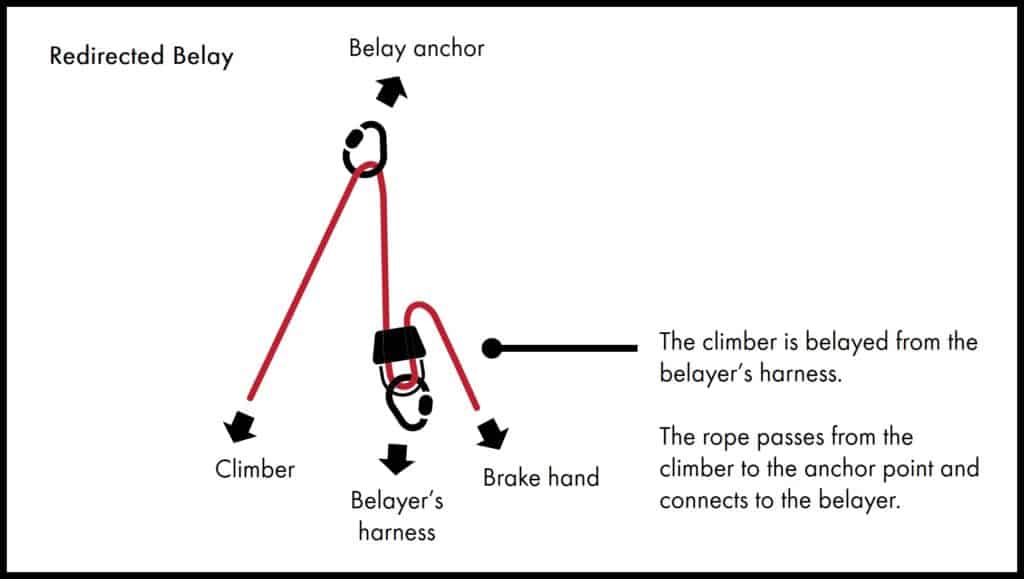
Method #2: Belaying From Above Using A Redirected Belay
In the redirected belay method, the belay device is secured onto the belayer’s harness. The rope runs from the climber to the anchor point and to the belayer.
This method is used by climbers for many years and is still widely used today.
Step By Step Guide Using An Aperture-style Self-braking Belay Device (E.g. ATC Guide Or Reverso)
- Tie the end of the rope onto your harness’s belay loop with a Figure 8 Follow Through Knot.
- Clip a locking carabiner into the belay anchor point.
- Secure yourself into the locking carabiner with a clove hitch. Lock the carabiner. Check that you have enough space to move around.
- There will be quite a bit of slack in the rope from the anchor point to your climber. Collect this excess by forming a stack of rope near your feet. Do this until there is minimal slack in the rope. This is where you set up your belay device.
- Clip a locking carabiner into your harness’ belay loop.
- Taking the strand of the rope that is going to the climber, make a bight.
- Slot the bight of rope through any one of the rope slots of the belay device.
- Take the locking carabiner on your harness, clip it through the bight of rope and the cable on the belay device. Lock the carabiner.
- Pull on the climber’s end of the rope. The self-braking belay device should lock down on the rope. If you can pull the rope easily on the climber’s end, you have inserted the bight of rope into the belay device wrongly.
- Clip a locking carabiner into the belay anchor point.
- Take the end of the rope that’s going to the climber and clip it into this locking carabiner. Lock the carabiner.
- To start belaying, your brake hand (this is usually your dominant hand) should be holding the end of the rope that’s not leading to the climber (I’ll call this the brake strand). In the brake position, your brake hand will be pulling the brake strand down towards your hips.
- Your other hand will be holding onto the end that’s leading to the climber (I’ll call this the climber’s strand). Take note that your hand should not be holding onto the rope between the belay device and anchor point. When the climber falls, you may get pulled into the anchor point and injure your hand.
- As the climber comes up, you take in the slack on the rope by pulling on the brake strand with your brake hand. This motion will pull your other hand close to the anchor point.
- Once the slack is taken in, return your brake hand to the brake position.
- Without releasing the rope, slide your other hand up the climber’s strand towards the anchor.
- Continue the belay by repeating steps 14 to 16.
- Even when using a self-braking belay device, you should always keep your brake hand on the rope.
Here you can see how to do a redirected belay with a self-braking belay device (the ATC Guide is being used here):
Watch from 0:00 to 2:23
Pros Of Using The Redirected Belay Method
- This belay method is similar to how the belay is done when the belayer is below the climber. It is easier for a beginner to learn.
Cons Of Using The Redirected Belay Method
- This applies more force on the anchor (2:1) as compared to the direct belay (1:1). This increases the risk of the anchor failing.
- When the climber falls, the belayer can get pulled towards the anchor. This may affect the ability to belay.
- It is harder for the belayer to get out of the belay in an emergency.
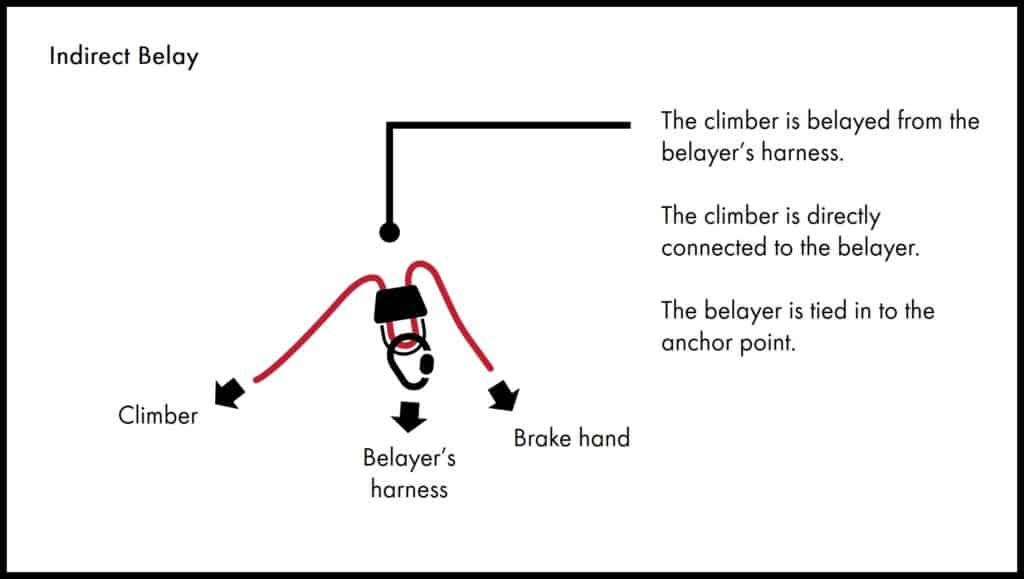
Method #3: Belaying From Above Using An Indirect Belay
In the indirect belay method, the belay device is secured onto the belayer’s harness. The rope runs from the climber directly to the belayer. The belayer is secured to the anchor point.
Step By Step Guide Using An Aperture-style Self-braking Belay Device (E.g. ATC Guide Or Reverso)
- Tie the end of the rope onto your harness’s belay loop with a Figure 8 Follow Through Knot.
- Clip a locking carabiner into the belay anchor point.
- Secure yourself into the locking carabiner with a clove hitch. Lock the carabiner. Unlike the previous 2 methods, you should be tied in close to the anchor. When the climber pulls on you, you should be held safely in place by the anchor.
- There will be quite a bit of slack in the rope from the anchor point to your climber. Collect this excess by forming a stack of rope near your feet. Do this until there is minimal slack in the rope. This is where you set up your belay device.
- Clip a locking carabiner into your harness’ belay loop.
- Taking the strand of the rope that is going to the climber, make a bight.
- Slot the bight of rope through any one of the rope slots of the belay device.
- Take the locking carabiner on your harness, clip it through the bight of rope and the cable on the belay device. Lock the carabiner.
- Pull on the climber’s end of the rope. The self-braking belay device should lock down on the rope. If you can pull the rope easily on the climber’s end, you have inserted the bight of rope into the belay device wrongly.
- As the climber’s weight is hanging directly on the belayer, it is easy for the belayer to lose his balance during a fall. The belayer should sit down when doing an indirect belay.
- Make sure the anchor point, belay device, and climber are all on the same side of your body. The rope should not be running between your legs or crossing from one side of your body to the next. Otherwise, the rope or belay device may dig into you or pinch your skin if the climber falls.
- To start belaying, your brake hand (this is usually your dominant hand) should be holding the end of the rope that’s not leading to the climber (I’ll call this the brake strand). In the brake position, your brake hand will be pulling the brake strand down towards your hips.
- Your other hand will be holding onto the end that’s leading to the climber (I’ll call this the climber’s strand).
- As the climber comes up, you take in the slack on the rope by pulling on the brake strand with your brake hand. This motion will pull your other hand close to the belay device.
- Once the slack is taken in, return your brake hand to the brake position.
- Without releasing the rope, slide your other hand down the climber’s strand towards the climber.
- Continue the belay by repeating steps 14 to 16.
- Even when using a self-braking belay device, you should always keep your brake hand on the rope.
Here you can see how to do an indirect belay with a belay device (the ATC is being used here):
Pros Of Using The Indirect Belay Method
- This belay method is similar to how the belay is done when the belayer is below the climber. It is easier for a beginner to learn.
- Applies less force on the anchor (1:1) as compared to the redirect belay (2:1)
Cons Of Using The Indirect Belay Method
- The belayer needs to sit down during the belay for better stability.
- The climber’s weight is always hanging directly on the belayer. This can be uncomfortable.
- The belayer cannot get out of the belay in an emergency.
This is Part 5 of 5 of the Learn To Belay Mini-series:
Part 1: How To Belay With An ATC
Part 2: How To Pass A Belay Certification Test
Part 3: How To Belay A Heavier Climber
Part 4: How To Belay From Above
Part 5: How To Set Up Top Rope Anchor
Save to handy reminder to Pinterest!
This article is intended to provide general information. No article or video can replace qualified instruction, practice and experience. Your safety is your responsibility.