Setting up a secure top rope anchor is vital. When a climber falls, having a solid top rope anchor is literally a matter of life and death. An anchor refers to the whole system — the anchor points, the protection gear, runners, carabiners and climbing rope.
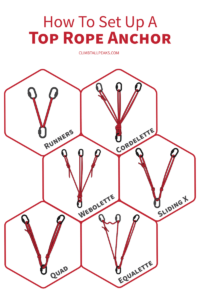
There are many ways to set up a top rope anchor and this article covers 7 of them. Each of them has its pros and cons. It is important to understand the limitations when deciding on which method to use.
The anchor points can be permanent fixed bolts or temporary protection gear such as nuts, hexes or cams. The set up will be the same.
This is Part 5 of 5 of the Learn To Belay Mini-series:
Part 1: How To Belay With An ATC
Part 2: How To Pass A Belay Certification Test
Part 3: How To Belay A Heavier Climber
Part 4: How To Belay From Above
Part 5: How To Set Up Top Rope Anchor
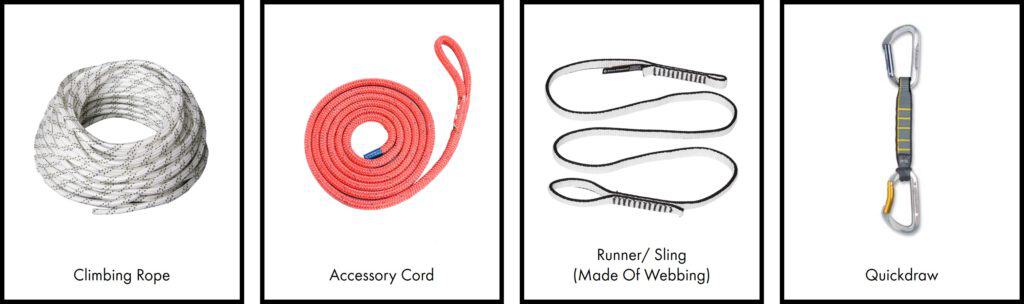
Overview Of Ropes, Cords, Webbings, Quickdraws
You can build an anchor with ropes or webbings.
Ropes are generally preferred over webbings for a couple of reasons:
- Ropes are tougher than webbings. You should use ropes if you are setting up your anchors in areas where they may be rubbing against rock surfaces or rough edges. Ropes have a protective sheath so there is a lower risk of it being damaged or cut as compared to webbings.
- It is easier to tie knots with ropes than webbings. It is usually harder to adjust knots that are tied in webbing. The webbing strands can also become more twisted and messy.
However, webbings are lighter and less bulky than ropes.
Types Of Ropes
Ropes that are used for setting anchors are often referred to as static ropes, static lines, accessory cords or cordelettes.
They are more or less the same thing, with some slight variations.
Static Rope/ Static Line
Unlike dynamic ropes that stretch and elongate under a load, static ropes do not. Static ropes are never ever used for climbing since they do not absorb any impact during a fall. Climbers should only use dynamic ropes for climbing.
However, they can be used to set up an anchor for top-roping. You will typically use an 8mm to 10mm diameter static rope or static line to build an anchor.
Accessory Cord
Static ropes with a diameter smaller than 8mm are referred to as accessory cords.
You will typically use a 7mm to 8mm diameter accessory cord to build an anchor. Cords of this diameter have a good strength to weight ratio for setting up anchors.
Cordelette
A cordelette is just a fancy name for any strand of rope or cord that is tied into a loop.
Webbing
Webbing is made of fabric woven together into a flat strip or tube.
There are 2 types of webbings — tubular webbing and flat webbing. You only use tubular webbing for climbing. Flat webbings are what you typically see on your backpack straps.
You will typically use a 2.5 cm (1 in) wide tubular webbing to build an anchor.
Runner/ Sling
Tubular webbings can be sewn or tied to form a runner or sling.
You can find runners in a variety of lengths:
- Short runners: 30 cm/ 12 in
- Single-length runners: 60 cm/ 24 in
- Double-length runners: 120 cm / 48 in
- Long runners: 180 — 240 cm / 72 — 96 in
Quickdraw
A quickdraw is made with 2 carabiners secured to both ends of a sewn webbing.
You can find runners in a variety of lengths:
- 10 — 12 cm/ 4 — 5 in
- 17 — 18 cm/ 6.5 — 7 in
- 60 cm / 24 in
Materials Of Ropes, Cords And Webbings: Nylon Vs High Strength Polyethylene e.g. Spectra/ Dyneema
I personally prefer using nylon ropes over any high strength polyethylene variety such as Dyneema or Spectra.
These polyethylene ropes are stronger and you can use a thinner rope for your anchor. This means a lighter and less bulky load for you to carry while climbing.
However, they have several disadvantages:
- They have lower stretch than nylon and do not distribute weight between the anchors as well as nylon.
- They do not last as long as nylon, especially when used to set up anchors with lots of knotting and flexing.
- They can be badly damaged if a loaded rope happens to run over them.
- They have lower friction than nylon. You will need to double up on any knots that you use on them as compared to nylon.
- They are more expensive than nylon.
SERENA Principle For Setting Up Anchors
The acronym SERENEA is an easy way to keep in mind the principles to follow when building an anchor system.
All anchor systems have to be:
Solid: Every component in the anchor should be solid.
Equalized: The load should be equally distributed between the anchor points.
Redundant: Always have redundant components in the anchor. Having 2 solid, bombproof anchor points is the bare minimum. 3 or more anchor points are preferred.
Efficient: The anchor system should be kept as simple as possible. This saves time and effort and minimizes the risks of mistakes.
No Extension: If one of the anchor points fails, there should be no sudden shock load generated on the rest of the system.
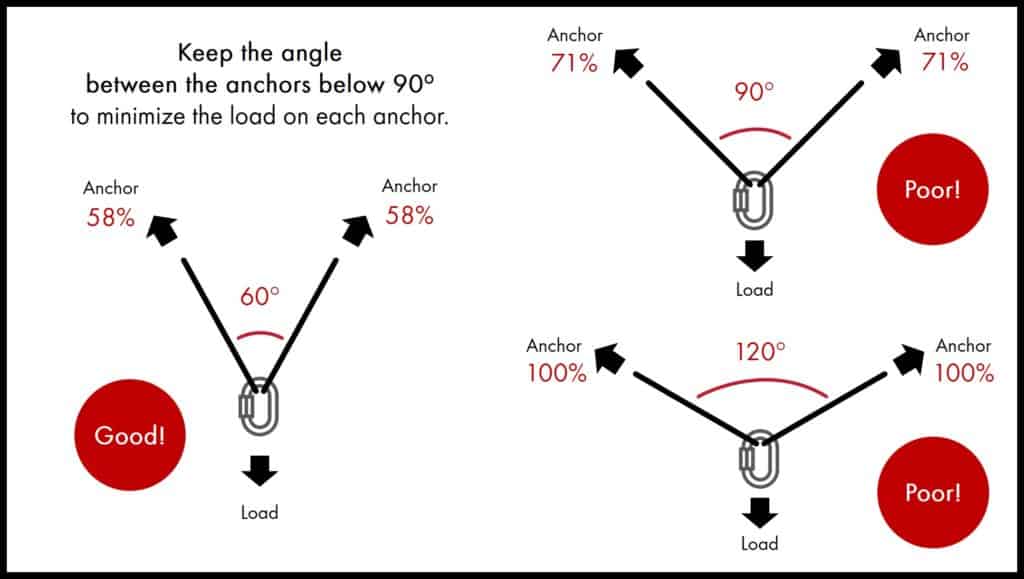
Angle: When the anchor is set up, the angle formed by the ropes or webbings should be less than 90 degrees. An angle smaller than 60 degrees is ideal. The larger the angle, the more load is exerted on each anchor point.
How To Equalize Anchors
As mentioned in the SERENEA principle, it is important for the anchors to be equalized.
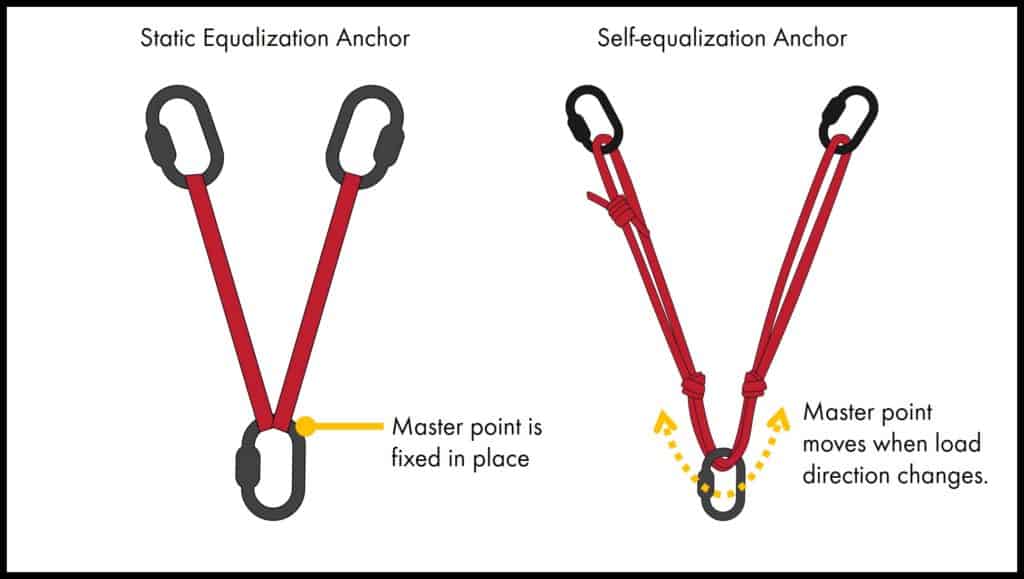
There are 2 methods of equalizing your anchors — static equalization or self-equalization.
Static Equalization
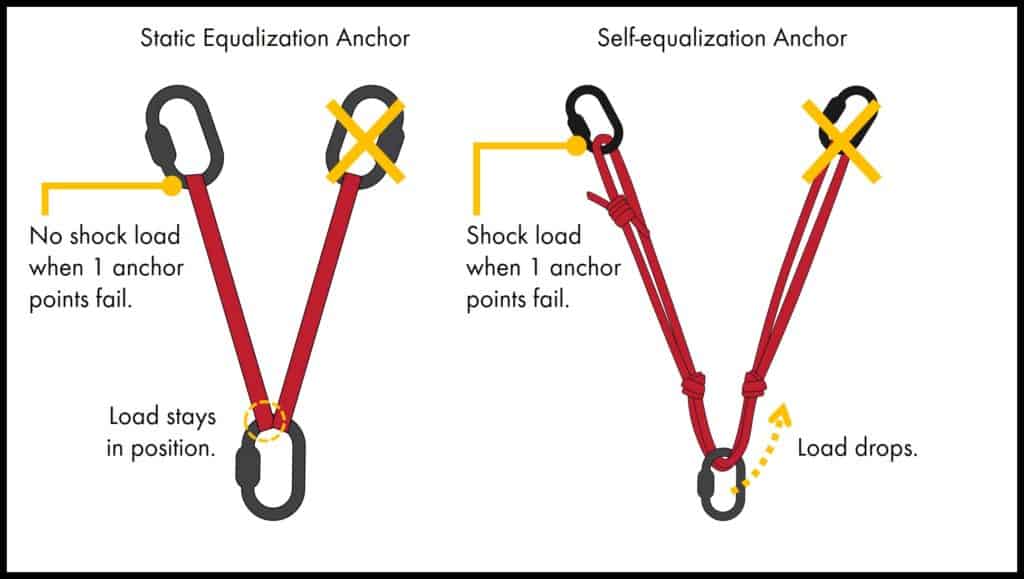
Static equalization means that the anchor is equalized during the anchor set up. If one of the anchor points fails, there will be no extension on the anchor and no risk of shock loading.
However, if the load deviates from the original loading direction, the anchor does not adjust to the change. A fall in the deviated direction will cause one of the anchor points to be shock loaded.
Self-equalization
Self-equalization means that the anchor can adjust to changes in the loading direction. This minimizes the risks of any of the anchor points getting shock loaded during a fall in any direction.
However, this also means that when an anchor point fails, there will be some extension in the anchor. The remaining anchor point will be shock loaded.
However, in reality, complete equalization is hardly ever achieved. There are a lot of variables affecting how the anchors will perform. These include the locations of the anchors, the configurations of the anchors, the route of the climber and so on.
The key is to keep the SERENEA principles in mind when constructing the anchor. You need to understand how the anchors will perform in different scenarios.
Save this cheatsheet to Pinterest!
Method #1: Runners/ Slings
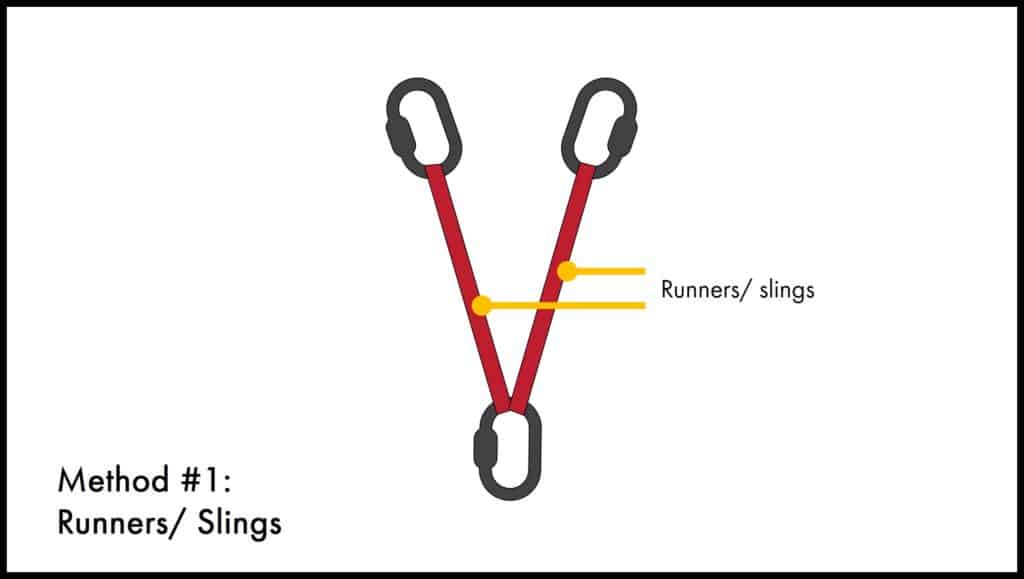
The Equipment You Need
- 4 locking carabiners
- 2 single length nylon runners/ slings (60 cm/ 24 in)*
* This is a general guide. The actual length you need depends on the positions of your anchors.
Step By Step Guide To Set Up Top Rope Anchors With Runners/ Slings
This is a static equalization anchor.
This setup is for 2 anchor points. For 3 or more anchor points, it is easier to equalize the anchor points with the Cordelette method (see Method #3 below).
- Clip 1 locking carabiner onto each of the 2 anchor points.
- Clip 1 runner onto each of the anchor point carabiners. Lock the carabiners.
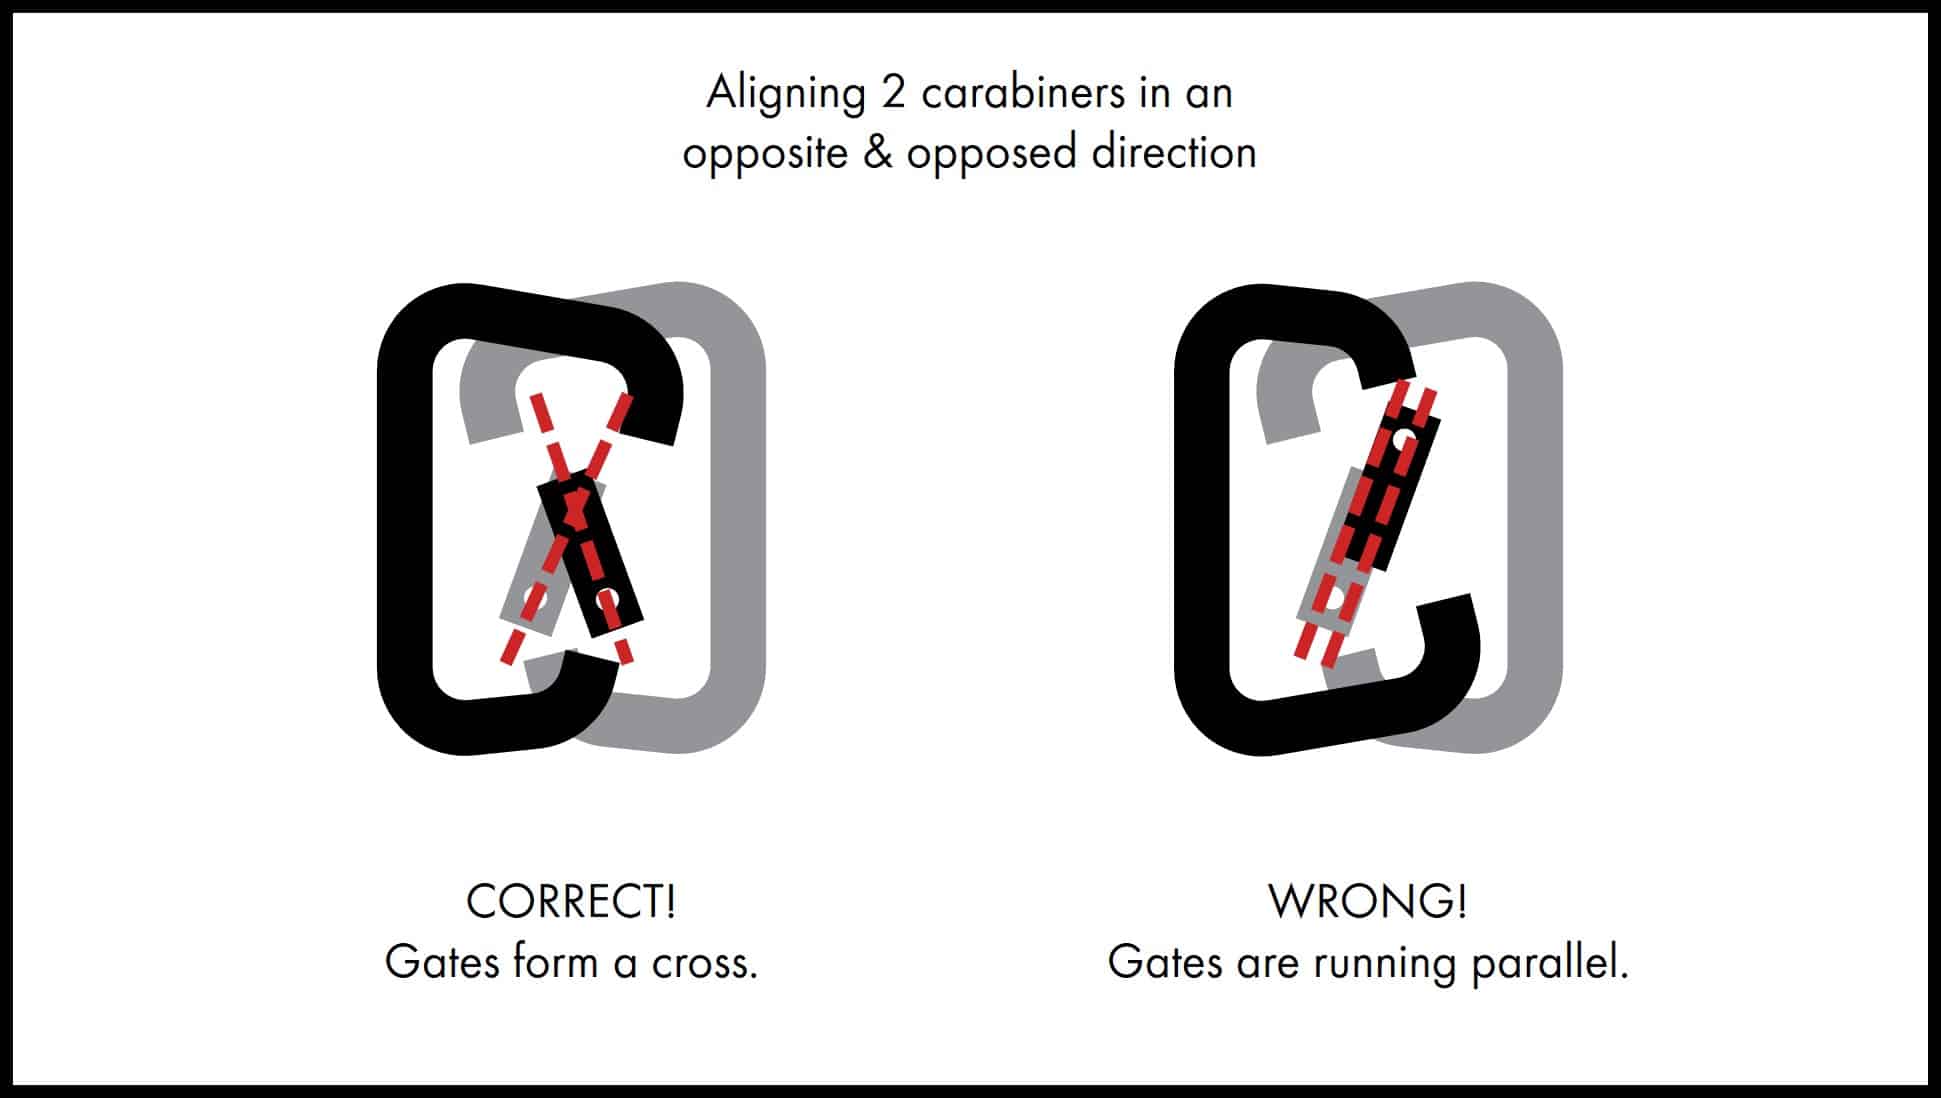
- Clip the 2 runners together at the bottom with a locking carabiner. For redundancy, you can clip in another locking carabiner, in an opposite and opposed direction.
- Clip your climbing rope through the bottom locking carabiner(s). Lock your carabiner(s).
Pros
- Simple and easy to set up.
Cons
- This method seldom achieves equalization except in ideal situations.
Method #2: Quickdraws
If you are doing short and quick climbs, you can also use quickdraws instead of runners for the same set up above.
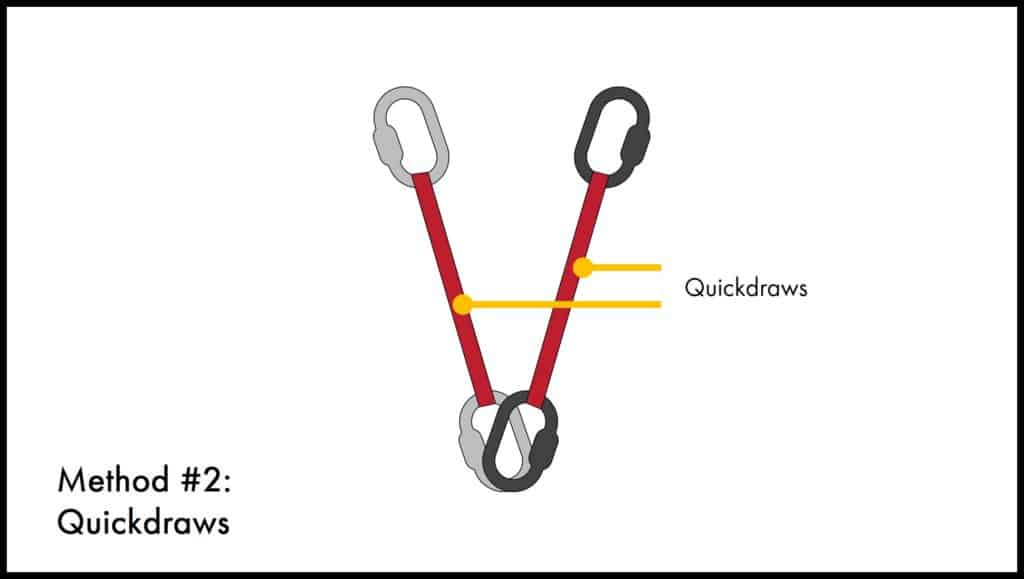
The Equipment You Need
- 2 18 cm (7 in) quickdraws with locking carabiners on both ends
* This is a general guide. The actual length you need depends on the positions of your anchors.
Step By Step Guide To Set Up Top Rope Anchors With Quickdraws
This is a static equalization anchor.
This setup is for 2 anchor points. For 3 or more anchor points, it is easier to equalize the anchor points with the Cordelette method (see Method #3 below).
- Clip 1 quickdraw onto each of the 2 anchor points. Make sure the carabiners are opposite and opposed. Lock the top carabiners.
- Clip your climbing rope through the 2 lower carabiners of the quickdraw. Lock the bottom carabiners.
You can see the setup here (0:00 to 1:10):
.
Pros
- Simple and easy to set up.
Cons
- This method seldom achieves equalization except in ideal situations.
Method #3: Cordelette
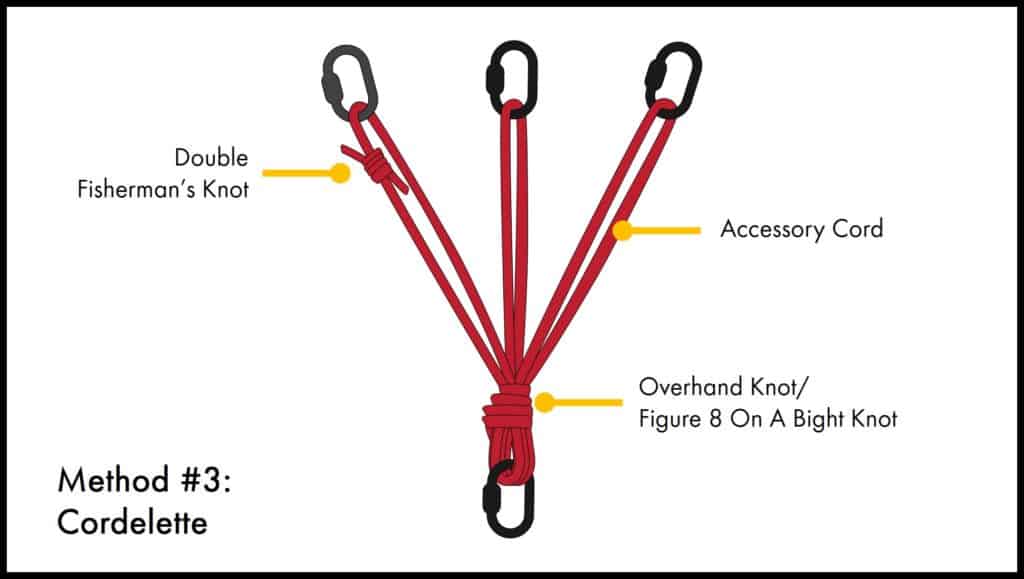
The Equipment You Need
- 5 locking carabiners
- 5.5 meters (18 feet) of 7mm nylon accessory cord*
* This is a general guide. The actual length you need depends on the positions of your anchors.
* You can also use 8mm — 10mm static rope for this setup. For such a long length, I usually avoid using tubular webbing.
Step By Step Guide To Set Up Top Rope Anchors With A Cordelette
This is a static equalization anchor.
This setup is for 3 anchor points. You typically set up a cordelette with 3 anchor points. This provides redundancy in case one of the anchor points fails.
- Clip 1 locking carabiner onto each of the 3 anchor points.
- Tie the accessory cord into a loop with the Double Fisherman’s Knot.
- Clip the loop into all 3 anchor point carabiners. Lock the carabiners.
- Pull down on the 2 sections of the rope that are between the 3 anchor points. Pull until they meet the bottom strand of the loop.
- Check that the Double Fisherman’s Knot is not pressing against any of the carabiners. Adjust if necessary.
- Take all the strands of the rope and tie an Overhand Knot*.
- Clip a locking carabiner into the bight formed by the Overhand Knot. Pull the carabiner to tighten the knot. For redundancy, you can clip in another locking carabiner, in an opposite and opposed direction.
- Clip your climbing rope through the locking carabiner(s). Lock your carabiner(s).
* You can also tie a Figure 8 On A Bight Knot. A Figure 8 On A Bight Knot will be easier to untie after heavy loading. However, it uses up more rope.
You can see the setup here:
Pros
- Easier to achieve static equalization than using runners or quickdraws. There’s no need to adjust the individual lengths of the runners or quickdraws.
Cons
- This method doesn’t achieve equalization except in ideal situations.
Variation Of The Cordelette On 2 Anchor Points
Having 3 anchor points provided redundancy in the anchor system. However, if you have 2 bombproof anchors, you can do a similar set up with those 2 anchor points.
You can see the setup here (1:10 to 2:24)
Method #4: Webolette
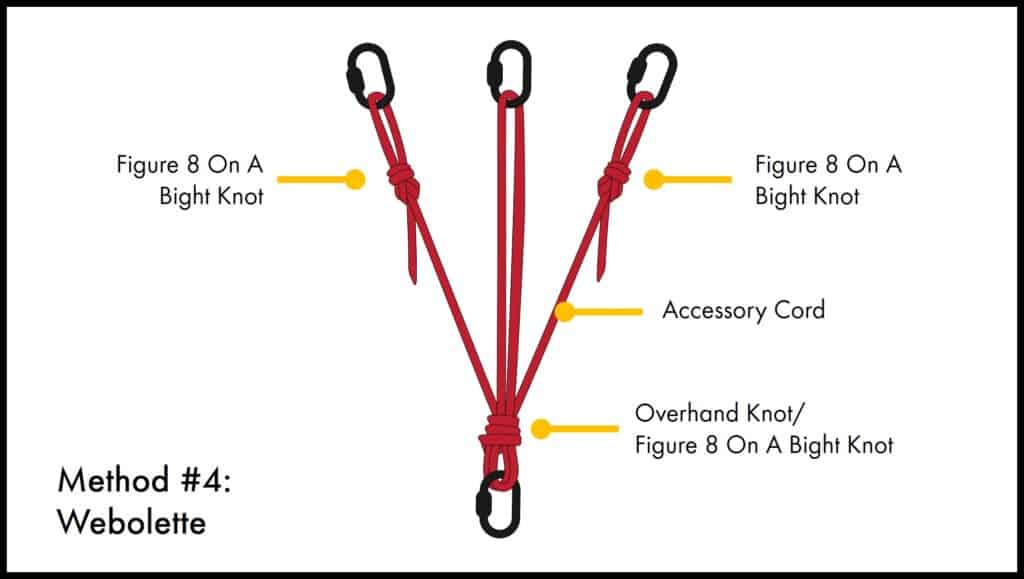
The Equipment You Need
- 5 locking carabiners
- 5.5 meters (18 feet) of 7mm nylon accessory cord*
* This is a general guide. The actual length you need depends on the positions of your anchors.
* You can also use an 8mm — 10mm static rope for this setup. For such a long length, I usually avoid using tubular webbing.
Step By Step Guide To Set Up Top Rope Anchors With A Webolette
This is a static equalization anchor.
This setup is for 3 anchor points. You typically set up a webolette with 3 anchor points. This provides redundancy in case one of the anchor points fails.
- Clip 1 locking carabiner onto each of the 3 anchor points.
- Tie a Figure 8 On A Bight Knot on both ends of the accessory cord. Make sure there is a long tail for both knots.
- Clip 1 loop into the anchor point carabiner on the left. Clip the other loop into the anchor point carabiner on the right. Lock both carabiners.
- Clip the middle section of the rope into the middle anchor point carabiner. Lock the carabiner.
- You should see a W-shaped rope hanging from the anchor points. Pull the bottom 2 bights of the rope to equalize the lengths of all the strands.
- Take all the strands of the rope and tie an Overhand Knot*.
- Clip a locking carabiner into the bight formed by the Overhand Knot. Pull the carabiner to tighten the knot. For redundancy, you can clip in another locking carabiner, in an opposite and opposed direction.
- Clip your climbing rope through the locking carabiner(s). Lock your carabiner(s).
* You can also tie a Figure 8 On A Bight Knot. A Figure 8 On A Bight Knot will be easier to untie after heavy loading. However, it uses up more rope.
You can see the setup here :
Pros
- It uses less rope than a Cordelette. This is useful when your anchor points are far apart and your cord is too short.
- Easier to achieve static equalization than using runners or quickdraws. There’s no need to adjust the individual lengths of the runners or quickdraws.
Cons
- This method doesn’t achieve equalization except in ideal situations.
Method #5: Sliding X

The Equipment You Need
- 4 locking carabiners
- 2 meters (6.5 feet) 7mm nylon accessory cord*
* This is a general guide. The actual length you need depends on the positions of your anchors.
* You can also use an 8mm — 10mm static rope for this setup. If the anchor is not in contact with any rock surfaces, you can also use 1 in tubular webbing.
Step By Step Guide To Set Up Top Rope Anchors With Sliding X
This is a self-equalization anchor.
This setup is only for 2 anchor points.
I have included 2 Overhand Knots in this method to act as limiter knots. They prevent the anchor from a large extension if one of the anchor points fail. Using the Sliding X without limiter knots is no longer a common practice.
- Clip 1 locking carabiner onto each of the 3 anchor points.
- Tie the accessory cord into a loop with the Double Fisherman’s Knot.
- Clip one side of the loop into one of the anchor points. Lock the carabiner.
- At about a third of the length from the locked carabiner, tie an Overhand Knot in the rope.
- At about a third of the length from the Overhand Knot, tie another Overhand Knot.
- Clip the other end of the rope into the second anchor point. Lock the carabiner.
- The 2 Overhand Knots should be roughly at about the same height. There should be about 25cm (10 in) of rope between the 2 Overhand Knots. The Overhand Knots allows you to easily adjust the position of the knots.
- Check that the Double Fisherman’s Knot is not pressing against any of the carabiners.
- Make a twist on one of the strands of rope between the 2 Overhand Knots.
- Clip a locking carabiner through both strands of rope. For redundancy, you can clip in another locking carabiner, in an opposite and opposed direction.
- Clip your climbing rope through the locking carabiner(s). Lock your carabiner(s).
You can see the setup here:
Pros
- The anchor self-equalizes when the climber moves in different directions during the climb.
Cons
- The 2 Overhand Knots act as limiters to prevent the anchor from a large extension if one anchor point fails. However, there is still some extension between the 2 Overhand Knots. The remaining anchor will still receive some shock load.
Method #6: Quad
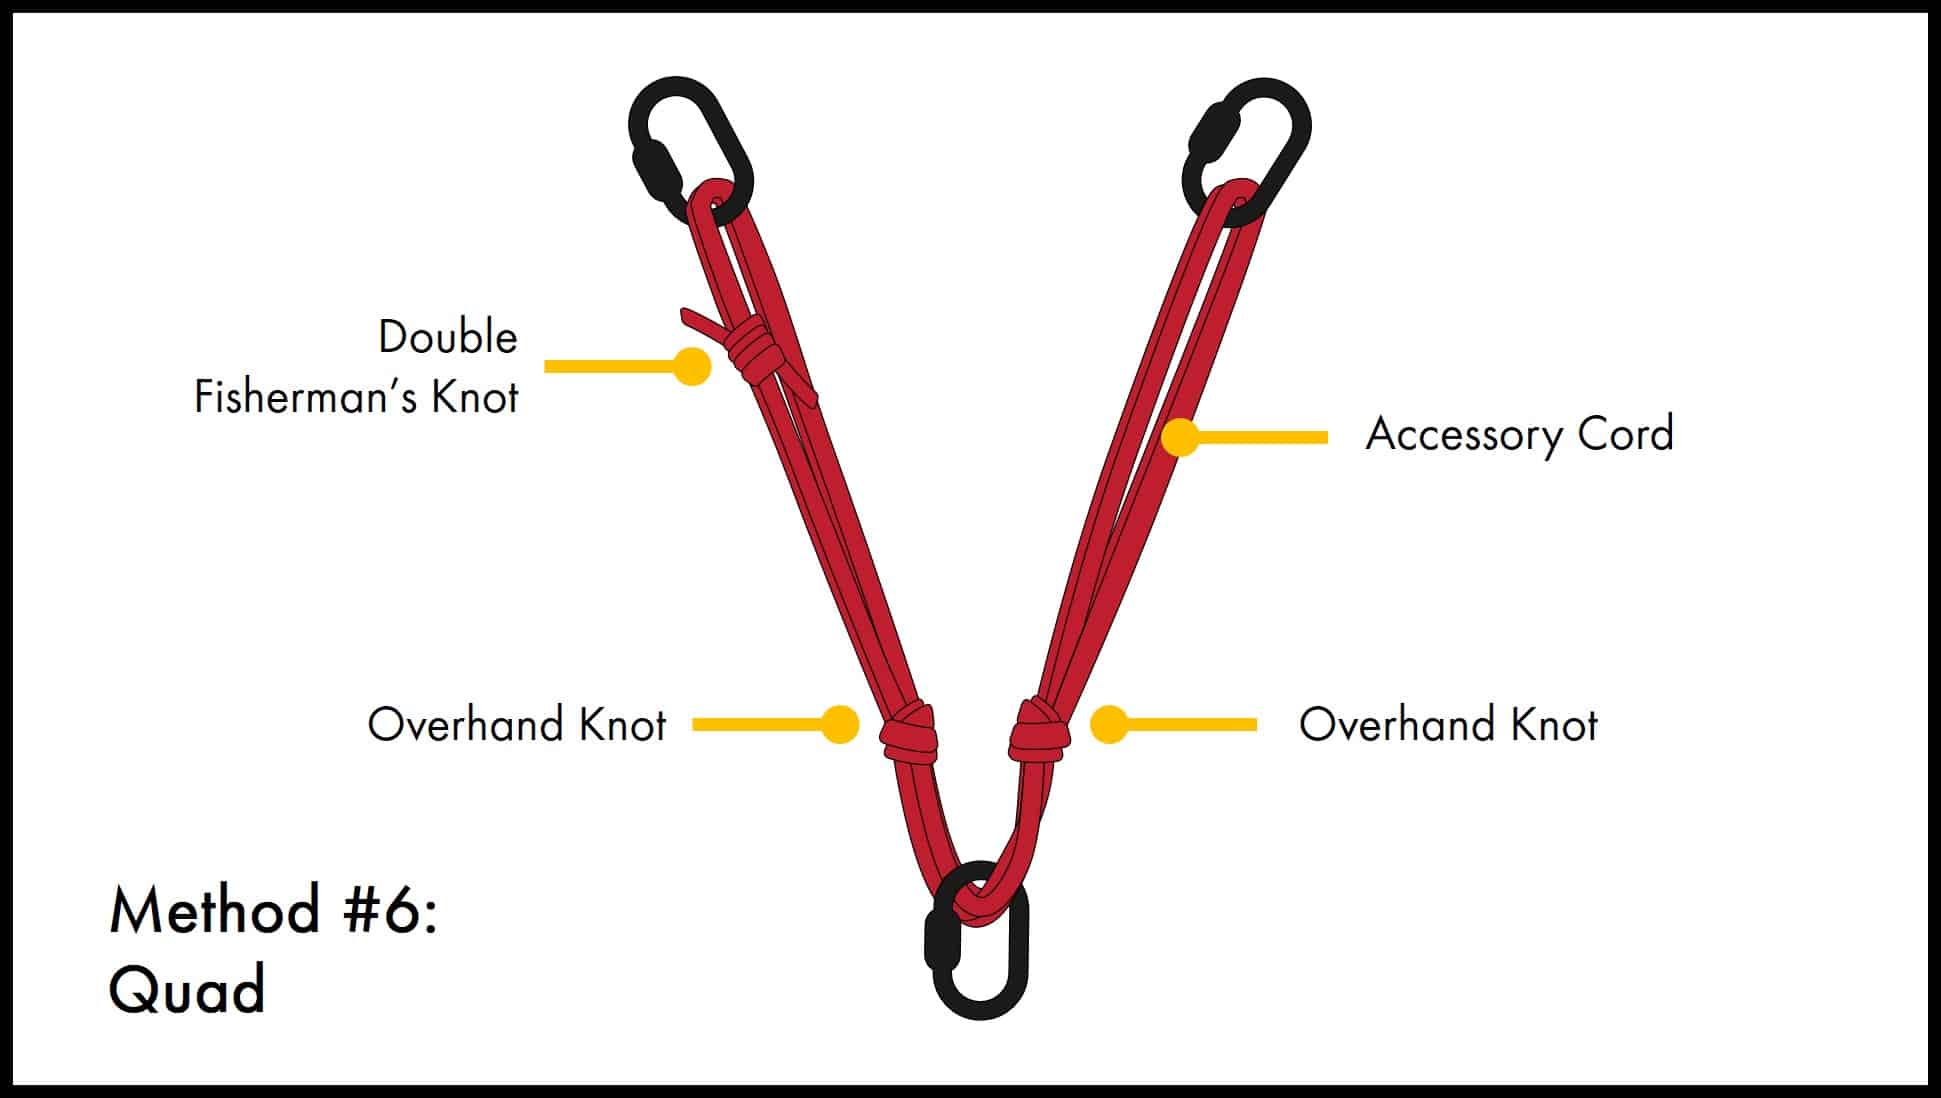
The Equipment You Need
- 4 locking carabiners
- 6 meters (10 feet) of 7mm nylon accessory cord*
* This is a general guide. The actual length you need depends on the positions of your anchors.
* You can also use an 8mm — 10mm static rope for this setup. For such a long length, I usually avoid using tubular webbing.
Step By Step Guide To Set Up Top Rope Anchors With The Quad
This is a self-equalization anchor.
This setup is only for 2 anchor points.
- Clip 1 locking carabiner onto each of the 2 anchor points.
- Tie the accessory cord into a loop with a Double Fisherman’s Knot.
- Double up the loop so that you get 4 strands of rope.
- Clip one side of the loop into the anchor point carabiner. Lock the carabiner.
- At about a third of the length from the locked carabiner, tie an Overhand Knot in the rope.
- Then, at about a third of the length from the Overhand Knot, tie another Overhand Knot.
- The 2 Overhand Knots should be roughly at about the same height. There should be about 25 cm (10 in) of rope between the 2 Overhand Knots.
- Check that the Double Fisherman’s Knot is not pressing against any of the carabiners.
- Clip a locking carabiner through 3 strands of rope. DO NOT clip your carabiner through all 4 strands. If you do and one of the anchor points fails, the carabiner will slide out of the rope.
- For redundancy, you can clip in another locking carabiner, in an opposite and opposed direction.
You can see the setup here:
Pros
- The anchor self-equalizes when the climber moves in different directions during the climb.
Cons
- This method uses more rope than the Sliding X. You will need a longer piece of rope.
- The 2 Overhand Knots act as limiters to prevent the anchor from a large extension if one anchor point fails. However, there is still some extension between the 2 Overhand Knots. The remaining anchor will still receive some shock load.
Method #7: Equalette
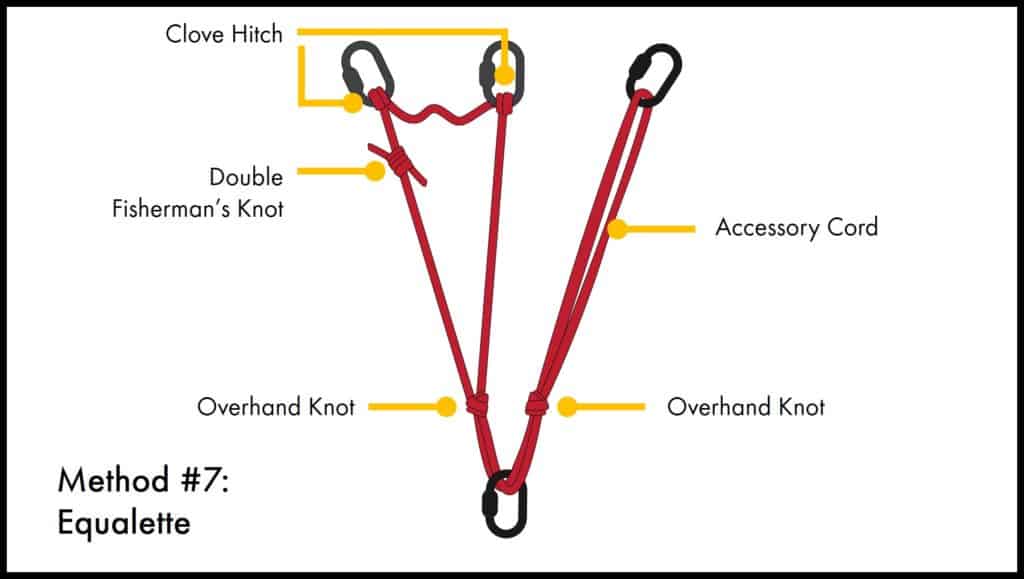
The Equipment You Need
- 5 locking carabiners
- 3 meters (10 feet) of 7mm nylon accessory cord*
* This is a general guide. The actual length you need depends on the positions of your anchors.
* You can also use an 8mm — 10mm static rope for this setup. For such a long length, I usually avoid using tubular webbing.
Step By Step Guide To Set Up Top Rope Anchors With An Equalette
This is a self-equalization anchor.
This setup is for 3 anchor points. You cannot do this setup with only 2 anchor points.
- Clip 1 locking carabiner onto each of the 3 anchor points.
- Tie the accessory cord into a loop with a Double Fisherman’s Knot.
- Make a Clove Hitch in the rope and clip it into the middle anchor point carabiner. Lock the carabiner.
- Leaving some slack in the rope from the first Clove Hitch, make another Clove Hitch. Clip the second Clove Hitch into the carabiner on another anchor point. Lock the carabiner.
- Take the strands from both of the anchor points. At about a third of the length from the locked carabiners, tie an Overhand Knot.
- Leave about 25cm (10 in) from the Overhand Knot, tie another Overhand Knot.
- Clip the other end of the rope to the carabiner on the last anchor point carabiner. Lock the carabiner.
- Make a twist on one of the strands of rope between the 2 Overhand Knots.
- Clip a locking carabiner through both strands of rope. For redundancy, you can clip in another locking carabiner, in an opposite and opposed direction.
- Clip your climbing rope through the locking carabiner(s). Lock your carabiner(s).
You can see the setup here:
Pros
- The anchor self-equalizes when the climber moves in different directions during the climb. This is an improvement over the Cordelette.
- It can also be set up using less rope than the Cordelette. This is useful when your anchor points are far apart and your cord is too short.
Cons
- The 2 Overhand Knots act as limiters to prevent the anchor from a large extension if one anchor point fails. However, there is still some extension between the 2 Overhand Knots. The remaining anchor will still receive some shock load.
This is Part 3 of 3 of the Introduction To Climbing Ropes Mini-series:
Part 1: What Are Differences Between Double/ Half And Twin Ropes?
Part 2: What Is The Best Rope For Scrambling?
Part 3: How To Set Up Top Rope Anchors With Static Ropes?
This is Part 5 of 5 of the Learn To Belay Mini-series:
Part 1: How To Belay With An ATC
Part 2: How To Pass A Belay Certification Test
Part 3: How To Belay A Heavier Climber
Part 4: How To Belay From Above
Part 5: How To Set Up Top Rope Anchor
This is Part 1 of 3 of the Introduction To Climbing Ropes Mini-series:
Part 1: What Are Differences Between Double/ Half And Twin Ropes?
Part 2:What Is The Best Rope For Scrambling?
Part 3: How To Set Up Top Rope Anchors With Static Ropes?
Save this cheatsheet to Pinterest!
This article is intended to provide general information. No article or video can replace qualified instruction, practice and experience. Your safety is your responsibility.