The Figure 8 Knot is one of the first knots that every climber will use. It is easy to tie and you can use it in many situations. The simple Figure 8 Knot has formed the basis for an entire family of Figure 8 Knot variations. Here I shall discuss the 6 variations, their uses, and their pros and cons. You can also learn how to tie each of these knots in the step by step guides.
This is Part 2 of 2 of the Climbing Knots 101 series:
Part 1: Climbing Knots Pros And Cons: 10 Beginner Knots
Part 2: Figure 8 Knot: 6 Variations And Their Uses For Climbing
Basic Terminology For Ropes And Knots
But first, let’s look at some basic terminology for knots and ropes.
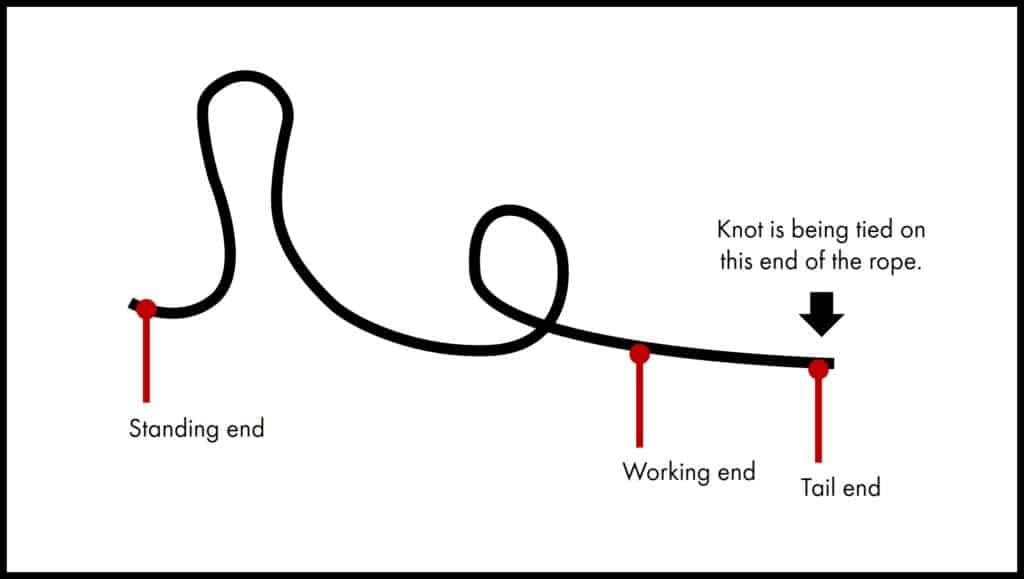
Standing end: The standing end of the rope is the section that is not being used when tying a knot.
Working end: The working end of the rope is the section that is being used to tie a knot.
Tail end: The tail end is the end of the rope on the working end side.
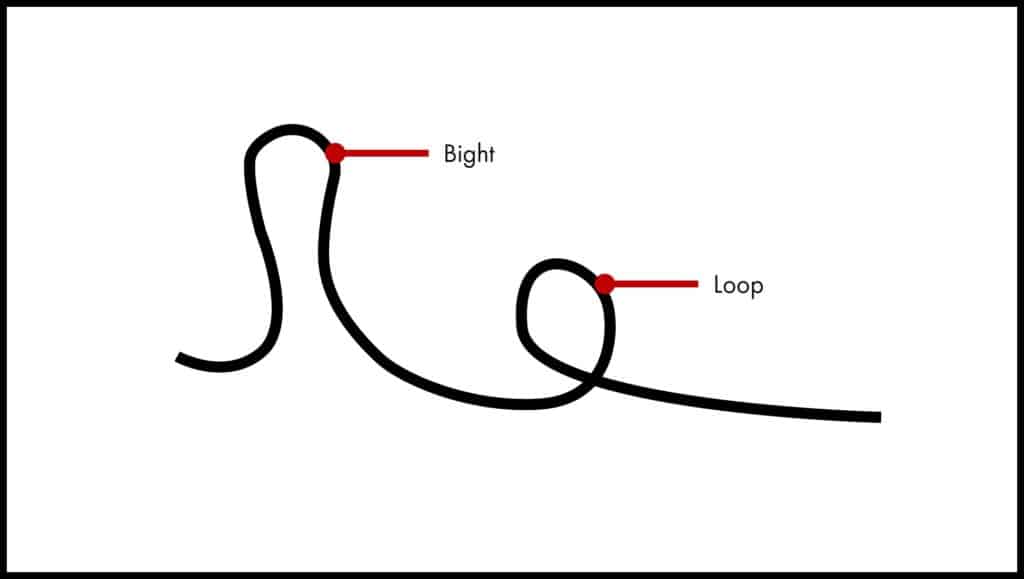
Bight: A bight refers to a bend in the rope.
Loop: A loop is formed when the 2 rope strands on a bight cross.
| To learn more about ropes, check out the Introduction To Climbing Ropes Mini-series: Part 1: What Are Differences Between Double/ Half And Twin Ropes? Part 2: What Is The Best Rope For Scrambling? Part 3: How To Set Up Top Rope Anchors With Static Ropes? |
Dressing a knot: Knots are usually “dressed” after tying. Dressing a knot means arranging the strands of the ropes by crossing or uncrossing them. This improves the strength of the ropes and ensures the ropes do not get jammed or twisted during use.
The Ashley Book of Knots (ABOK): This is an encyclopedia about knots written by Clifford Warren Ashley in 1944. The book contains over 3,000 detailed explanations and illustrations of knots. It is believed to be the most comprehensive book on knots. Many articles and resources on knots often provide an ABOK number. This allows readers to look up the respective entries in the encyclopedia.
Figure 8 Knot Variations & Uses
.
This is a quick comparison of how the various knots look like.
These images are from the wonderful online resource Animated Knots. You can see their animated illustration from the links provided below.

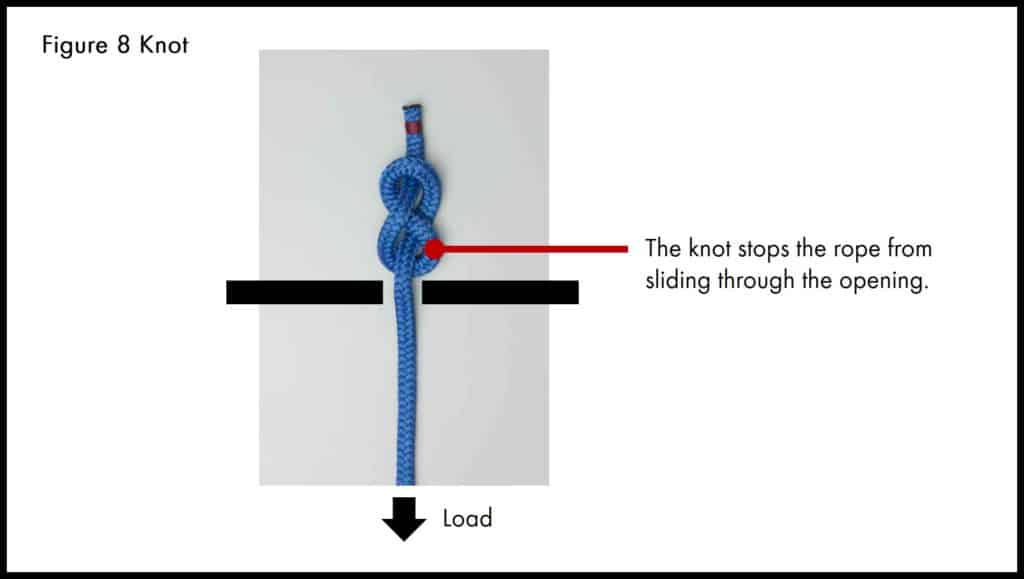
Figure 8 Knot (ABOK #420, #520, #570)
This knot forms the basis for all the other Figure 8 knot variations.
Alternative Names
- Figure of 8 Knot
- Flemish Knot
- Savoy Knot
Uses Of A Figure 8 Knot
- The Figure 8 Knot is a stopper knot. It prevents the rope from sliding through an opening such as a carabiner or belay device.
- It is also used at the end of other knots to prevent those knots from coming undone.
Pros And Cons Of A Figure 8 Knot
| Pros | Cons |
| – One of the simplest stopper knot to tie. – Easy to untie even after a heavy load. | – Smaller than the other stopper knots. |
Alternatives To A Figure 8 Knot
- Double Overhand Stopper Knot (ABOK #516): This is a bigger stopper knot.
How To Tie A Figure 8 Knot: A Step By Step Guide
- Form a loop by crossing the working end of the rope over the standing end.
- Bring the tail end of the rope back under the standing end and back up on the other side.
- Pass the tail end through the bight.
- Pull on each strand to tighten the knot.
Figure 8 Follow Through Knot (ABOK #1047)
Although you also see two figure 8s in this knot, do not confuse this with the Double Loop Figure 8 Knot (ABOK #1085).
Alternative Names
- Rewoven Figure 8
- Rethreaded Figure 8
- Figure 8 Retraced
Uses Of A Figure 8 Follow Through Knot
- The Figure 8 Follow Through Knot is a loop knot. It is widely used to tie in the rope to the harness for climbing and belaying.
Pros And Cons Of A Figure 8 Follow Through Knot
| Pros | Cons |
| – Easy to learn.- Easy to check if the knot is tied correctly. – Will not come undone during use. | – Hard to untie after heavy loading. – Cannot be tied with one hand. |
Alternatives To A Figure 8 Follow Through Knot
- Double Bowline (ABOK #1013): This is another tie in knot. You can tie it quickly and even with one hand. However, it is harder to learn and requires a stopper knot to prevent it from coming undone during use. It is easier to untie even after heavy loading.
How To Tie A Figure 8 Follow Through Knot: A Step By Step Guide
- When tying the rope to your harness, you need to make sure that you have at least 6 inches (15 cm) of rope at the tail end after the tying the knot.
- To ensure that, take one end of the rope in your right hand. Straighten your right arm out to the side. With your left hand, measure the rope from the right hand to your left shoulder.
- Form a bight at the section of the rope that’s at your left shoulder.
- Hold the 2 strands of rope together just below the bight.
- Twist the bight once so that the standing end of the rope is over the working end to form a loop. Twist it again so that the working end is now over the standing end.
- Pass the tail end of the rope through the loop.
- Pull both ends of the rope tight. You should see a knot that looks like the number 8.
- Taking the tail end of the rope, pass it through the lower tie in point in your harness. The tail end should pass through from the bottom and come up from the top (i.e. towards your face).
- Then pass the tail end through the higher tie in point in your harness. The Figure 8 Knot should be pulled in close to the lower tie in point.
- Once the tail end passes through both tie in points, it needs to go back into the Figure 8 Knot. Retrace the original Figure 8. The strands should run parallel to each other from start to finish.
- Pull on each strand to tighten the knot.
- Check that you have at least 6 inches (15 cm) of rope at the tail end.
Figure 8 Loop Knot (ABOK #1047)
The Figure 8 Loop Knot is effectively the same knot as the Figure 8 Follow Through Knot. While the Figure 8 Follow Through Knot is tied into the harness, the Figure 8 Loop Knot is just tied to form a loop. It is much easier to tie.
Alternative Names
- Figure 8 On A Bight
- Flemish Loop
- Flemish 8
Uses Of A Figure 8 Loop Knot
- The Figure 8 Loop Knot is a loop knot. The knot forms a loop in the rope which can then be secured to an anchor.
- The knot is also used when a heavy load needs to be secured to the middle of a rope.
- You can also tie the knot at the end of the rope for hauling equipment.
Pros And Cons Of A Figure 8 Loop Knot
| Pros | Cons |
| – Easy to learn. – Easy to check if the knot is tied correctly. – Will not come undone during use. | – Hard to untie after heavy loading. |
Alternatives To A Figure 8 Loop Knot
- Alpine Butterfly Loop (ABOK #331, #532, #1053): You can also use this to form a secure loop in the middle of the knot. It is very effective at spreading the load between the 2 ends and the middle loading point. It is also easier to untie. However, it is a more difficult knot to learn and can be difficult to tie on thicker ropes.
How To Tie A Figure 8 Loop Knot: A Step By Step Guide
It is tied in the same way as you would a simple Figure 8 Knot.
- Form a bight in the rope.
- Take the bight end and cross it over the standing strands to form a loop.
- Bring the bight end of the rope back under the standing end and back up on the other side.
- Pass the bight end through the loop.
- Dress the knot by making sure both strands run parallel to each other throughout the knot.
- Pull on each strand to tighten the knot.
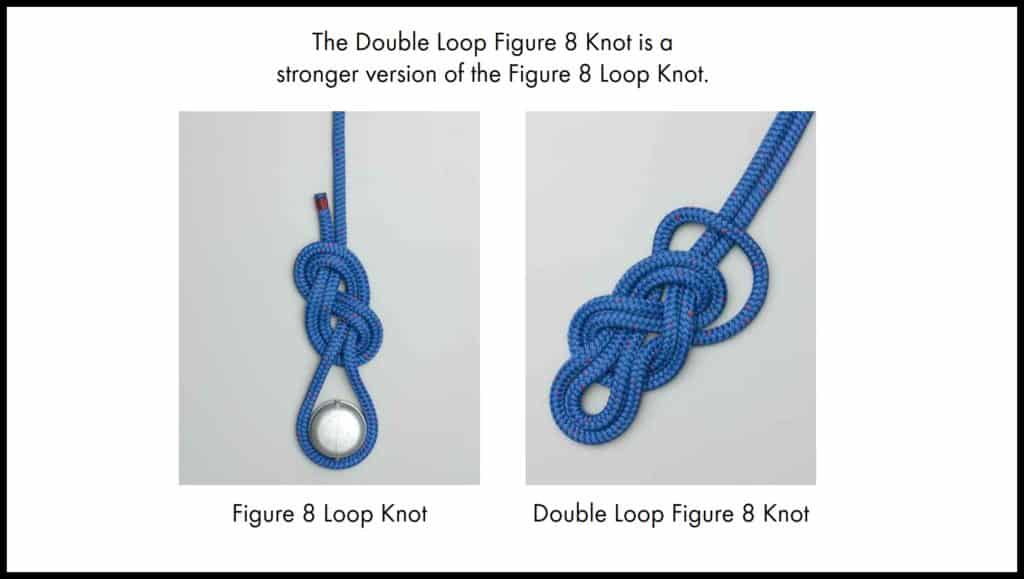
Double Loop Figure 8 Knot (ABOK #1085)
Alternative Names
- Double Figure 8
- Double Flemish Loop
- Bunny Ears
- Dog-eared Loop
Uses Of A Double Loop Figure 8 Knot
- The Double Loop Figure 8 Knot is a loop knot. It is a stronger improved version of the Figure 8 Loop Knot.
- The double loops provide a very secure anchor point in the middle of a rope for belaying.
- The 2 loops can also be used to hook into 2 separate anchor points.
Pros And Cons Of A Double Loop Figure 8 Knot
| Pros | Cons |
| – The loop is more stable and unlikely to slip when compared to other double loop knots. | – When using the 2 loops to hook into 2 separate anchor points, the failure of 1 anchor point can cause a sudden impact to the other anchor point. It can cause the second anchor point to fail as well. |
Alternatives To A Double Loop Figure 8 Knot
- Double Alpine Butterfly Loop: This is a good alternative. However, it is a more difficult knot to learn.
How To Tie A Double Loop Figure 8 Knot: A Step By Step Guide
- Form a bight in the rope. Make sure you have at least one arm’s length on the working side of the rope.
- Hold the 2 strands of rope with your left hand, at about 2 feet (60 cm) from the tail end.
- Pass the bight end under the standing end and back up on the other side.
- Do not pass the bight end through the loop like a typical Figure 8. Instead, use the bight end to form another bight within the loop.
- Take the original bight end and turn it back to loop over the bight you just made. Bring this original bight end to the end of the knot. It should sit on the side closer to the 2 loops.
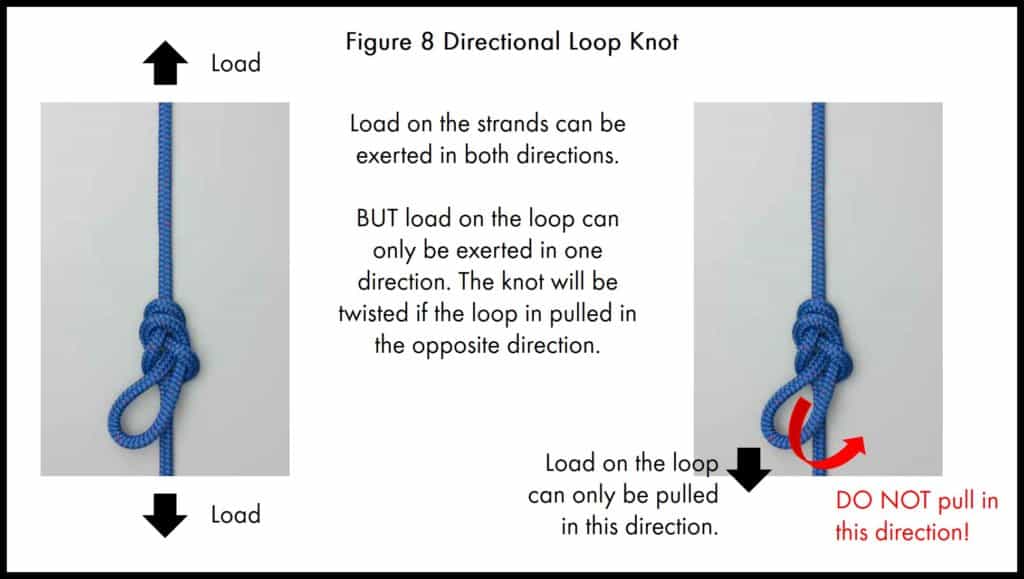
Figure 8 Directional Loop Knot (ABOK #1058)
Alternative Names
- Inline Figure 8 Loop
Uses Of A Figure 8 Directional Loop Knot
- The Figure 8 Directional Loop Knot is a loop knot. It is mainly used to haul equipment. You can tie several Directional FIgure 8 Knot along the rope and use them as handholds.
Pros And Cons Of A Figure 8 Directional Loop Knot
| Pros | Cons |
| – Easy to learn. – Can be tied quickly. | – The loop only takes a load in one direction. – Hard to untie after heavy loading. |
Alternatives To A Figure 8 Directional Loop Knot
- Alpine Butterfly Loop (ABOK #331, #532, #1053): The loop formed by this knot can be safely loaded in both directions. It is also easier to untie. However, it is a more difficult knot to learn and can be difficult to tie on thicker ropes.
How To Tie A Figure 8 Directional Loop Knot: A Step By Step Guide
- Form a loop by crossing the working end of the rope over the standing end.
- The section of rope in the loop is used to tie the knot. Make sure it is long enough (at least 1 foot/ 30 cm).
- Compress the loop so that it looks like a long oval.
- Pass the loop under the standing end and back up on the other side.
- Pass the loop end through the loop.
- Dress the knot by making sure both strands run parallel to each other throughout the knot.
- Pull on the loop and the two strands to tighten the knot.
- Loads can be applied to both strands on the rope. However, the load on the loop can only be applied in one direction.
Figure 8 Bend (ABOK #1411)
Alternative Names
- Flemish Bend
Uses Of A Figure 8 Bend
- The Figure 8 Bend is a bend knot used to join 2 ropes together.
Pros And Cons Of A Figure 8 Bend
| Pros | Cons |
| – Easy to tie. – Easy to inspect if the knot is tied correctly. – Easy to untie even after loading. | – May come undone during use, add a stopper knot after the knot on each side for better security. |
Alternatives To A Figure 8 Bend
There are several other knots that you can use to join 2 ropes:
- Double Fisherman’s Bend: Works as well as the Figure 8 Bend but will be more difficult to untie after heavy loading.
- Zeppelin Bend: Improved version of the Double Fisherman’s Bend. But it is more difficult to inspect whether it’s tied correctly.
- Alpine Butterfly Bend: A good alternative but harder to learn.
- Flat Overhand Bend: Easy to tie but often thought to be less reliable than other bend knots.
How To Tie A Figure 8 Bend: A Step By Step Guide
This is similar to the Figure 8 Follow Through Knot, but with 2 ropes.
- Form a loop by crossing the tail end of the rope over the standing end.
- Bring the tail end of the rope back under the standing end and back up on the other side.
- Pass the tail end through the loop.
- You should see a Figure 8 Knot.
- Take the tail end of the other piece of rope.
- Trace the original figure 8, entering from the tail end side of the first rope.
- Dress the knot by making sure both strands run parallel to each other throughout the knot.
- Pull on each strand to tighten the knot.
- To withstand heavy loads, make sure you have at least 1 foot (30 cm) of tail for each strand of the rope. You can also add a stopper knot on each side for added security.
This is Part 2 of 2 of the Climbing Knots 101 series:
Part 1: Climbing Knots Pros And Cons: 10 Beginner Knots
Part 2: Figure 8 Knot: 6 Variations And Their Uses For Climbing
This article is intended to provide general information. No article or video can replace qualified instruction, practice and experience. Your safety is your responsibility.