Wondering about the pros and cons of using each climbing knot? Learning about climbing knots can be one of the most confusing things for a beginner. When do you use each type of knot? And why are there so many knots in the first place?!
It was frustrating trying to figure these things out. So I have put together what I have learned in this article here for you. I’ll explain 10 commonly used climbing knots, how to tie and use them and compare their pros and cons.
Read on!
This is Part 1 of 2 of the Climbing Knots 101 series:
Part 1: Climbing Knots Pros And Cons: 10 Beginner Knots
Part 2: Figure 8 Knot: 6 Variations And Their Uses For Climbing
Basic Terminology For Ropes And Knots
But first, let’s look at some basic terminology for knots and ropes.
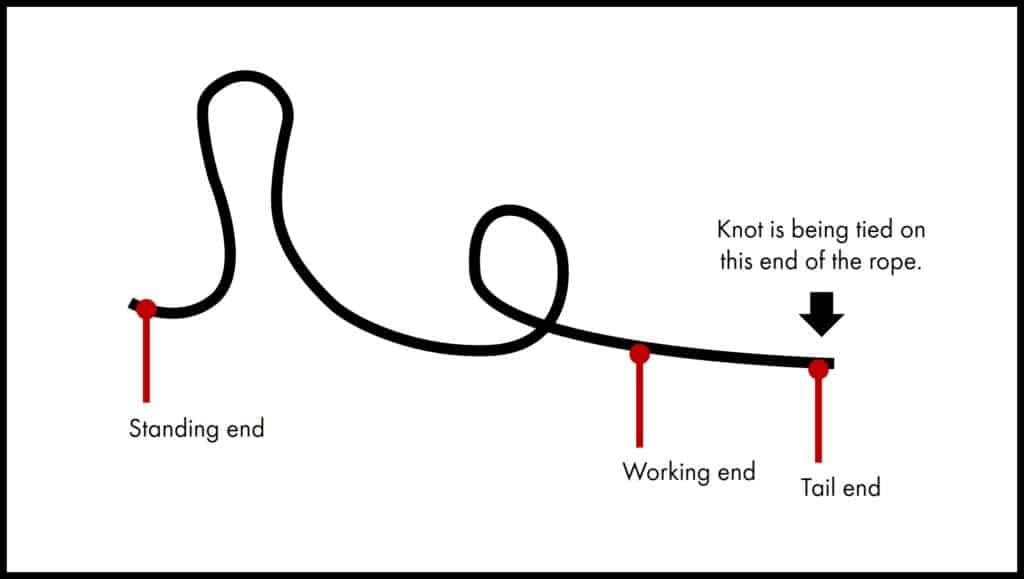
Standing end: The standing end of the rope is the section that is not being used when tying a knot.
Working end: The working end of the rope is the section that is being used to tie a knot.
Tail end: The tail end is the end of the rope on the working end side.
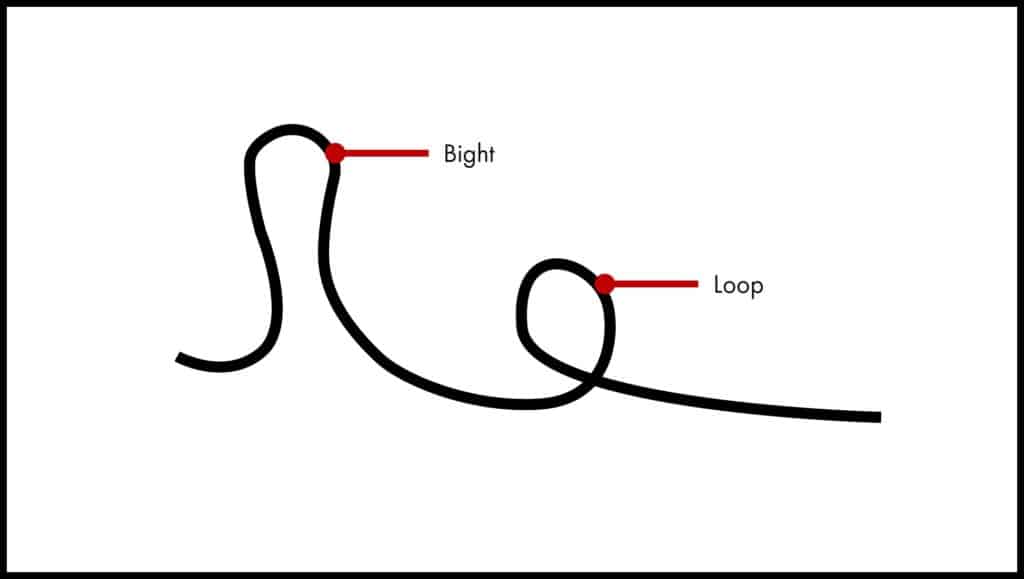
Bight: A bight refers to a bend in the rope.
Loop: A loop is formed when the 2 rope strands on a bight cross.
| To learn more about ropes, check out the Introduction To Climbing Ropes Mini-series: Part 1: What Are Differences Between Double/ Half And Twin Ropes? Part 2: What Is The Best Rope For Scrambling? Part 3: How To Set Up Top Rope Anchors With Static Ropes? |
Dressing a knot: Knots are usually “dressed” after tying. Dressing a knot means arranging the strands of the ropes by crossing or uncrossing them. This improves the strength of the ropes and ensures the ropes do not get jammed or twisted during use.
The Ashley Book of Knots (ABOK): This is an encyclopedia about knots written by Clifford Warren Ashley in 1944. The book contains over 3,000 detailed explanations and illustrations of knots. It is believed to be the most comprehensive book on knots. Many articles and resources on knots often provide an ABOK number. This allows readers to look up the respective entries in the encyclopedia.
Types Of Climbing Knots
There are many different types of climbing knots. Here are a few more common ones:
- Stopper: A stopper is a knot usually used at the end of a rope. You use a stopper knot to stop another knot from coming undone or stop a rope from passing through a hole or opening.
- Mid loop or end loop: A mid-loop or end-loop is a knot that forms a loop in the rope.
- Hitch: A hitch is a type of knot that connects a rope to another rope or item such as a carabiner.
- Bend: A bend is a type of knot that connects 2 ropes together.
10 Climbing Knots: Pictures
.
This article will cover the following knots:
| Stopper Knots | Loop Knots | Hitches | Bends |
| – Overhand Knot – Figure 8 Knot | – Figure 8 Follow Through Knot – Double Bowline Knot | – Clove Hitch – Girth Hitch – Munter Hitch | – Double Fisherman’s Bend – Figure 8 Bend – Overhand Bend |
These images below are from the wonderful online resource Animated Knots. You can see their animated illustration from the links provided below.
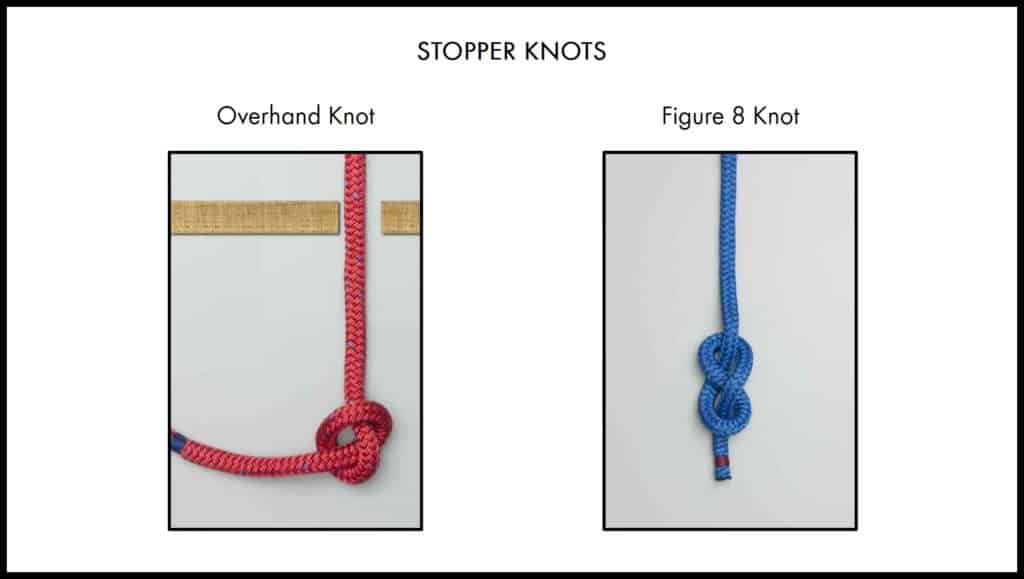
Stopper Knots
I shall cover the stopper knots first since they are often used as the basis for some of the other knots.
Climbing Knots Pros And Cons: Figure 8 Knot Vs Overhand Knot
| Figure 8 Knot | Overhand Knot | |
| Usage | – Used to stop a rope from slipping through an opening. – Used as the basis of other Figure 8 Knots such as Figure 8 Follow Through Knot and Figure 8 Bend. | – Seldom used on its own for climbing. A Double Overhand Knot is often used instead because it is a bigger and more secure stopper knot. |
| Ease of tying | Quick and easy to tie. | Easiest knot to tie. |
| Ease of untying | Easy to undo after use. | Difficult to undo after use. |
| Inspection | Easy to check if the knot is tied correctly. | Easy to check if the knot is tied correctly. |
| Reliability | May come undone during use. | Will not come undone during use. |
| Size | Bigger than the Overhand Knot. | Small knot. |
Figure 8 Knot: Step By Step Guide
This knot forms the basis for all the other Figure 8 knot variations.
ABOK: #420, #520, #570
Alternative Names
- Figure of 8 Knot
- Flemish Knot
- Savoy Knot
Other Variations:
- Figure 8 Follow ThroughKnot/ Figure 8 Loop Knot
- Double Loop Figure 8 Knot
- Figure 8 Directional Loop Knot
- Figure 8 Bend
Learn more about these Figure 8 variation knots here.
How To Tie A Figure 8 Knot:
- Form a loop by crossing the working end of the rope over the standing end.
- Bring the tail end of the rope back under the standing end and back up on the other side.
- Pass the tail end through the bight.
- Pull on each strand to tighten the knot.
Overhand Knot: Step By Step Guide
This is the simplest knot to tie.
ABOK: #46, #514
Other Variations:
- Double Overhand Stopper Knot
- Overhand Bend
How To Tie An Overhand Knot
- Make a loop in the rope.
- Pass the tail end through the loop.
- Pull on each strand to tighten.
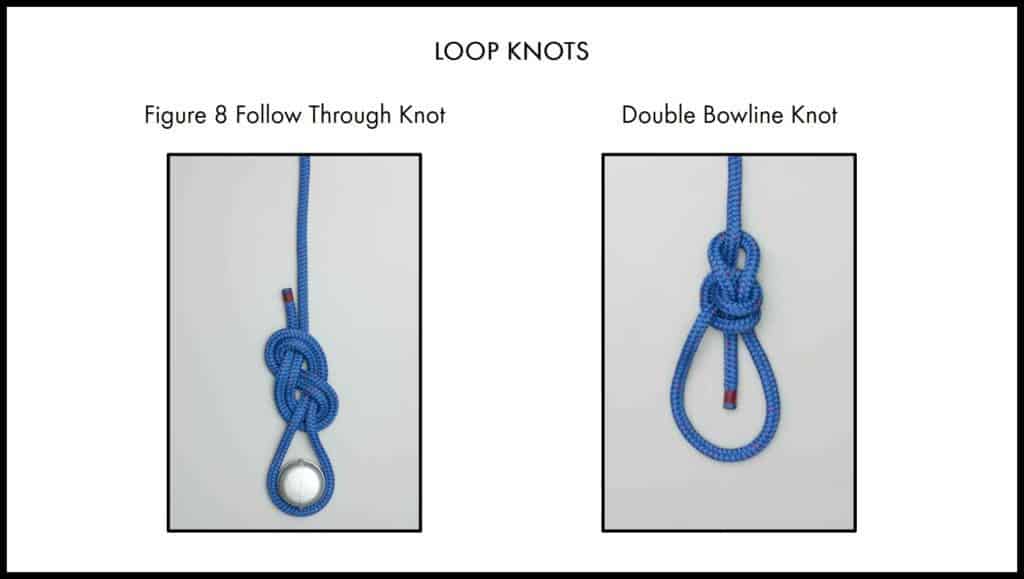
Loop Knots
The most basic use for a loop knot is to secure the rope to a harness for climbing and belaying.
Most climbers today use the Figure 8 Follow Through Knot. A less common alternative is the Double Bowline Knot.
Climbing Knots Pros And Cons: Figure 8 Follow Through Vs Bowline
| Figure 8 Follow Through | Double Bowline | |
| Usage | Most common knot for tying into a harness. | Used by climbers who may take repeated falls or spend more time sitting on their harness. |
| Ease of tying | Easy to learn. | More difficult to learn. |
| Ease of untying | Hard to untie after heavy or repeated loading. | Easy to untie after heavy or repeated loading. |
| Inspection | Easy to check if the knot is tied correctly. | Harder to check that the knot is tied correctly. |
| Reliability | Will not come undone during use. The long tail provides additional safety even if the knot comes undone. | May come undone over time. Use with a stopper knot to prevent this from happening. |
| Size | Bulky. | Less bulky. |
Figure 8 Follow Through Knot: Step By Step Guide
This is one of the first few knots you will need to master as a climber.
ABOK: #1047
Alternative Names:
- Rewoven Figure 8
- Rethreaded Figure 8
- Figure 8 Retraced
Other Variations:
- Figure 8 Knot
- Double Loop Figure 8 Knot
- Figure 8 Directional Loop Knot
- Figure8 Bend
How To Tie A Figure 8 Follow Through Knot:
- When tying the rope to your harness, you need to make sure that you have at least 6 inches (15 cm) of rope at the tail end after tying the knot.
- To ensure that, take one end of the rope in your right hand. Straighten your right arm out to the side. With your left hand, measure the rope from the right hand to your left shoulder.
- Form a bight at the section of the rope that’s at your left shoulder.
- Hold the 2 strands of rope together just below the bight.
- Twist the bight once so that the standing end of the rope is over the working end to form a loop. Twist it again so that the working end is now over the standing end.
- Pass the tail end of the rope through the loop.
- Pull both ends of the rope tight. You should see a knot that looks like the number 8.
- Taking the tail end of the rope, pass it through the lower tie in point in your harness. The tail end should pass through from the bottom and come up from the top (i.e. towards your face).
- Then pass the tail end through the higher tie in point in your harness. The Figure 8 Knot should be pulled in close to the lower tie in point.
- Once the tail end passes through both tie in points, it needs to go back into the Figure 8 Knot. Retrace the original Figure 8. The strands should run parallel to each other from start to finish.
- Pull on each strand to tighten the knot.
- Check that you have at least 6 inches (15 cm) of rope at the tail end
Double Bowline Knot: Step By Step Guide
ABOK: #1013
Alternative Names:
- Water Bowline
- Round Turn Bowline
Other Variations:
- Bowline Knot
- Bowline on a Bight
How To Tie A Double Bowline Knot:
- Take the work end of the rope and pass it through the lower tie in point in your harness. The tail end should pass through from the bottom and come up from the top (i.e. towards your face).
- Then pass the tail end through the higher tie in point in your harness.
- Pull the tail end through until the working end of the rope is at least one arm’s legnth.
- Coil the longer end of the rope around your hand twice.
- Remove the coil from your hand.
- Pass the tail end of the rope through the loop formed by the coil. The tail end should enter the loop from the standing end of the rope.
- Then bring the tail end of the rope under the standing end and back up above it.
- Pass the tail end back into the loop.
- Dress the knot by pulling the 2 strands of rope that came through the loop and the standing end at the same time
- Then pull on each strand to tighten the knot.
- Tie a double overhand knot with the tail end. This is ensure that the Double Bowline does not come undone during use.
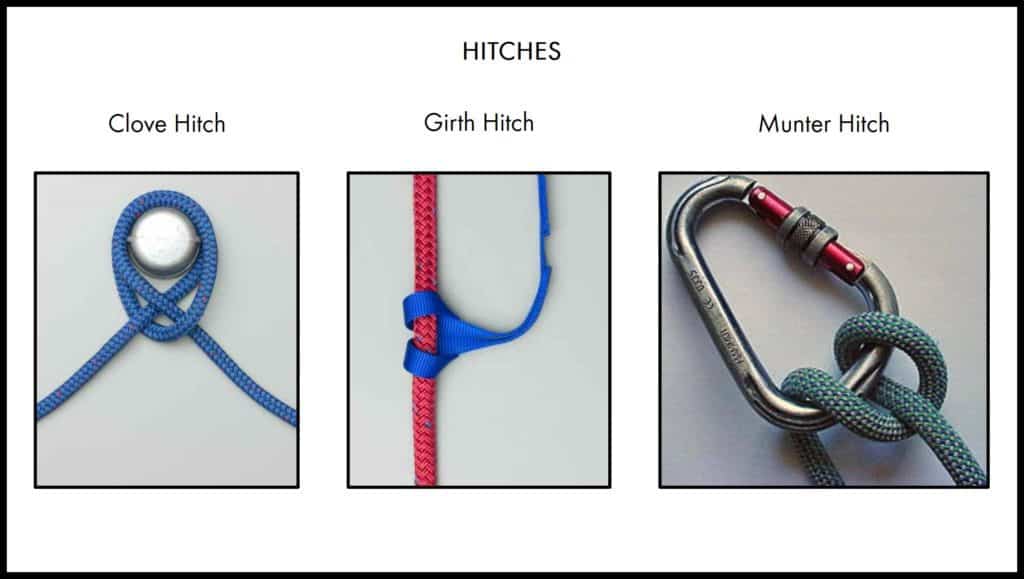
Hitches
There are 2 main types of hitch knots. One of them is used to the rope to another object such as a carabiner. The other is to tie 2 pieces of ropes together. I shall discuss the first type here.
Climbing Knots Pros And Cons: Clove Hitch Vs Girth Hitch
| Clove Hitch | Girth Hitch | |
| Usage | Used to quickly secure the rope to an anchor point. | Used to quickly secure the rope to an anchor point. |
| Ease of tying | – Quick and easy to tie. – Can be tied with one hand. | – Quick and easy to tie. – Can be tied with one hand. |
| Ease of untying | Easy to untie, even after heavy loading. | Easy to untie, even after heavy loading. |
| Inspection | Easy to check if the knot is tied correctly. | Easy to check if the knot is tied correctly. |
| Reliability | – The knot is wide and may end up pressing on the gate of the carabiner. – The hitch relies on the carabiner to hold it together. Once the carabiner is open, the hitch falls apart. | Unless it is loaded on one end, the hitch can come undone even when the carabiner is locked. |
| Size | Small knot. | Small knot. |
Clove Hitch: Step By Step Guide
The Clove Hitch is very convenient to secure climbers onto an anchor point for a short period of time.
ABOK: #11, #53, #69, #70, #204, #400, #421, #437, #1176, #1177, #1178, #1179, #1180, #1245, #1773, #1774, #1775, #1776, #1778, #1779, #1814, #2079, #2541, #2542, #2543, #2544, #2546, #2547, #2548
Alternative Names:
- Double Hitch
How To Tie A Clove Hitch:
- Cross the rope to form a loop with the working end on top.
- Form another loop just beside the first loop. Make sure the working end is also on top.
- Without turning the loops, slide the second loop behind the first loop.
- Put both loops through the carabiner. Make sure that the load bearing end of the rope (i.e. the side that’s connected to your harness) is on the spine of the carabiner.
- Pull on each strand to tighten the knot.
The clove hitch can also be tied with one hand directly into the carabiner. You can see that in the video above.
Girth Hitch: Step By Step Guide
This knot is commonly used on slings or webbings to tie the climber to an anchor point.
ABOK: #5, #56, #59, #244, #1184, #1673, #1694, #1698, #1700, #1802, #2163, #2164, #2168, #2175, #3317
Alternative Names:
- Cow Hitch
- Lark’s Head
- Lark’s Foot
- Ring Hitch
How To Tie A Girth Hitch:
- If you are using a rope, tie the rope into a loop with a Double Fisherman’s Bend or other similar knots.
- Pass one end of the loop through the object you are securing to.
- Take the other end of the loop and pass it through the center of the first loop.
- Pull to tighten.
Climbing Knot Pros And Cons: Munter Hitch
| Pros | Cons |
| – Can be used to belay someone when you don’t have a belay device. – Quick and easy to tie.- Easy to operate in a belay. | – The rope may get twisted during use. – The turning of the hitch back and forth may loosen the lock on a carabiner and cause it to open. – Easy to tie it wrongly and it becomes a Clove Hitch. |
Munter Hitch: Step By Step Guide
An important knot that allows you to belay without a belay device. Useful when you have accidentally dropped your belay device or need to do an emergency belay.
ABOK: #1818
Alternative Names:
- Italian Hitch
- Crossing Hitch
Other Variations:
- Auto Locking Munter Hitch
- Super Munter Hitch
- Munter Mule Combo
How To Tie A Munter Hitch:
- Hold the rope straight in front of you with both hands crossed. Make sure both your hands are facing down.
- Uncross your hands and bring your fists towards each other (like doing a fist bump).
- Bring the 2 loops from your hands together. Clip the loops into a carabiner.
- You should be able to pull the rope freely back and forth using both ends of the rope. Pulling the rope on either side will flip the knot over in the carabiner.
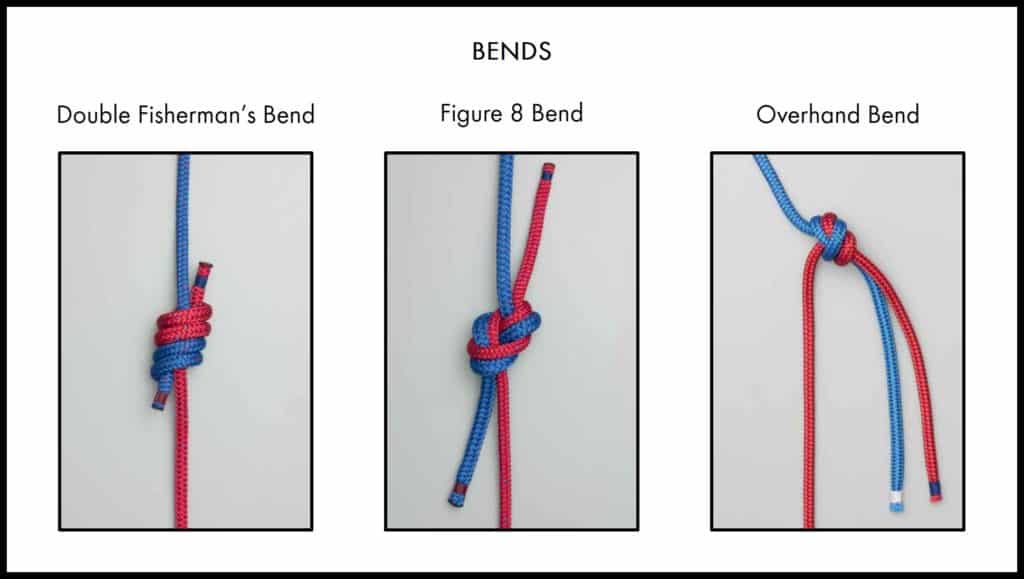
Bends
Climbing Knots Pros And Cons: Double Fisherman Vs Figure 8 Bend Vs Overhand Bend
| Double Fisherman’s Bend | Figure 8 Bend | Overhand Bend | |
| Usage | – Join 2 ropes. – Tie a rope into a loop. | – Join 2 ropes. – Tie a rope into a loop. | – Join 2 ropes. |
| Ease of tying | Harder to tie, takes longer. | Easy to tie. | Quick and easy to tie. |
| Ease of untying | Difficult to untie after loading. Can be impossible to untie. | Easy to untie even after heavy loading. | Difficult to untie after loading. |
| Inspection | Hard to inspect. | Easy to inspect. | Easy to inspect. |
| Reliability | Reliable, generally accepted as the standard bend knot. | As reliable as the Double Fisherman’s Bend. | Less likely to get stuck on rock surfaces when loaded. |
| Size | Bulky, may get caught on rocks or cracks. | Bulkier than Double Fisherman’s Bend. | Less bulky as it flattens out under load. |
Double Fisherman’s Bend: Step By Step Guide
This knot is standard bend knot that is most commonly used.
ABOK: #294
Alternative Names:
- Grapevine Bend
How To Tie A Double Fisherman’s Bend:
- Bring the 2 ends of the ropes towards each other. Both tail ends should face in opposite directions. Overlap the 2 ends of the rope by at least 20 inches (50 cm).
- Grab the overlapping portion of both ropes with one hand.
- Straighten the index finger of the hand that’s holding the rope. It should be pointing towards the tail end of one of the ropes.
- Pick up that tail end of the rope and coil it around your index finger and the other rope twice.
- The coils should form an X shaped cross around your index finger, NOT coiled side by side.
- Pass the tail end of the rope through the loop formed by the coil.
- Pull on each strand to tighten the knot.
- Pull the other rope through the knot until you have about 12 inches (30 cm) on the tail end.
- Use this tail end to tie the same knot you just did.
- Grab the overlapping portion of both ropes with one hand.
- Straighten the index finger of the hand that’s holding the rope. It should be pointing towards the tail end of the second rope.
- Pick up that tail end of the rope and coil it around your index finger and the other rope twice.
- The coils should form an X shaped cross around your index finger, NOT coiled side by side.
- Pass the tail end of the rope through the loop formed by the coil.
- Pull on each strand to tighten the knot.
- Pull the 2 long ends of the rope away from each other. This should bring the 2 knots next to each other.
Figure 8 Bend: Step By Step Guide
This is a good alternative to the Double Fisherman’s Bend.
ABOK: #1411
Alternative Names:
- Flemish Bend
Other Variations:
- Figure 8 Knot
- Figure 8 Follow ThroughKnot/ Figure 8 Loop Knot
- Double Loop Figure 8 Knot
- Figure 8 Directional Loop Knot
How To Tie A Figure 8 Bend:
- Form a loop by crossing the tail end of the rope over the standing end.
- Bring the tail end of the rope back under the standing end and back up on the other side.
- Pass the tail end through the loop.
- You should see a Figure 8 Knot.
- Take the tail end of the other piece of rope.
- Trace the original figure 8, entering from the tail end side of the first rope.
- Dress the knot by making sure both strands run parallel to each other throughout the knot.
- Pull on each strand to tighten the knot.
- To withstand heavy loads, make sure you have at least 1 foot (30 cm) of tail for each strand of the rope. You can also add a stopper knot on each side for added security.
Overhand Bend: Step By Step Guide
When tied incorrectly, this knot has led to several fatalities. This was why the knot became known as the European Death Knot.
ABOK: #1410
Alternative Names:
- European Death Knot
Other Variations
- Overhand Knot
- Double Overhand Stopper Knot
How To Tie An Overhand Bend:
- Place the 2 ropes side by side. Both tail ends should face the same direction.
- Keeping both strands together, cross them to form a loop.
- Pass the tail ends of both strands through the loop. Make sure the tail end is at least 20 inches (50 cm) after the knot.
- Dress the knot by making sure both strands run parallel to each other throughout the knot.
- Pull on each strand to tighten the knot.
Other Climbing Knots
Besides the knots described above, there are many other climbing knots such as:
Loop Knots
- Alpine Butterfly Loop
- Figure 8 Double Loop
- Double Alpine Butterfly
Hitches
- Blake’s Hitch
- Distel Hitch
- Prusik Knot
- Klemheist Knot
- Munter Mule Combo
Bends
- Alpine Butterfly Bend
- Water Knot
- Zeppelin Bend
This is Part 1 of 2 of the Climbing Knots 101 series:
Part 1: Climbing Knots Pros And Cons: 10 Beginner Knots
Part 2: Figure 8 Knot: 6 Variations And Their Uses For Climbing
This article is intended to provide general information. No article or video can replace qualified instruction, practice and experience. Your safety is your responsibility.