Finding an anchor for rappelling is always a challenge. Can we rappel from a tree? How do we do that? For a climber, having more options for a rappelling anchor is always better. So I’ve decided to learn more about it.
How to rappel from a tree? There are 2 things you need to know when rappelling from a tree:
- How to choose the right tree
- Checking the location of the tree
- Checking the health of the tree
- Checking the strength of the tree
- How to set up the rappelling anchor
- What equipment to use
- Where to tie the anchor
- How to tie the anchor
- How to attach the ropes
This is Part 1 of 2 of the Learn To Rappel Mini-series:
Part 1: How To Rappel From A Tree
Part 2: How To Rappel With A Carabiner
How To Choose The Right Tree
The tree is going to be all that stands between you and a mighty fall. So it is important that you find the right one for the job.
There are 3 checks that you need to do when selecting the right tree to set up your anchor.
Check The Location Of The Tree
This first check will help narrow down your options.
Avoid trees that are growing close to the edge of a cliff. Although they may look like the ideal position for an anchor, they may not provide the best support. When growing at the edge, the roots of the trees are restricted. The edges of a cliff are usually rocky and there is less soil for the roots to penetrate. The roots may be shallow and less established than those growing further inland.
To be safe, I would go for a tree that is at least 10 feet (3 meters) away from the edge.
Check That The Tree Is Alive And Healthy
Do not ever use a tree that is dead or dying. Even if they appear to be strong or stable, their core could be rotting. The roots of a dead tree are unlikely to be able to hold any heavy loads.
Even if a tree is alive, you need to also check that it is healthy.
Here are a few things to check for a healthy tree:
- The leaves on the tree should be healthy and not wilting. Make sure the color of the leaves is right for the season. The tree should not have any bare sections. If the tree shed in certain seasons, look out for the other signs listed below.
- The bark of the tree should not be peeling or loose (except for some trees such as birch, eucalyptus or maple trees).
- The bark should not have any fungi or moss growing.
- The tree should not have any open wounds, large cracks or holes.
- The tree should not have an excessive number of bugs. Check if there are small holes in the bark, branch or leaves which may be caused by insects. If the holes are all over the tree, it may be infested.
Check The Strength Of The Tree
As a general guide, the thicker the tree trunk, the stronger the tree.
But if you only see a bunch of skinny looking trees, how do you decide which one is good enough?
There are no hard and fast rules here. Here are a few common guidelines:
- Pick a tree with a trunk that is thicker than your thigh.
- Pick a tree with a trunk that is at least 8 inches (20 cm) in diameter.
A tree with a thick trunk is usually well-rooted. But it doesn’t hurt to be doubly sure.
.
Once you have picked out the tree, push on it with your shoulder or back. Put your strength into it like you are trying to push the tree down. See if the tree wobbles or moves even a little bit. If it does, look for another tree.
For added security, you can also use 2 trees to rappel from. This will distribute the load between the trees.
However, you need to make sure that both trees pass all the tests mentioned above. Do not rely on a tree that may be unsafe because you think you have another one as a backup. If one of the trees give way during a rappel, the remaining tree will get a sudden shock. This additional force will increase the risk of that tree failing as well.
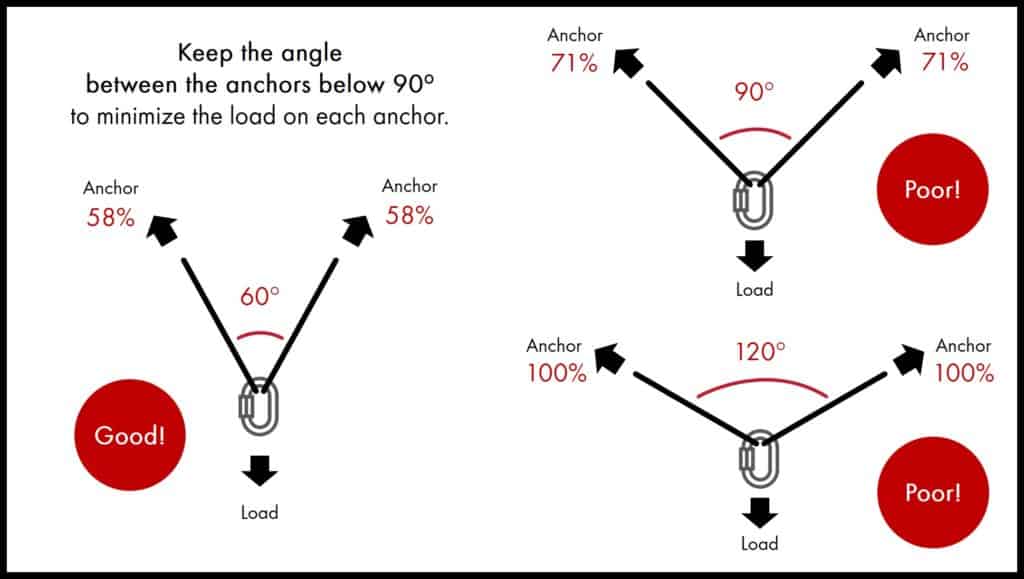
When picking the trees, try to find 2 that are close together. The closer the trees, the less load will be exerted on each anchor point.
When the anchors are set up, the angle formed by the runners should be less than 90 degrees. An angle smaller than 60 degrees is ideal.
For angles less than 60 degrees, the load is distributed roughly 50/50 between the 2 anchors. As you reach 90 degrees, the load on each anchor is about 71% of the total load. When the angle is at 120 degrees, the load on each anchor is 100%. At this point, there is no difference between rappelling from both trees or just using one of the trees.
How To Set Up The Rappelling Anchor
What Equipment To Use
It is good practice to set up the anchor by first securing a runner or sling that’s made of webbing (instead of accessory cord) around the tree. The climbing rope then goes through the runner instead of looping directly on the tree.
There are 2 types of webbing — tubular and flat webbing. Tubular webbing is thicker and stronger and is the standard for climbing. Flat webbing is what you see on backpack straps and not used for climbing.
You need to use tubular webbing that is 1 inch (2.5 cm) wide for making anchors.
It is possible to use a climbing rope directly on a tree. In fact, you may see it on many videos or articles. However, there are a couple of good reasons why you should not do this:
- The tree trunk may damage your climbing ropes by causing abrasion.
- Your ropes may be soiled with tree resins.
- It is harder to retrieve your rope from the tree due to friction.
- The ropes may injure or kill the tree with repeated usage.
After the climb, the runner or sling will be left behind. It is important to see a length of runner or sling that does not constrict around the tree trunk. You want to give the tree trunk space to grow. I like to make sure that the runner or sling is at least twice the size of the tree trunk.
Where To Tie The Anchor
Your runner and ropes will typically be secured at the base of the tree trunk.
To make it easier to retrieve the rope after the rappel, some climbers may attach the runner on a tree branch. However, the higher the anchor point, the more leverage is being placed on the tree. You will also need to make sure that the tree branch is strong enough to take the load of the rappel.
How To Tie The Anchor
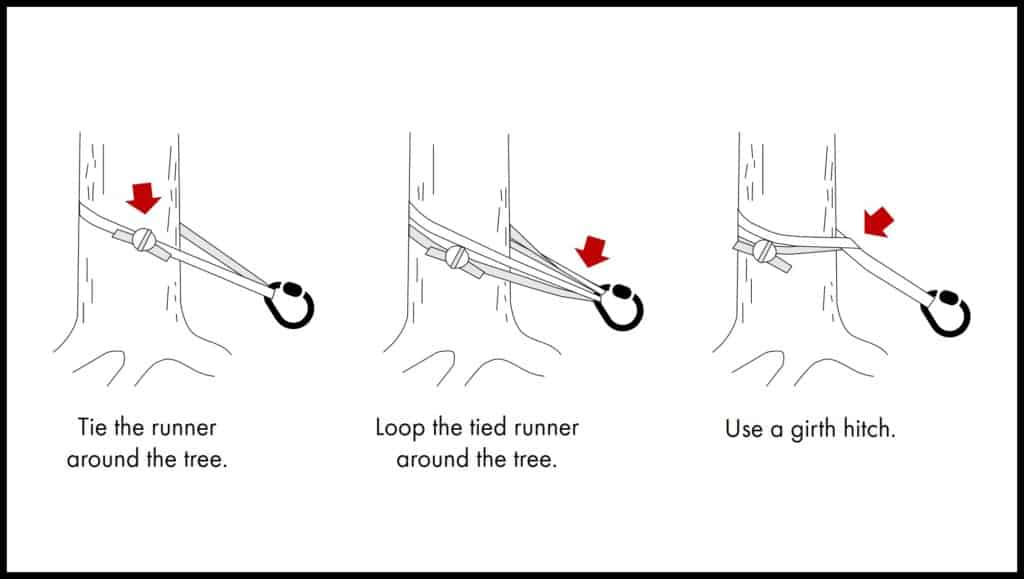
There are a few ways to secure your runners or slings to the tree.
Option 1. Tie the runner around the tree.
Option 2. Loop a tied runner around the tree.
Option 3. Use a girth hitch to secure a tied runner around the tree.
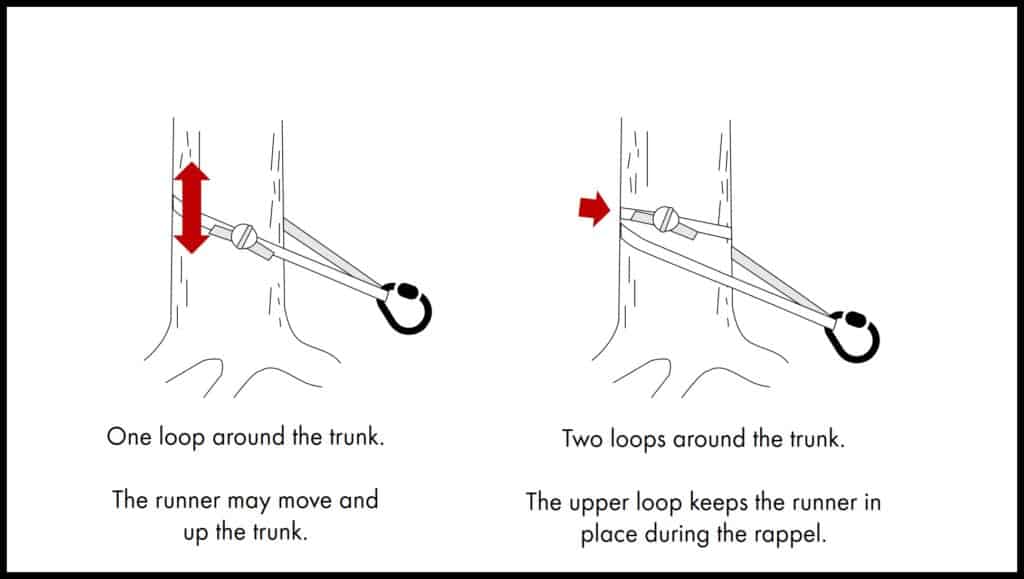
If you have a longer piece of runner, you can also wrap it twice around the tree. The climbing rope will be attached to the lower loop. The upper loop tightens around the tree to hold it in place. This is useful when you want to better secure your runner to a fixed location on the tree. For example, on a smaller tree, you want to keep the anchor low to reduce leverage on the tree. On the larger tree, you may want to have the anchor higher up. This will make it easier to retrieve the rope afterward.
If you do not feel comfortable using just 1 runner as your anchor, you can add 1 to 2 more runners and secure your rope through all of them.
Things to note when you are using runners made of webbing:
- Make sure that all the knots are tied with a Water Knot (also known as a Ring Bend). However, the knot can work itself loose with repeated usage or when it catches on a snag. Always check the knot before using the runner. You can minimize the risk with longer and tying Overhand Knots at the tails. An alternative knot you can use is the Flat Overhand Bend.
- Avoid putting twists into the runner when you are tying the knot.
- Make sure that the tails after the knot are at least 3 inches (8 cm) long.
- After tying the knot, step on the sling and pull hard to tighten the knot. This minimizes the risk of the knot untying.
How To Attach The Ropes
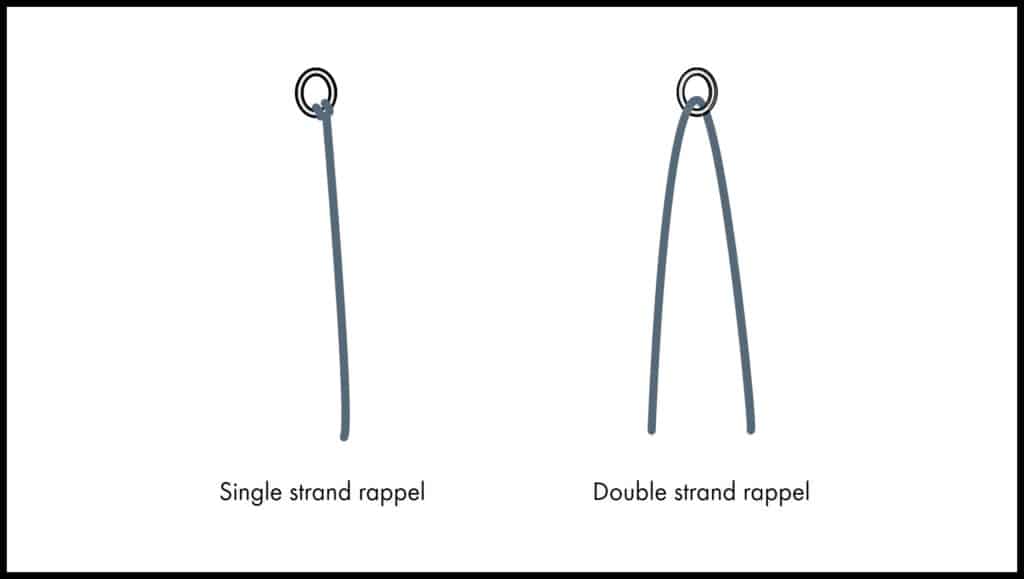
Once the runner is set up, you will need to attach the rope to it. It is more common to rappel with double strands of rope instead of 1. Double strands of rope will create more friction in the belay device. This makes it easier to control the rappel. You can also remove the rope at the end of the rappel.
When rappelling on a single strand, the rope is tied in to the anchor at one end. This is usually done only when the climber is returning to the anchor point to remove the rope.
Here’s how a double strand and single strand of rope will look like on the anchor:
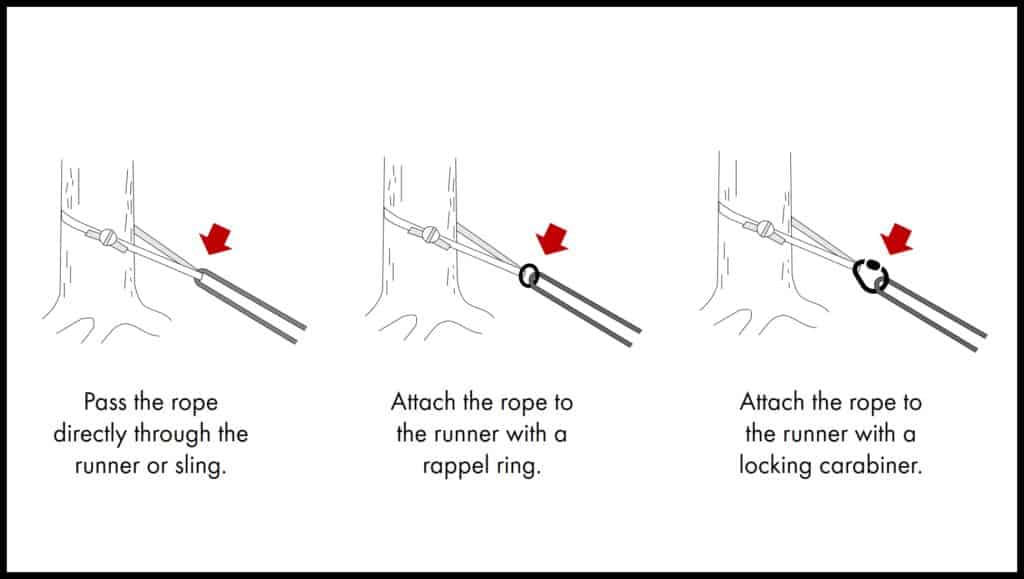
There are also 3 different options to secure your rope to the runner or sling.
Option 1. Pass the rope directly through the runner or sling.
When you are setting up the anchor or retrieving the rope, pulling it against the runner may cause friction damage.
Option 2. Attach the rope to the runner with a rappel ring.
You have to make sure that the rappel rings are not welded (older ones are) since those have a risk of breaking.
This method prevents friction damage to your ropes. However, it adds another possible point of failure. You can use 2 rappel rings for added safety.
Some climbers may also tie another runner to the rope in case the rappel ring fails.
Option 3. Attach the rope to the runner with a locking carabiner.
This is safer than using rappel rings but carabiners are more costly to leave behind after a rappel.
How To Equalize The Anchors When Rappelling From 2 Trees
If you are rappelling from 2 trees, remember that you have to keep the angle between the runners below 90 degrees.
You will need to use a separate runner on each tree. Do not use one runner on both trees! This will increase the load on each tree and weaken the system.
You can secure the runners together with a rappel ring or carabiner or pass the rope through both runners.
Next, you need to make sure that the anchor points are equalized. This means that the load is equally distributed between the 2 anchor points. This will increase the reliability of each anchor point.
To check that the load is equalized, the load should be running down the center of the angle formed by the runners. If the load is not running down the center, there will be more load exerted on one of the anchors.
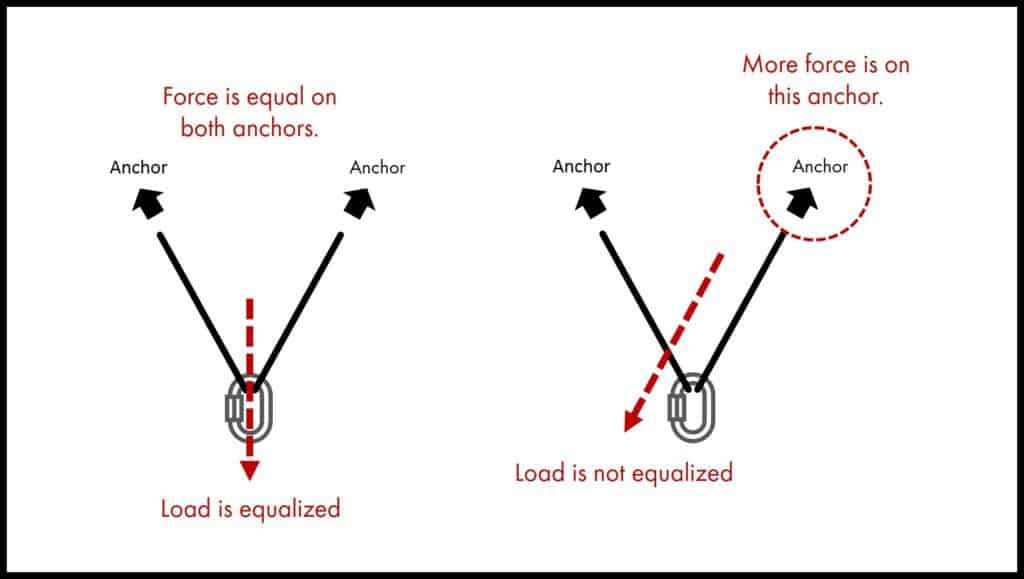
You may need to untie and retie the runners a couple of times to get the right placement.
However, you may not be able to predict the loading direction accurately. This is why it is important to keep the angle between the runners small. In case the loading direction is off-center, the anchors can still take the increased loading.
This is also why each tree has to be a reliable anchor.
Is It Safe To Rappel From An Existing Anchor On A Tree?
Sometimes, you may come across a tree with a runner already tied in place.
Don’t assume that that tree is a perfect choice!
You still have run through all the checks listed above. The health of the tree may have changed since the rappel was last set up.
Repeated rappelling off the same tree may also injure or damage the tree. Check that the trunk does not have any deep grooves or cuts caused by runners or climbing ropes.
If the tree still proves to be a good choice, remove the old runners (if you can) and use your own runners. Even if the existing runners look new, they could have been there for a while. Being exposed to the sun and weather will compromise the strength of the webbing.
This is Part 1 of 2 of the Learn To Rappel Mini-series:
Part 1: How To Rappel From A Tree
Part 2: How To Rappel With A Carabiner
Save this handy reminder to Pinterest!
This article is intended to provide general information. No article or video can replace qualified instruction, practice and experience. Your safety is your responsibility.