I was just thinking the other day, what happens if I drop my belay device as I was preparing to rappel? How will I be able to rappel with just my carabiners? I know I have a serious case of butterfingers. So I decided to prepare myself for this worst-case scenario.
So how do I rappel with a carabiner? There are 2 methods of rappelling with a carabiner:
1. The carabiner brake method: This requires 4 to 6 carabiners. You can do this with a single strand or double strand of rope.
2. The hunter hitch method: This requires 1 to 2 carabiners. You can do this with a single strand or double strand of rope.
Each method has its pros and cons. The carabiner brake method is the standard way of rappelling without a belay device. But it is more complex to set up than the munter hitch method. It also needs more carabiners. It is good to familiarize yourself with both methods.
This is Part 2 of 2 of the Learn To Rappel Mini-series:
Part 1: How To Rappel From A Tree
Part 2: How To Rappel With A Carabiner
Rappeling With A Single Strand Or Double Strand Of Rope
Unlike belaying where the climber is attached to a single strand of rope, it is more common to rappel with double ropes. 2 strands of rope will provide more friction than a single rope. This will make it easier for you to control your rappel without exerting a lot of strength.
Here’s how the rope will be set up on the anchor for a single strand and double strand of rope:
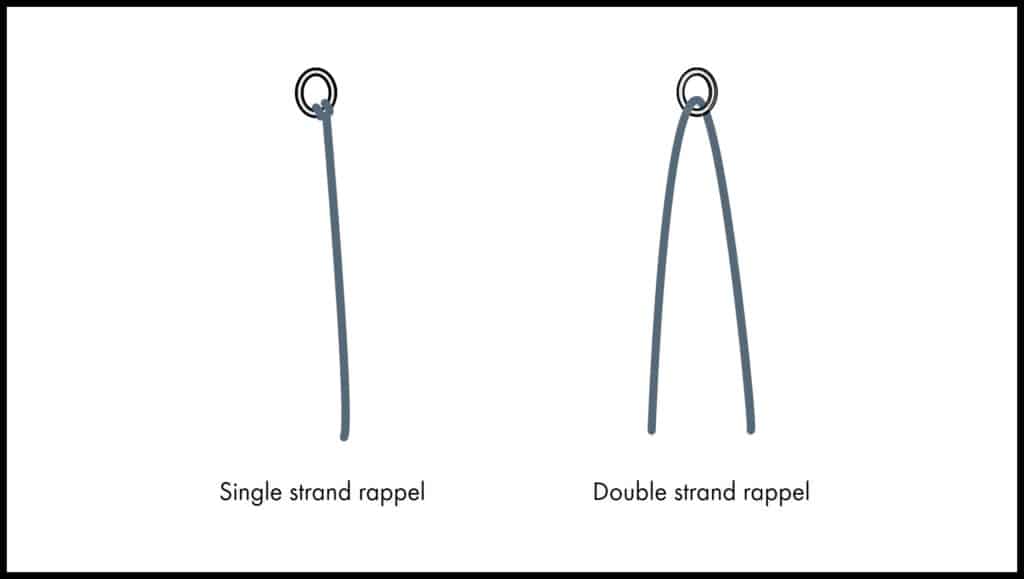
Rappelling With Double Strand Of Rope
Double ropes can sound deceiving. It actually doesn’t refer to 2 separate pieces of ropes. You will pass 1 rope through the anchor point to its midpoint. You will now have 2 ends of the rope on either side of the anchor point and these 2 strands are used to rappel.
Pros Of Using Double Strand Of Rope
.
At the end of the rappel, you can just pull on one end of the rope to remove the rope from the anchor.
Cons Of Using Double Strand Of Rope
Because the rope can be pulled through the anchor point, you need to make sure that the strands are equal on both sides. If one side is longer, you may end up just pulling on one strand and the entire rope will slip out of the anchor.
Rappelling With A Single Strand Of Rope
Having your rope slip out during your rappel sounds scary, doesn’t it! For that reason, some climbers may prefer to rappel with a single rope. When using a single rope, you will tie one end of the rope to the anchor point. You will use this single strand to rappel.
Pros Of Using A Single Strand Of Rope
Since the rope is tied into the anchor point, it will not slip out.
Cons Of Using A Single Strand Of Rope
You cannot remove the rope at the end of your rappel.
How To Rappel With The Carabiner Brake Method
The carabiner brake method uses 4 to 6 carabiners. The number of carabiners you need will depend on your set up. I’ll explain more in the step by step guide below.
The carabiner brake method works best with oval carabiners. It is easier to set up and the rappel will feel smoother.
If you are using the offset D-shaped or pear-shaped carabiners, make sure that you orientate them correctly.
Step By Step Guide
- Set up your rope.
- If you are rappeling with a single strand, tie one end of the rope to the anchor point.
- If you are rappeling with double ropes, pass the rope through the anchor point. Make sure you have the same length of rope on each side.
- Start by attaching either 1 locking carabiner or 2 non-locking carabiners to your harness’ belay loop.
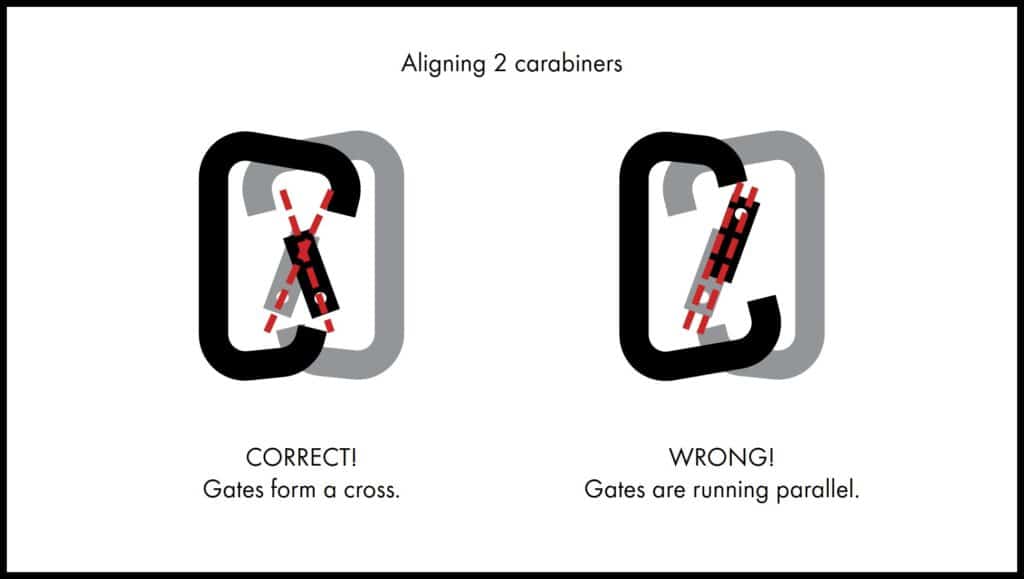
- When using 2 non-locking carabiners, make sure the gates of each carabiner are on opposite sides. When you open both gates, they should form an X. The gates should not be parallel to each other. You can see what I mean in the image below.
- When using offset D-shaped or pear-shaped carabiners, make sure the wider sides of the carabiners are facing away from you.
- Next, clip in 2 carabiners into the first set of carabiner(s). You have to use 2 carabiners here. It doesn’t matter if they are locking or non-locking.
- Again, make sure the gates of each carabiner are on opposite sides. When you open both gates, they should form an X. The gates should not be parallel to each other.
- When using offset D-shaped or pear-shaped carabiners, make sure the wider sides of the carabiners are facing away from you.
- Now, orientate yourself to face the anchor point. Take a bight of the rope and pass it through the second set of carabiners, going from the bottom of the carabiners towards you.
- Take 1 more carabiner. It doesn’t matter if it is locking or non-locking. Clip this carabiner across the second set of carabiners, beneath the bight of rope.
- Make sure the gate is facing down, away from the bight of rope. The bight of rope should be running across the spine of the carabiner and not the gate.
- When using offset D-shaped or pear-shaped carabiners, you may not be able to clip the carabiner through. Instead, you can clip it onto the bight of rope that is further from you. Then clip it onto the strand of rope running from the anchor point. Then slide the carabiner down towards the second set of carabiners. It should slide right over the second set.
- Usually, this will be sufficient when you are rappelling with ropes that are 10 to 11 mm in diameter. But if you are using thinner ropes which has less friction, or rappelling with a heavy load or over a steep or overhanging section, you may need to add another carabiner. This carabiner will be added to the same location as the third set of carabiner.
- Make sure the gates of the 2 carabiners are on opposite sides. When you open both gates, they should form an X. The gates should not be parallel to each other.
- Pull the ropes on opposite ends to tighten them through the carabiners.
- When using double ropes, make sure the 2 strands are not twisted.
- You are ready to rappel!
Setting up the carabiner brake method is the same with a single strand or double strand of rope.
Here you can see how to set up the carabiners with a single strand of rope:
Here you can see how to set up the carabiners with a double strand of rope:
Pros Of The Carabiner Brake Method
The carabiner brakes method works the same way as a belay device. It is safe and secure. The ropes will not get twisted up during your rappel.
Cons Of The Carabiner Brake Method
As you can see, setting the carabiners up for this method is not very easy. You should practice this frequently to make sure you know what to do if you need to use it.
How To Rappel With The Munter Hitch Method
The munter hitch is also known as the Italian hitch or crossing hitch.
Rappelling with the munter hitch is the same as belaying with the munter hitch.
The munter hitch method is useful if you don’t have enough carabiners to set up the carabiner brake method. The hunter hitch method only uses 1 locking carabiner or 2 non-locking carabiners.
Some climbers find that using the munter hitch on double ropes creates too much friction for rappeling. But the additional friction can be useful when rappeling with heavy loads or over steep or overhanging sections. You have to try and see which one works for you in different situations.
Related: Learn more about how to belay with a munter hitch here.
Step By Step Guide
Tying the munter hitch is the same whether you are using a single strand or double strand rope.
- Set up your rope.
- If you are rappeling with a single strand, tie one end of the rope to the anchor point.
- If you are rappeling with double ropes, pass the rope through the anchor point. Make sure you have the same lenght of rope on each side.
- Start by attaching either 1 locking carabiner or 2 non-locking carabiners to your harness’ belay loop.
- When using 2 non-locking carabiners, make sure the gates of each carabiner on opposite sides. When you open both gates, they should form an X. The gates should not be parallel to each other.
- When using offset D-shaped or pear-shaped carabiners, make sure the wider sides of the carabiners are facing away from you.
- Tie the munter hitch.
- Hold the rope straight in front of you with both hands crossed. Make sure both your hands are facing down.
- Uncross your hands and bring your fists towards each other (like doing a fist bump).
- Bring the 2 loops from your hands together. Clip the loops into a carabiner.
- Check that the rope is running across the spine of the carabiner and not the gate
- You can check that you have the right knot by pulling the rope back and forth. You should be able to pull the rope freely back and forth using both ends of the rope. Pulling the rope on either side will flip the knot over in the carabiner.
- You are ready to rappel!
Here you can see how to set up the munter hitch with a single strand of rope:
This video is demonstrating how to use a munter hitch for a belay but it is the same technique for a rappel.
Here you can see how to set up the munter hitch with a double strand of rope:
The munter hitch is tied a little differently here. I personally find the method above to be easier. But both ways work to create the same munter hitch.
Pros Of The Munter Hitch Method
The munter hitch is much easier to set up than the carabiner brake method. You only need 1 locking carabiner or 2 non-locking carabiners for this. It is safe and secure.
Cons Of The Munter Hitch Method
The ropes can get twisted up during the rappel.
This is Part 2 of 2 of the Learn To Rappel Mini-series:
Part 1: How To Rappel From A Tree
Part 2: How To Rappel With A Carabiner
Have butterfingers like me? Pin this handy reminder and you never have to worry about losing a belay device when rappelling!

This article is intended to provide general information. No article or video can replace qualified instruction, practice and experience. Your safety is your responsibility.