It’s no fun to be on a climbing trip and realized you forgot a bunch of stuff. Even if you are only at the start of the trail, the nearest town may not necessarily have what you need.
I have a packing list on my phone that I’m always adding things to (every time I forget something!). Everything big and small, I have captured them in this list for you.
How To Use This List
This list is kind of massive. So I have broken down them down into several sections that you can jump into whichever you need:
If you are going on a guided expedition, the climbing crew may also provide some of the items. Check with the guides to ensure you are not bringing any unnecessary items.
And if you are new to mountain climbing, I have also included some helpful information for each of the items:
- When you need that item
- The different types or variations of that item
- Things to look out for
- The quantities you need for that item
- The average cost for that item
| If you are new to mountain climbing, check out these helpful guides: – How To Start Mountain Climbing Today: 10 Simple Steps – What Are The Dangers Of Mountain Climbing: 15 Potential Hazards – Why Go Mountain Climbing: 25 Things To Do At The Summit – What Is The Difference Between Mountaineering And Alpine Climbing? |
How Much Stuff Should You Carry?
This list is meant to be comprehensive. But oftentimes, it is just not possible to bring everything you want.
A good guideline could be to keep the weight of your backpack at about 20% of your bodyweight. If you really need to carry a lot more items, ensure that you have adequate training. you need to train with your full backpack weight prior to the climb.
What To Bring For Mountain Climbing
Essentials
Whether you are doing a day hike or climbing Mount Everest, these are essential items you should have.
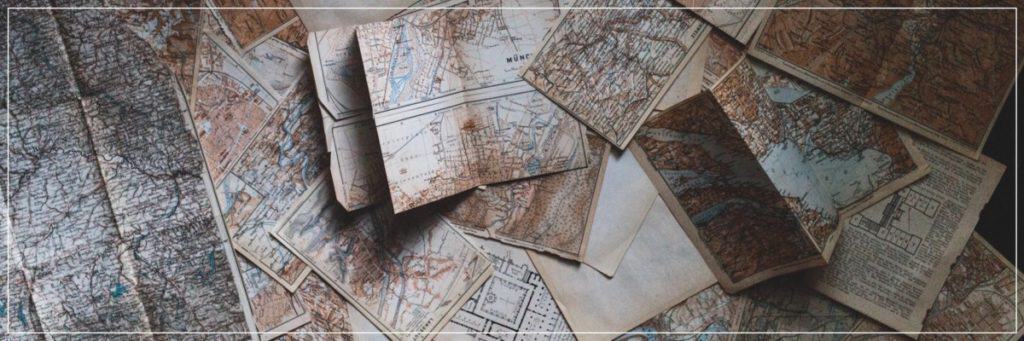
1. Map
When do you need it:
- You will need to bring along a map where you are not using any well-defined trails. Climbs rated Class 2 and higher typically would involve some route finding.
- If you are going to be climbing a particularly remote mountain. Or one that’s not frequently used by hikers or climbers. Even well-established trails could be improperly maintained or hidden in some parts.
- If you are following a guided expedition, you wouldn’t need to have a map since the guide would be leading the way. However, it is useful to still bring a map along to pick up or brush up on some navigation skills.
Types of maps:
- Trail maps (showing marked trails, starting points, distance etc)
- Topographic maps (showing contour lines and elevations)
- Informational maps (showing campsites, bathrooms etc)
Things to look out for:
- You might need a few different maps (different scales, different information etc).
- Place the map in a waterproof case.
- Print the map in a suitable size. it is best if you can refer to the map without needing to take it out and unfold it outside of the waterproof case.
- Check the map to ensure it has all the information that you might need to refer to in the mountains.
- Check that the information can be clearly seen (especially if you are printing them yourself).
- Bring an extra copy in case one gets damaged or lost.
Where to get your maps:
- The park’s or ranger’s websites
- Online communities such as summitpost.org or blogs
- The park’s or ranger’s offices
- Signboards at the start of the trail (it is good to take some pictures of this with your phone for reference)
Quantity: 2 of each map (+ protective cover)
Average cost: Free (unless you need to purchase a guide or book)
2. Compass
When do you need it:
- You will need a compass if there are no trails to follow.
- You will need a compass as long as you are navigating with a map.
Types of compasses:
- There are several types of compasses but any kind would work just fine for a climb.
Things to look out for:
- Check that the compass is working. Check with another compass or using the general sun direction. There is usually a compass app on your smartphone which you can also use to check.
- BUT, do not use your phone as the only compass in case the battery runs out.
- Check that the markings on the compass is readable and not scratched or worn off.
- Having a strap on the compass will be useful for hanging it around your neck or on your backpack.
Quantity: 1
Average cost: USD 15 to USD 30
3. GPS
When do you need it:
- Not a necessity but it is a good complement to the map and compass.
- Useful for beginners.
- Useful on challenging route-finding climbs. Sometimes, you may find difficulty in getting your bearings with a map and compass.
Types of GPS:
- GPS can vary from those with simple navigation functions to those with more elaborate features. Extra features include barometer/altimeter, electronic compass, cameras, and two-way radio.
- More functions will mean that the GPS will be more costly. It will also increase the weight of the GPS.
Things to look out for:
- DO NOT replace your map and compass with a GPS. Technology sometimes has a habit of failing when you need them most.
- Your smartphone is not the best GPS option. A dedicated GPS receiver is more likely to receive satellite reception in remote places. It can also withstand rugged and wet conditions.
Quantity: 1 (+ spare batteries)
Average cost: USD 200 to USD 300 for a mid-range option.
4. Permits
When do you need it:
- You need to get a permit for climbing in certain areas.
- Sometimes, you do need a permit to hike or climb but you need a permit for overnight stays.
Types of permits:
- Climbing permit: allows you to climb
- Backcountry or wilderness permit: allows you to camp overnight
Things to look out for:
- Permits can be free or require payment.
- Some areas use permits as a way to prevent overcrowding. For some popular areas, you may need to apply for the permits weeks or months in advance.
- Don’t lose your permits. You may be required to pay a fine or asked to leave the area.
Where to get permits:
- Online via the relevant websites.
- At the visitor center or ranger’s office.
Quantity: As required.
Average cost: Depends.
5. Writing Material
- Pens, pencils
- Notebook or paper (to plan routes, do self-reflection etc)
6. Emergency And Medical Information
- Medical information (including information like blood type, any medical conditions, allergies etc)
- Emergency contact (write it on a piece of paper and keep it in your wallet)
- Insurance card
7. First Aid Kit
- Plasters
- Gauze
- Cotton swabs/ buds
- Bandages
- Adhesive tape
- Antiseptic lotion or cream
- Alcohol wipes
- Eye drops
- Tweezers
- Scissors
- Pain relief creams, sprays, sticky pads (for cramps, strains, sprains, muscle aches etc)
- Medication for headaches, nausea, stomach upset, altitude sickness etc)
- Insect repellent, ointments for insect bites
8. Valuables and Electronics Items
Types of items:
- Water resistant watch
- Wallet (with your identity card, cash, credit card)
- Copy of your passport (it’s good to keep a copy of your passport with you if you are overseas. Keep the original in a safe location)
9. Water Bottle Or Hydration Bladder
When do you need it:
- ALWAYS.
- A hydration or water bladder is more convenient for drinking. It is easier for you to stay hydrated.
Things to look out for:
- If water is scarce for your climb, make sure your bottles or bladders have sufficient capacity to last you between refills.
- If you are climbing in cold temperatures, use bottles or bladders with insulation. This prevents the water from freezing.
- If you are using a small hydration bladder, you may need extra bottles to refill the bladder.
Types of hydration bladders:
- They vary from small 15 ounces (500ml) to 100 ounces (3 liters).
Quantity: depends on the climb (if there are many areas for you to fill your water along the way, you can bring a smaller bottle).
Average cost of hydration bladders:
- USD 10 to USD 30 depending on capacity
10. Water Treatment System
When do you need it:
- For climbs longer than 2 days, you are most likely going to be refilling your water supply along the way.
Types of water treatment:
- Water purification tablets (read also: Are water purification tablets safe?)
- Water filter
- Water purifier
- Boiling
- Bleach
Things to look out for:
- Always make sure you know where you can refill your water supply beforehand.
- Check that the water sources are not next to campsites. These areas are prone to pollution from human waste and soapy water.
Quantity: Sufficient quantity for the amount of water you will be drinking (this varies between the different systems).
Average cost:
- Water purification tablets: less than USD 8 for 10 tablets
- Water filter: USD 30 for a mid-range option
- Water purifier: USD 60 for a mid-range option
- Bleach: less than USD 20
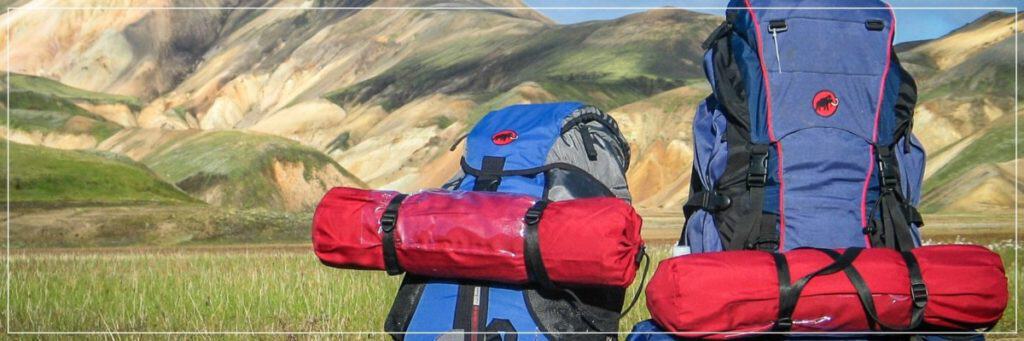
11. Backpack
When do you need it:
- All the time.
Types of backpacks:
- By capacity: this depends on how long your climb is and how much stuff you need. A general guide:
- 1-3 nights: 30-50 liters
- 3-5 nights: 50-80 liters
- 5+ nights: 70 liters or larger
- By functionality:
- Hiking backpack:
- Mountaineering backpack:
A quick comparison of the various options:
| Hiking Backpack | Mountaineering Backpack | |
| Weight | Lighter | Heavier |
| Frame | Does not have any frame | External or internal frame |
| Size | Less bulky | Bulkier |
| Comfort | Minimal padding. Less comfortable when hiking due to lack of a frame. More comfortable for climbing. | More padding. More comfortable when hiking due to support frames. |
| Functionality | Minimalistic | Has more compartments, clips, and buckles to store and attach climbing equipment. |
Things to look out for:
- A more durable backpack material will be resistant to tears by rocks and sharp tools. But this also means a heavier backpack.
- Useful to have a pack that can open at the top and bottom or side for easier access to your things.
- Look for a mesh material or an airflow gap on the back of your pack for better ventilation when you are carrying it.
- The more pockets, the merrier. Useful for keeping your water bottles, snacks, maps and other items you want to reach easily.
- Straps or loops to attach climbing equipment and tools.
- Some packs have a removable day pack that you can use for day trips or summit climbs.
- Rain cover for wet weather.
- An internal compartment and attachments for a water bladder.
Quantity:
- 1 to 2 day climbs: 1 hiking backpack
- Climbs longer than 2 days: 1 main mountaineering backpack (+ 1 day hiking backpack if necessary)
Average cost: USD 100 to USD 150 for a mid-range option.
12. Shelter
When do you need it:
- When you are camping overnight.
Types of shelter:
- Tent
- Bivy sack
- Tarp or tent tarp
A quick comparison of the various options:
| Tent | Bivy Sack | Tarp | |
| Description | Enclosed shelter. | A cross between a tent and sleeping bag. | This is basically just a roof to keep out sun and rain. |
| Capacity | One to many people. | One person. | One to many people. |
| Weight | Usually heavier. | Lighter. | Lighter. |
| Set up | Harder to set up. | Easier to set up. | Easier to set up. |
| Ventilation | Sufficient ventilation. | Poor ventilation if the waterproof cover is on. | Good ventilation since a tarp is not enclosed. This means exposure to bugs and other wildlife. |
| Warmth | Can retain warmth. | Cannot retain warmth in harsh conditions. | Cannot retain warmth. |
| Storage space | Has storage space for your things. | No storage space. Only has sleeping space for one person. | Adequate (but not complete) shelter for your things. |
| Protection from elements | Good protection from the elements. Can retain warmth. | Limited protection. Cannot retain warmth in harsh conditions. In the event of heavy rain, you are likely to feel the rain coming down on you. | Limited protection. Cannot retain warmth. In the event of heavy rain, there is no ground cover to keep water out. |
| Cost | More affordable than a bivy sack, especially if you are sharing the tent with a few people. | If you have more people, it is cheaper to share a tent. | Cheap |
| Other considerations | – | Might be claustrophobic if you are not used to it. | Useful to provide shade at mealtimes. |
Quantity: As required.
Average cost:
- Tent: USD 70 to USD 150 for a mid-range 2 to 3 person tent.
- Bivy sack: USD 60 to USD 120 for a mid-range option.
- Tarp: USD 20 to USD 50 for a mid-range option.
13. Sleeping Bag
Read: How To Improve Sleep When Climbing At High Altitude
When do you need it:
- When you are camping overnight.
Types of sleeping bags:
- Insulation: sleeping bags have various temperature ratings and insulation materials.
- Shape and size: sleeping bags have various shapes and sizes. No particular reason other than personal preference.
Things to look out for:
- Choose a sleeping bag that is a bit warmer than what you would need. You can unzip a warmer sleeping bag to keep cool but you cannot do much if your sleeping bag is not warm enough.
Quantity: 1
Average cost: USD 25 to USD 50 for a mid-range option.
14. Sleeping Pad
When do you need it:
- When you are camping on rocky or hard terrains (i.e. no grass or dirt surfaces).
- When you are camping in very cold temperatures.
Types of sleeping pads:
- Air pads
- Self-inflating pads
- Foam pads
A quick comparison of the various options:
| Air Pad | Self-inflating Pad | Foam Pad | |
| Weight | Light | Heavier | Light |
| Durability | Can get punctured | Can get punctured | Durable, will not get punctured |
| Size | Most compact | Compact | Bulky |
| Comfort | Comfortable | Comfortable | Firmer and less comfortable. |
| Insulation | Excellent | Excellent | Good |
| Cost | More costly | More costly | Cheap |
| Other Consideration | Needs to be inflated and deflated daily | Needs to be inflated and deflated daily | Can easily double up as a sitting pad during the day |
Quantity: 1
Average cost:
- Air pad: USD 60 to USD 100 for a mid-range option.
- Self-inflating pad: USD 60 to USD 100 for a mid-range option.
- Foam pad: USD 20 to USD 50 for a mid-range option.
15. Reflective Blanket
When do you need it:
- When climbing in extremely cold conditions
- For emergencies when you are exposed to the elements without shelter.
Quantity: 1
Average cost: USD 10 to USD 20 for a mid-range option.
16. Sunscreen
When do you need it:
- All the time.
Types of sunscreen:
- SPF ratings: Although sunscreens go from SPF 15 to SPF 100, there’s really not much difference between them. SPF 15 blocks out 93% of UVB radiation, SPF 30 blocks 97%, SPF 50 blocks 98%, and SPF 100 blocks 99%. Proper and frequent application is more important than the SPF ratings.
- Water or sweat resistance: helpful for outdoor activities.
Things to look out for:
- Apply sunscreen even on a cloudy day.
- Reapply sunscreen throughout the day (follow instructions on the bottle). Reapply more frequently if you are sweaty or wet.
- Do not overlook any exposed areas such as the back of your neck and the top of your ears (I have seen a friend with blisters on his ears from sunburnt!).
- Stick to a brand you are familiar with or try it out beforehand. You don’t want to be coming down with skin irritation during a climb.
Quantity: 1
Average cost: Less than USD 20
17. Lip Balm And Moisturizer
When do you need it:
- All the time, especially in dry or cold conditions.
Things to look out for:
- Stick to a brand you are familiar with or try it out beforehand. You don’t want to be coming down with any irritation during a climb.
Quantity: 1
Average cost: Less than USD 8
18. Hygiene Products
- Preseciprton medication
- Insect repellent
- Quick-drying towels (1 to dry your sweat in the day + 1 to wash up at night)
- Toilet paper or tissues (read also: What Leaves Can You Use As Toilet Paper?)
- Wet wipes
- Toothbrush and toothpaste or mouthwash
- Hand sanitizer
- Plastic bags or ziplocks (to store smelly clothes, food waste, wet items etc)
- Shaver
- Hair ties or clips
- Comb
- Feminine hygiene products
- Rubber bands or twisties (to tie up leftover food)
- Nail clippers
- Powder or deodorant (this helps when you can’t shower for days)
19. Eyewear
When do you need it:
- Use your prescription glasses instead of contacts. You risk eye infection when putting in or removing your contacts with dirty hands. The conditions in the mountains are often very drying on the eyes.
- Sunglasses are usually optional for climbing on terrains without any ice or snow.
- Sunglasses are recommended when climbing for long periods of time on snowy or icy terrains or in sunny conditions.
- Glacier glasses offer more protection than sunglasses. They have darker tints and have a rim going around it like goggles.
Types of eyewear:
- Prescription glasses
- Sunglasses
- Glacier glasses
Things to look out for:
- You may need both sunglasses and glacier glasses. Glacier glasses might be too dark in certain conditions.
- Ear hooks are useful to prevent your eyewear from falling off when climbing.
- A strap is useful for hanging your eyewear around your neck. Placing your eyewear on your head is probably the number one reason for lost or damaged glasses.
Quantity: As required.
Average cost:
- Sunglasses: USD 100 to USD 200 for a mid-range pair
- Glacier glasses: USD 100 for a mid-range pair
20. Flashlight
When do you need it:
- When you are camping overnight.
Types of flashlight:
- Battery operated flashlight
- Mechanical flashlight: these types of flashlights do not use batteries. They are charged by manually winding them up. Winding them up is usually a hassle and the charges might not hold for long. Might be useful for long expeditions if you do not want to bring a lot of spare batteries.
Things to look out for:
- Some flashlights are designed for camping. They may come with straps for hanging or can be extended to act as a small table lamp.
- Bring spare batteries.
- When the temperature is low, it is good to keep the headlamp and spare batteries close to your body to keep them warm. Cold batteries lose their charge very quickly.
Quantity: 1 (+ spare batteries)
Average cost: USD 10 to USD 20
21. Headlamp
When do you need it:
- You need a headlamp for any climbs longer than 6 hours. Even if you are doing a day hike, you may end up taking longer than expected. You do not want to be stranded in the mountains in the dark.
- You need a headlamp for a multi-day climb.
- You need a headlamp for longer day hikes that require you to start your climb before sunrise.
- You can substitute your flashlight with a headlamp but NOT the other way around. You should always keep your hands free during a climb by using a headlamp.
Things to look out for:
- Test out the brightness of your headlamp beforehand. Make sure it is bright enough to see more than a few feet in front of you.
- Some headlamps have several light settings (e.g. normal white light, flashing white or red light). These might come in handy during emergencies.
- Bring spare batteries. Make sure you check for the right size of the batteries! They typically use the smaller AAA batteries.
- When the temperature is low, it is good to keep the headlamp and spare batteries close to your body to keep them warm. Cold batteries lose their charge very quickly.
Quantity: 1 (+ spare batteries)
Average cost: USD 10 to USD 30
22. Matches Or Lighter
When do you need it:
- To cook your meals or heat up water.
- To start a fire for warmth.
Types of matches:
- Nowadays, you can find special matches that are “storm proof”. They can light up even in wet conditions. But they cost a lot more than your normal matches.
- Some camping matches longer for longer burn time.
Things to look out for:
- I generally prefer using lighters since they are easier to lit and weatherproof.
- If you are using matches, make sure you keep them in a waterproof container.
- Some parks or areas have strict guidelines on the use of fire. Make sure to check them before your climb.
- Make sure to put out the fire completely when you are done.
Where to get stormproof matches
- Sporting goods store
- Online
Quantity: 1 lighter or 1 set of matches
Average cost:
- Stormproof matches: USD 8 to USD 15
23. Firestarter
When do you need it:
- To start a fire quickly to get attention in emergencies.
- To start a fire more easily if matches or lighters do not work.
Types of firestarters:
- Gun type
- Ball of fluff
Things to look out for:
- Many firestarters are waterproof but it will be good to keep them in a waterproof container.
- Some parks or areas have strict guidelines on the use of fire. Make sure to check them before your climb.
- Make sure to put out the fire completely when you are done.
Quantity: depends on the climb (you need more if your climb is riskier or in more remote areas)
Average cost:
- Gun type: USD 10 to USD 20
- Balls of fluff: less than USD 10
24. Pocket Knife Or Multi-tool (e.g. Swiss Army Knife)
When do you need it:
- Most of the time, especially for multi-day climbs.
- Useful to open stubborn food packaging, cut food, cutting ropes and twines and for any emergency repairs.
- Generally, a pocket knife is more useful for cutting than a multi-tool. But a multi-tool is probably a better tool for unexpected situations.
Types of pocket knives or multi-tool:
- Pocket knives: can have a foldable or fixed blade.
- Pocket knives: the blade can be smooth or serrated (cut ropes better).
- Multi-tool: the number of tools can vary from 2 to 30 or even more.
Things to look out for:
- A pocket knife is usually lighter and more compact than a multi-tool. The blade of a pocket knife is also typically larger than those you can find in a multi-tool.
- Spend a bit more on a decent pocket knife or multi-tool. You may find difficulty in opening some of the lower quality multi-tools. You may end up injuring yourself.
- Make sure your knife or multi-tool is not rusty. Rusty tools are difficult to open, can’t be used to handle food and you have to worry about tetanus if you get cut.
Quantity: 1
Average cost:
- USD 15 to USD 25 for a decent pocket knife or simple multi-tool.
- A multi-tool with many features and components can go up to USD 70.
25. Duct Tape Or Other Repair Items
When do you need it:
- For emergencies like split soles, torn backpacks, leaking tents etc.
- There’s almost nothing that cannot be solved with duct tape.
Types of repair items:
- Duct tape or other sticky tapes
- Safety pins
- Rope or twine
Things to look out for:
- Make sure your duct tape is sticky. Especially if they have been stored for ages.
Quantity: depends on the climb.
Average cost: Less than USD 10 in total.
26. Emergency Signaling Items
When do you need it:
- To catch a rescuer’s attention during an emergency.
Types of emergency signaling items:
- Signaling mirror
- Whistle
- Brightly colored cloth or item
Things to look out for:
- Useful to have a leash or a hole to fit a leash through so that you can hang it around your neck.
.
Quantity:
- Depends on the climb (if you are on a particularly risky climb, you may want to have all items)
Average cost:
- Signaling mirror or whistle: USD 3 to USD 8 for a mid-range option.
- Brightly colored cloth or item: just use any cold shirt or rag that’s bright enough
27. Bear Deterrence Items
When do you need it:
- When you are climbing in areas with a bear population
Types of:
- Bear bell: this is basically a loud annoying bell hung onto your backpack or walking stick to keep bears away (bears usually stay away from loud noises)
- Bear canister: an airtight, hard container to store food and trash
- Bear spray: a spray to stop an attacking bear (a typical pepper spray for a human is unlikely to work on a bear)
Things to look out for:
- A bear bell is only good in the day. There’s no one to ring the bell while everyone is sleeping.
- A bear canister is bulky and heavy but unavoidable. Normal ziplock bags are not sufficient to keep the smell from a bear.
- A bear spray is not 100% failproof. There have been attacks on people despite a bear spray being used. Always be on the lookout for bears and stay far far away!
Quantity:
- Bear bell: 1 per person. But you can share this with others if you are in a small group and staying close together.
- Bear canister: 1 per person. The canister is usually quite small and insufficient to be shared with others.
- Bear spray: 1 per person. There won’t be time to help out another person during a bear attack.
Average cost:
- Bear bell: less than USD 10
- Bear canister: USD 70 for a mid-range option
- Bear spray: USD 30 to USD 50
Clothing
Here’s a list of clothes to pack for your climb:
28. Cap or hat
29. Beanie
30. Headband
31. Helmet
32. Bandana
33. Scarf
34. Face mask
35. Headlamps
36. Sunglasses
37. Base layer
38. Middle layer
39. Softshell
40. Outer layer
41. Undergarments
42. Socks
43. Gaitors
44. Trainers
45. Boots
To find out more details on each item, check out What To Wear When You Go Mountain Climbing.
Food and Cookware
These are the items you need for cooking and eating.
46. Food
Here are some ideas of the food you can pack for your climb:
- Cereals and Grains
- Pancakes
- Bread
- Noodles
- Rice
- Sandwiches
- Potatoes
- Ready to eat meals
- Salad
- Fruits
For more ideas and recipes, check out What Food To Eat When Mountain Climbing.
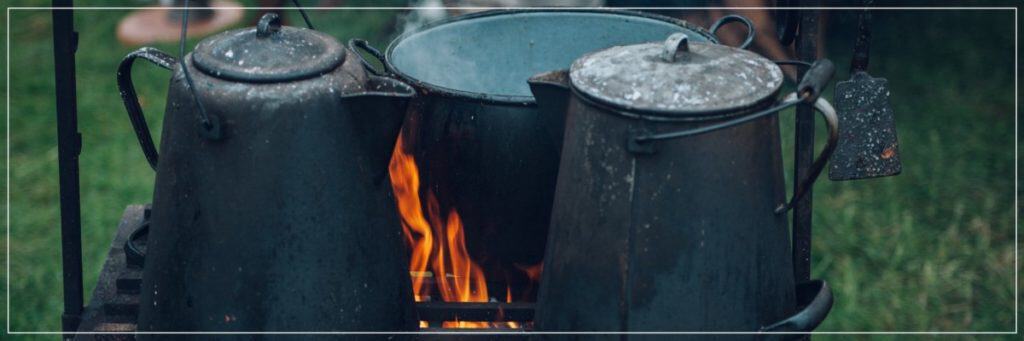
47. Cookware And Kitchen Supplies
When do you need it:
- If you cannot see yourself eating cold food and energy bars for the entire duration of your climb.
Types of cooking supplies:
- Portable stove
- Fuel
- Pots or pans (with lids)
- Aluminum foil
- Sponge
- Biodegradable soap
- Collapsible water container (large containers that you can collect water for cooking washing. They can be collapsed and kept when not in use)
Types of tableware:
- Spoons, forks, sporks, knifes
- Plates or bowls
- Mugs or cups
Things to look out for:
- These items are usually quite bulky so try to bring items which can serve multiple purposes (e.g. a bowl can also be used as a cup, a pot is more useful than a pan since it can also be used to boil water)
- To minimize the amount of washing up, line your pots and plates with aluminum foil.
- When washing up, pour your dirty water over soil instead of rocks. The soil will help to breakdown some of the pollutants.
Quantity: As required
Equipment
These are tools you may need for more challenging or technical climbs.
To find out more details on each item, check out The Complete List of Equipment You Need To Climb A Mountain.
48. Hiking Sticks or Poles
49. Hiking Shoes or Boots (read also: Can You Put Crampons On Hiking Boots?)
50. Crampons (read also: Can You Bring Crampons In A Carry-On?)
51. Rock Climbing Shoes
52. Climbing Helmet
53. Climbing Harness
54. Ice Axe and Ice Tool (read also: What’s The Difference Between An Ice Axe And Ice Tool?)
55. Ice Screws and Pitons
56. Snow Anchor
57. Climbing Ropes
58. Belay Device
59. Pulley (a.k.a. Ascender, Descender)
60. Carabiner
61. Quickdraw
62. Nut (a.k.a. Passive Protection Gear)
63. Cam (a.k.a. Active Protection Gear)
64. Avalanche Transceiver
65. Snow Probe
66. Snow Shovel
Luxury
These are the items that are typically not a necessity but are good to have.
67. Valuables And Electronics
- Cameras, batteries and memory cards (with waterproof bag)
- Phones and battery bank (with waterproof bag)
- Binoculars
Read: 40 Mountain Photography Ideas: Gorgeous Photos For Your Next Climb
68. Two-way Radios
When do you need it:
- Not a necessity but useful if you are planning to split into different groups during the climb.
- For emergencies when people need to descend ahead of the group or stay back in camp.
Things to look out for:
- Range: the range can be from 5 to 25 miles (8 to 40 kilometers). Higher range radios consume more battery and are usually more expensive.
- Ease of use: this is important if you will be wearing gloves for most of the climb
- Weight: look for small and lightweight options
- Hands-free option: useful if they can be connected to a headphone or microphone. You can stay connected even while climbing
Quantity: 1 pair
Average cost: USD 50 to USD 80 for a pair of mid-range radios.
69. Sleeping Aids
Types of sleeping aids:
- Eye mask (useful if you are an early sleeper or plan to sleep in)
- Earplugs (useful in you are staying in noisy and crowded campsites)
Read: How To Improve Sleep When Climbing At High Altitude
Things to look out for:
- I prefer to avoid these since I want to stay alert to my surroundings. I also don’t want to be sleeping through an emergency.
- If you are an extremely light sleeper who needs these items, it will be good to let your group know. They can get you in an emergency.
70. Hand And Foot Warmer
When do you need it:
- Hand warmers are nice to have when the temperature drops below 50F (10C).
- If your boots and socks have good insulation, you won’t need any foot warmer unless it’s below 0F (-18C)
Types of warmers:
- Disposable hand warmer
- Electronic hand warmer
- Fuel operated hand warmers
- Disposable foot and toe warmer
- Electronic foot warmer (heated boot insoles)
Things to look out for:
- Electronic and fuel operated warmers are hotter and last longer than disposable warmers.
- Electronic and fuel operated warmers need to be recharged or refueled.
- You can wear disposable foot warmers to sleep.
Quantity: depends on the duration of the climb.
Average cost:
- Disposable warmers: less than USD 10 for a pack of 10.
- Electronic or fuel-operated warmer: USD 20 to USD 30 for a mid-range option.
- Heated insoles with charging components: USD 100 to USD 200
71. Seating Mat Or Pad
When do you need it:
- Meal times and rest time during the day.
Types of:
- Picnic mat
- Insulated sitting pad: only for winter conditions
Quantity: 1
Average cost:
- Picnic mat: less than USD 10 for a mid-range option.
- Insulated sitting pad: USD 10 to USD 20 for a mid-range option.
72. Reading Materials
- Route descriptions or guidebooks
- Field guides on plants or wildlife
- Star charts or guidebooks