Thinking of climbing South Sister? South Sister is the third highest mountain in Oregon, USA. It is the highest peak among the Three Sisters — the other 2 peaks are North Sister and Middle Sister. The climb passes through several glaciers near the summit. Close to the summit, you will also find Teardrop Pool, the highest lake in Oregon.
In this guide, you will find everything you need to know about planning your climb on South Sister.
- Where Is South Sister?
- How Are The Views On South Sister?
- When Is The Best Time To Climb South Sister?
- What Are The Temperatures On South Sister?
- How Long Does It Take To Climb South Sister?
- How Many Trails Are There?
- How Do You Choose Which Trail To Take?
- What To Expect On Climber Trail #36
- What To Expect On The Green Lakes Trailhead #17
- What Time Should You Start Climbing (Itineraries)
- Do You Need A Permit? Are There Any Fees?
- What To Wear
- Packing List And What To Bring
- How To Get To The Trailhead?
- Locations Of Parking Lots
- Camping And Accomodation
- Climbing South Sister In Winter: A Recap And Important Things to Note
- What Are The Dangers Of Climbing South Sister?
- Other Important Information
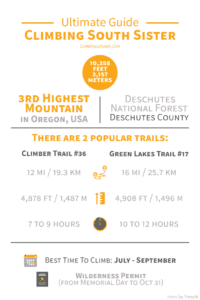
Here is some quick information about the climb at a glance:
| Elevation (feet) | 10,358 |
| Elevation (meters) | 3,157 |
| Popular Route | Climber Trail #36 |
| YDS Class | Class 3 |
| Elevation Gain (feet) | 5,000 |
| Elevation Gain (meters) | 1,524 |
| Distance (miles) | 12.4 |
| Distance (kilometers) | 20 |
| Route Type | Loop |
| Climbing Season | All year |
| Best Time To Climb | Jun to Sep |
| Snow And/ Or Ice | Winter |
| Permit Requirement | Wilderness Permit Recreation Day Use Fees |
This is Part 5 of 6 of the Mountains To Climb In The US Mini-series:
Part 1: Highest Mountains To Climb In The US For Beginners
Part 2: Ultimate Guide To Climbing Mount Elbert
Part 3: Ultimate Guide To Climbing Mount Katahdin
Part 4: Ultimate Guide To Climbing Mount Bierstadt
Part 5: Ultimate Guide To Climbing South Sister
Part 6: Ultimate Guide To Climbing Mount Borah
Where Is South Sister?
South Sister is located in the Three Sisters Wilderness of the Deschutes National Forest.
Here’s a map giving you a quick orientation of the area around South Sister:
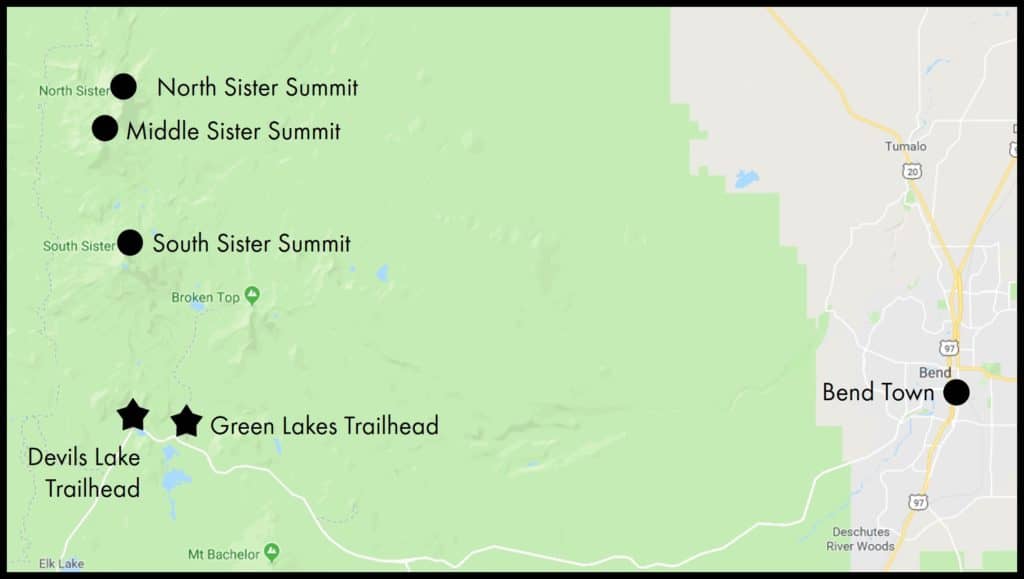
As her name implies, South Sister is to the south of North Sister and Middle Sister.
There are 2 popular routes for climbing South Sister — the Climber Trail #36 and the Green Lakes Trail #17.
The nearest town is Bend. You can stock up on supplies and find restaurants and accommodation here.
If you would like to visit the ranger’s office for information before your climb, they can be found in Bend.
Bend-Fort Rock Ranger District Office
Address: 63095 Deschutes Market Road, Bend, OR 97701
Phone: 541-383-5300
Fax: 541-383-4700
Operating hours: Monday — Friday, 8 am — 4.30 pm
How Are The Views On South Sister?
As a reward for climbing South Sister, you will get amazing views of the North and Middle Sister in the north.
On a good day, you can see Mount Hood and even Washington’s Mount Adams in the far north.
On the southeast side, you can see Broken Top Peak and the Green Lakes.
And down south, you will see many lakes with Diamond Peak and Mount Thielsen in the background.
When Is The Best Time To Climb South Sister?
You can climb South Sister all year round.
But the best time to climb will be in from July to Sep. This is also the peak season where you will see more climbers.
The weather varies from year to year. If the temperatures are warm enough, climbing in June or September may also be possible.
There are snow and ice on the mountain all year round. However, the trails are generally free from snow and ice from July to September.
If you are planning to climb South Sister from October to June, you will have to be prepared for winter climbing. Climbing South Sister in winter is more suited for experienced climbers. There is more information on winter climbing in the section below.
Save to Pinterest and add this to your bucket list!

What Are The Temperatures On South Sister?
These are the average monthly temperatures on South Sister:
| Low/ High (Fahrenheit) | Low/ High (Celsius) | |
| January | 8 / 22 | -13 / -6 |
| February | 7 / 22 | -14 / -6 |
| March | 9 / 27 | -13 / -3 |
| April | 12 /32 | -11 / 0 |
| May | 19 / 40 | -7 / 5 |
| June | 23 / 48 | -5 / 9 |
| July | 31 / 59 | -1 / 15 |
| August | 30 / 57 | -1 / 14 |
| September | 25 / 49 | -4 / 10 |
| October | 18 / 37 | -8 / 3 |
| November | 12 / 25 | -11 / -4 |
| December | 7 / 20 | -14 / -7 |
Do note that the temperature drops as you go higher up the mountain.
The elevation gain from the trailheads to the summit is about 4,000 to 5,000 feet (1,220 to 1,520 meters). You can expect a temperature drop of about 20 to 25 F (11 to 14 C) from the trailheads to summit.
* The conditions and temperatures vary year to year. Make sure you check the latest forecast before your climb.
How Long Does It Take To Climb South Sister?
When climbing South Sister in the summer, the average time for a round trip on Climber Trail #36 is about 7 to 9 hours. The average time in winter conditions is about 8 to 10 hours.
Here are some factors to consider when estimating the time you need:
- Route selection: Climber Trail #36 is the shortest and most direct route. Some of the longer routes may take up to 2 days.
- Health and fitness levels: If you are an experienced and fit climber, you are likely to complete this climb in less than 6 hours. If you have not been exercising in a while, you may need to factor in more time.
- Altitude sickness: If you are prone to altitude sickness, you may experience headaches or breathlessness during the climb. Taking frequent breaks and climbing at a slower pace can help alleviate the symptoms. Altitude sickness often has nothing to do with your fitness levels.
How Many Trails Are There?
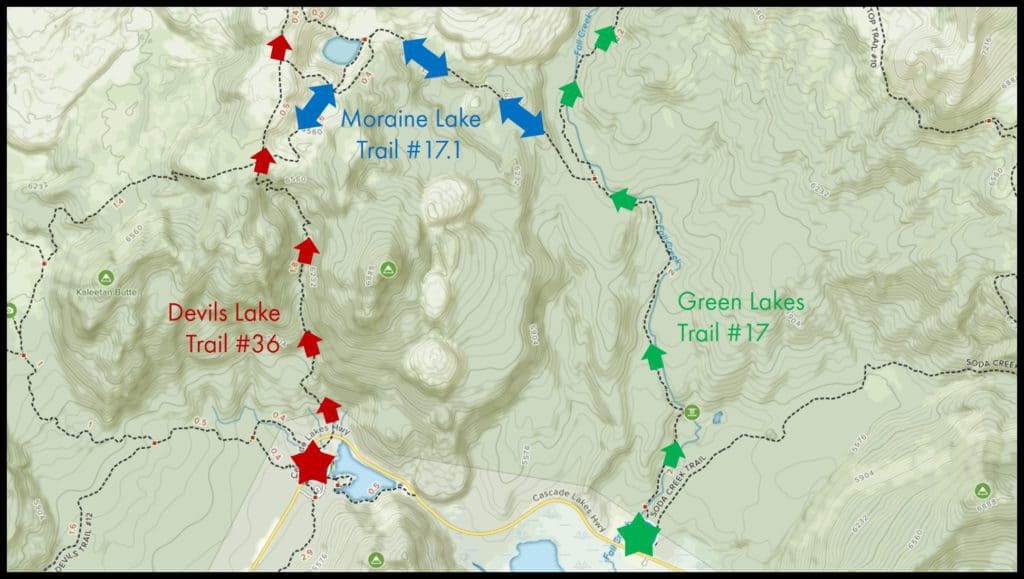
There are 2 main trails for climbing South Sister:
- Climber Trail #36: Starts from Devils Lake Trailhead. It is the shortest and most direct route to the South Sister peak.
- Green Lakes Trail #17: Starts from Green Lakes Trailhead. After reaching Green Lakes, a route in the west will join up with the Climber Trail #36 to the summit.
There is also a partial trail — the Moraine Lake Trail #17 which connects Climber Trail #36 and Green Lakes Trail #17. This trail is usually for hikers who are not planning to climb to the summit.
If you fancy a longer hike, there are numerous hiking trails in the Three Sisters Wilderness area. Many of these trails are connected and can lead you to South SIster summit.
In the south, there are 2 other possible trailheads:
- Broken Top Trailhead: Start of Broken Top Trail #10. The route takes you to the peak of Broken Top. You can then make your way over Green Lakes and join up with Climber Trail #36 to the summit.
- Todd Lake Trailhead: Start of Todd Trail #34. This trail can join up with Broken Top Trail #10.
You can see the various trailheads here.
There are also trailheads in the north.
How Do You Choose Which Trail To Take?
The Climber Trail #36 is the usual route for climbing South Sister. It is the fastest and shortest route. It can be done in a day.
If you have time to spare, you should go for the Green Lakes Trail #17. The Green Lakes area offers an amazing panoramic view of the Three Sister. But it is a longer trail than Climber Trail #36 and you can spend 2 to 3 days on the trail. Using Green Lakes as your base, you can climb to both South Sister and Broken Top.
Both Climber Trail #36 and Green Lakes Trail #17 are pretty popular for climbing South Sister. But Green Lakes Trail #17 is probably quieter than Climber Trail #36 which has many day hikers.
Both Climber Trail #36 and Green Lakes Trail #17 are rated Class 2 under the Yosemite Decimal System (YDS).
A YDS Class 2 climb is:
– An easy scramble.
– You need to use your hands occasionally for climbing.
– The trail is intermittent.
– Slightly higher chance of injury.
You can read more about YDS here.
A comparison of the Climber Trail #36 and Green Lakes Trail #17:
| Climber Trail #36 | Green Lakes Trail #17 | |
| Why take this trail? | It is the shortest and fastest route. | The trail is not as steep as Climber Trail #36. It is also less crowded. You can visit the Green Lakes area and Broken Top. |
| Trailhead location (GPS coordinates) | 44°02’07.7″N 121°45’56.8″W 44.035461, -121.765789 | 44°01’51.9″N 121°44’11.0″W 44.031087, -121.736384 |
| Trailhead elevation | 5,480 ft / 1,670 m | 5,450 ft / 1,660 m |
| Elevation gain | 4,878 ft / 1,487 m | 4,908 ft / 1,496 m |
| Round trip distance | 12 mi / 19.3 km | 16 mi / 25.7 km |
| Estimated completion time | 7 to 9 hours | 10 to 12 hours |
| YDS rating | Class 2 | Class 2 |
| Parking | About 60 to 70 lots | About 75 lots |
What To Expect On Climber Trail #36
The Climber Trail is a loop. You take the same trail up and down.
Being the most popular trail, the trail is pretty well defined. You should not have a problem following it.
Distance: 0 mi to 1.8 mi / 0 km to 2.9 km
Elevation: 5,480 ft to 6,700 ft / 1,670 m to 2,040 m
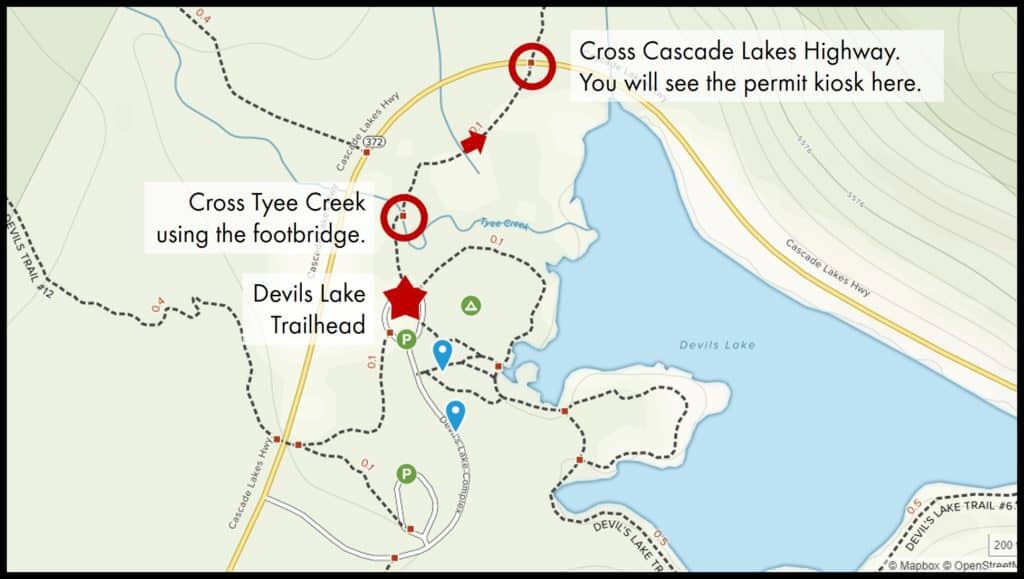
The trailhead is at the north end of the parking lot. You will see a sign for South Sister Climber Trail No.36.
The trail goes into the forest and soon you will need to cross Tyee Creek over a footbridge.
At about the 0.2 mile (0.3 km) mark, you will need to cross the Cascade Lakes Highway to continue on the trail.
Across the Cascade Lakes Highway, there is an information board and permit kiosk. You need to fill up the permit for your climb. It is free. The permit can be found in a box. Fill up the permit and return the original to the box. Keep a copy of the permit with you. If you are found to be climbing without a permit, you can be fined $200.
After the permit kiosk, the trail quickly becomes a steep climb.
Distance: 1.8 mi to 3.1 mi / 2.9 km to 5 km
Elevation: 6,700 ft to 7,000 ft / 2,040 m to 2,130 m
At around the 1.8 mile (2.9 km) mark, the trail finally flattens off to a plateau.
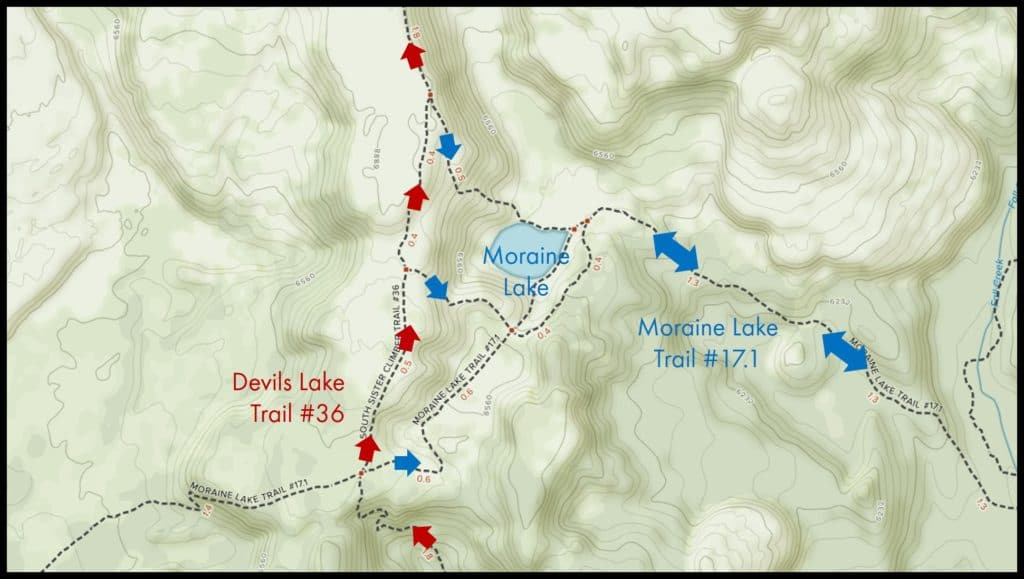
Here you will see a split to the right for the Moraine Lake Trail #17.1.
Continue straight to stay on the Climber Trail #36.
The trail here is open grassland and you can get a good view of the surrounding mountains. The trail is wide and mostly flat.
At about the 2.3 mile (3.7 km) mark, you can see Moraine Lake below. Here you will also see another trail on the right leading down to Moraine Lake.
Continue straight.
Around the 2.7 mile (4.3 km) mark, you will see yet another trail on your right leading down towards Moraine Lake. This is the last turn off to Moraine Lake and is steeper than the previous 2 turn offs.
Continue straight to stay on the Climber Trail #36. Here you will start to cross the sandy plain. You can see Broken Top in the northeast direction.
.
IMAGE of 3 splits to lake
Distance: 3.1 mi to 4.5 mi / 5 km to 7.2 km
Elevation: 7,000 ft to 8,830 ft / 2,130 m to 2,690 m
Sandy plain ends at the 3.1 mile (5 km) mark. The trail becomes very steep and stays that way all the way to the summit.
Distance: 4.5 mi / 7.2 km
Elevation: 8,830 ft / 2,690 m
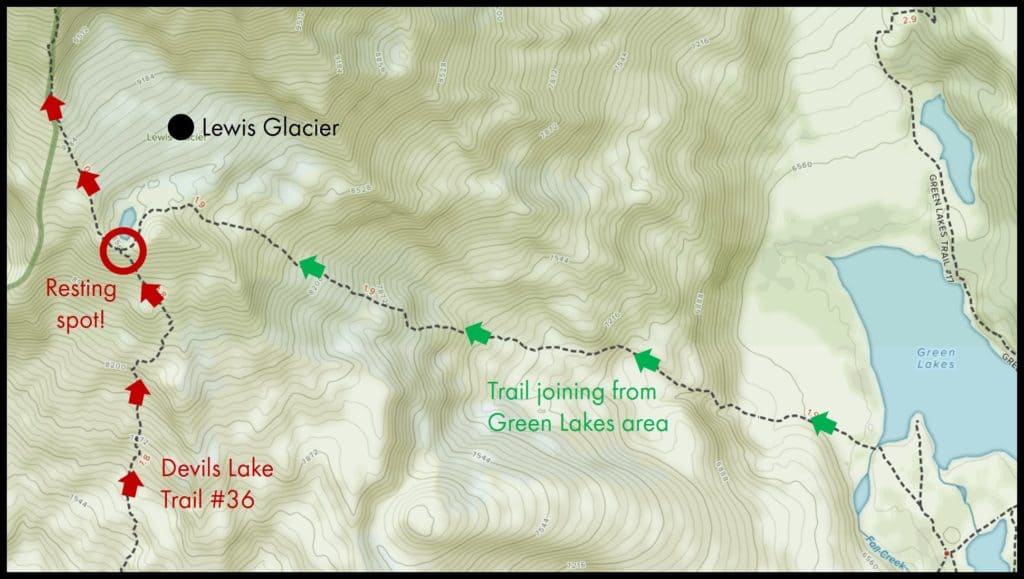
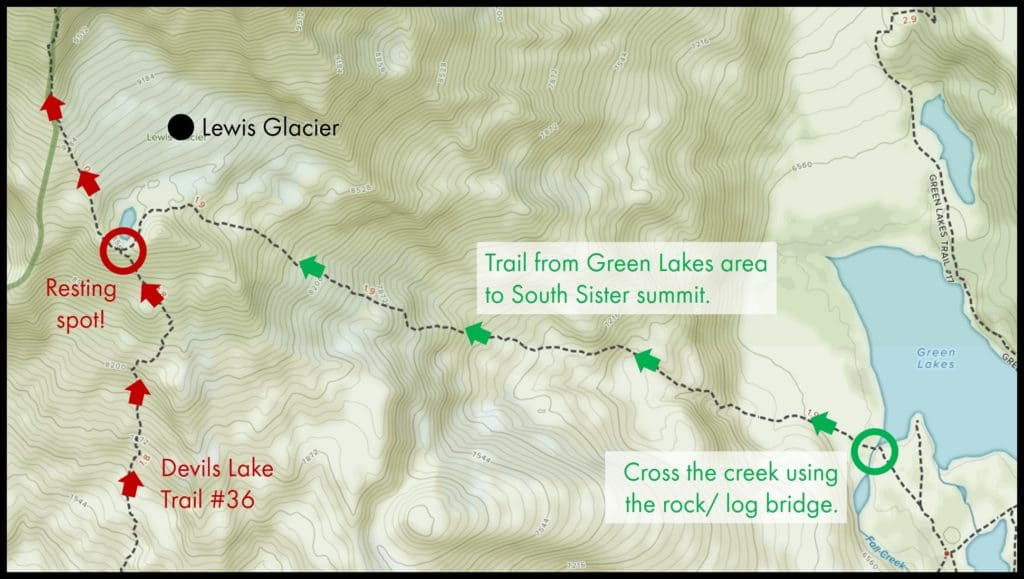
At the 4.5 mile (7.2 km) mark, you will see a small circular lake at the bottom of a glacier on your right. This is the Lewis Glacier.
In front of the lake is a trail coming in from the east. This is the trail joining in from the Green Lakes area.
On your left is another glacier — Clark Glacier.
This is a good resting spot before your last push to the summit.
Distance: 4.5 mi to 6 mi / 7.2 km to 9.7 km
Elevation: 8,830 ft to 10,358 ft / 2,690 m to 3,157 m
The trail grows steeper the closer you get to the summit. The rocks are loose, so watch out for your footing.
At the 5.2 mile (8.4 km) mark, you have reached the crater! In front of you is the Teardrop Pool. this is the highest lake in Oregon.
But the highest point is still some distance away. Turn right to continue onto the true summit.
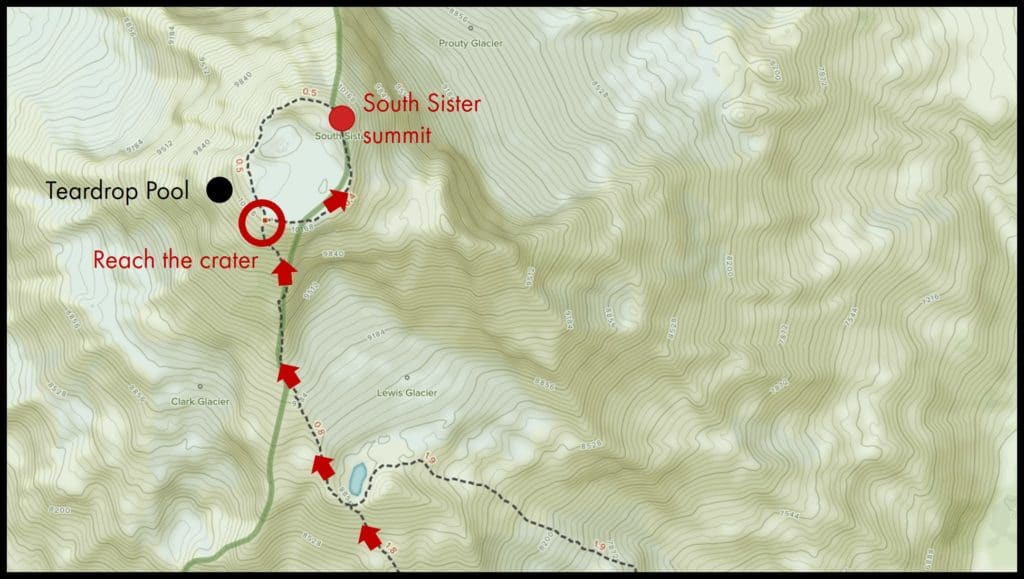
Distance: 6 mi/ 9.7 km
Elevation: 10,358 ft/ 3,157 m
The summit!
You can see the trail map here.
What To Expect On The Green Lakes Trailhead #17
Distance: 0 mi to 2.1 mi / 0 km to 3.4 km
Elevation: 5,450 ft to 5,970 ft / 1,660 m to 1,820 m
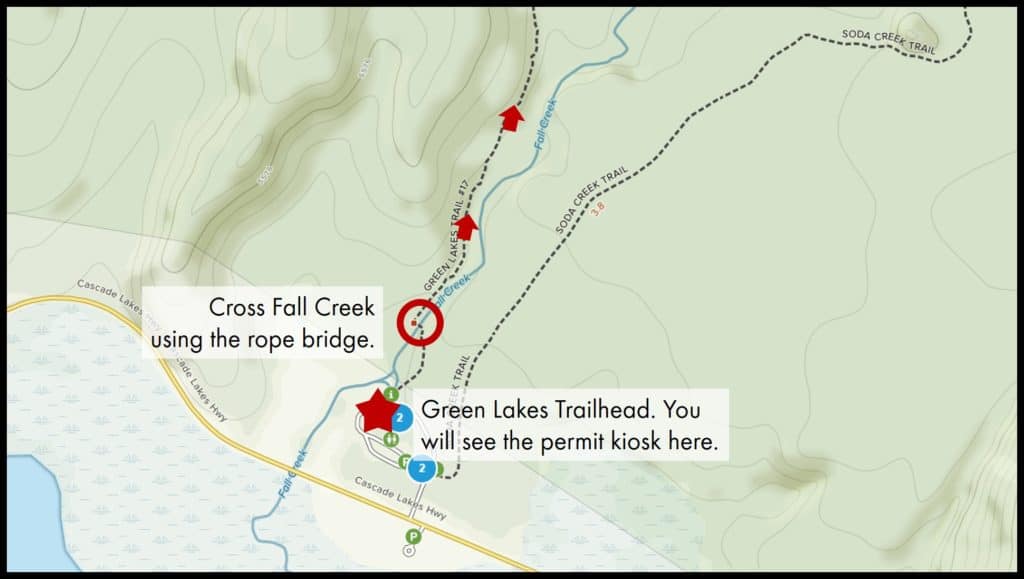
The trailhead is at the north end of the parking lot.
You need to fill up the permit for your climb. It is free. The permit can be found in a box. Fill up the permit and return the original to the box. Keep a copy of the permit with you. If you are found to be climbing without a permit, you can be fined $200.
After the permit kiosk, follow the trail which runs along Fall Creek.
At the 0.1 mile (0.2 km) mark, you will cross the creek on a rope bridge.
The trail continues alongside Fall Creek.
Distance: 2.1 mi to 4.2 mi / 3.4 km to 6.8 km
Elevation: 5,970 ft to 6,530 ft / 1,820 m to 1,990 m
At the 2.1 mi (3.3 km) mark, you will see a left turn to the Moraine Lake Trail #17.1. Continue straight to stay on Green Lake Trail #17.
A short distance ahead, you will some hot springs.
The trail continues in the northeast direction all the way to Green Lakes.
Distance: 4.2 mi / 6.8 km
Elevation: 6,530 ft / 1,990 m
At the 4.2 mile (6.8 km) mark, you will see Green Lakes in front of you.
On your right are a small lake and some snowfields. Here, the trail splits 3 ways.
On your right, in the southeast direction is the Broken Top Trail #10 joining from the trailhead.
Also on the right, in the northeast direction is the continuation of the Green Lakes Trail #17. It takes you around the east side of the Green Lakes.
On your left, in the northwest direction is the trail connecting to the summit of South Sister.
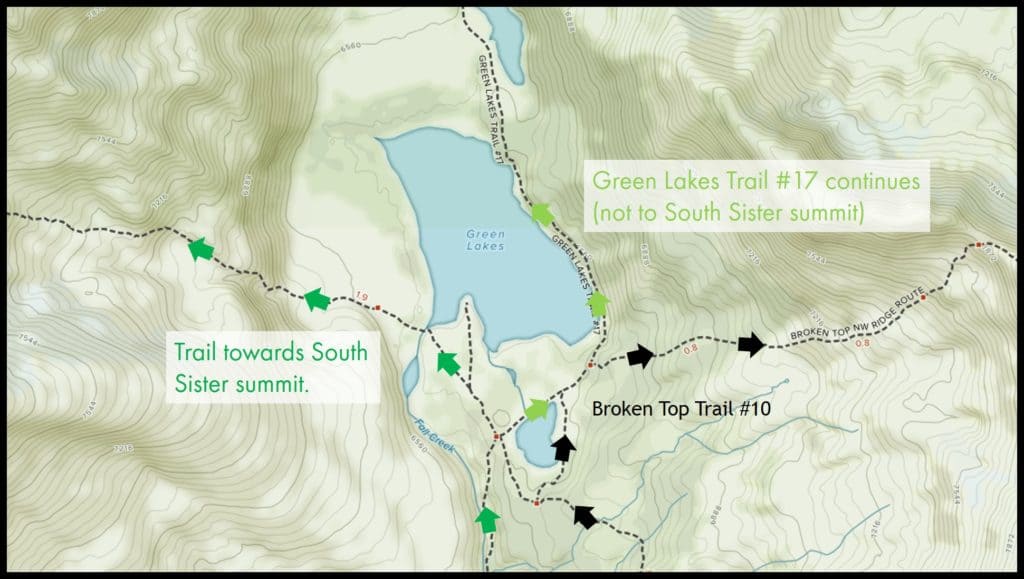
The Green Lakes area offers you an amazing view of the Three Sisters in the west. On the east, you will see the Broken Top area.
You can use this area as the base to climb both South Sister and Broken Top.
There are many camping spots in this area. But the spots are on a first-come-first-served basis.
Distance: 4.2 mi to 6.5 mi / 6.8 km to 10.5 km
Elevation: 6,530 ft to 8,830 ft / 1,990 m to 2,690 m
Take the trail in the northwest direction to continue to the summit of South Sister. You will need to cross the creek on a rock/ log bridge.
The trail here starts off gentle but turns steep after half a mile. It is a steep climb for the next 2 miles. This will take you to the bottom of Lewis Glacier where you will join Climber Trail #36.
Distance: 6.5 mi / 10.5 km
Elevation: 8,830 ft / 2,690 m
At the 6.5 mile (10.5 km) mark, you will see a small circular lake at the bottom of a glacier on your right. This is the Lewis Glacier.
On your left is Climber Trail #36 coming in from the trailhead. On your right is the Climber Trail #36 leading to the summit.
In front of you is Clark Glacier.
This is a good resting spot before your last push to the summit.
Distance: 6.5 mi to 8 mi / 10.5 km to 12.9 km
Elevation: 8,830 ft to 10,358 ft / 2,690 m to 3,157 m
The trail grows steeper the closer you get to the summit. The rocks are loose, so watch out for your footing.
At the 7.2 mile mark, you have reached the crater! In front of you is the Teardrop Pool. this is the highest lake in Oregon.
But the highest point is still some distance away. Turn right to continue onto the true summit.

Distance: 8 mi/ 12.9 km
Elevation: 10,358 ft/ 3,157 m
The summit!
You can see the trail map here. Do note that the trail highlighted in red stops at the Green Lakes area.
What Time Should You Start Climbing (Itineraries)
A couple of things to consider before climbing South Sister:
- If you want to catch the sunrise on the summit, you will need to camp in the park the night before. You will start climbing in the wee morning.
- If you want to do a day hike, the rangers advised that you should be descending from the summit latest by noon.
- If you are camping at Green Lakes, you may have better luck getting a spot in the early afternoon. Climbers who are done with the South Sister or Broken Top peaks may be packing up.
Itinerary 1:
- On Climber Trail #36
- To catch the sunrise
- Assuming an 8 hour round trip
| 1.30 am to 2.30 am | Begin climb |
| 5.30 am to 6.30 am | Reach the summit |
| Jul: 7 am to 7.15 am Aug: 6.25 am to 7 am Sep: 5.45 am to 6.30 am | Sunrise + take photos |
| 7 am to 8 am | Begin descent |
| 11 am to 12 pm | Return to the starting point |
Itinerary 2:
- On Climber Trail #36
- Day trip
- Assuming an 8 hour round trip
| 7 am | Begin climb |
| 11 am | Reach the summit |
| 11 am to 12 pm | Lunch + take photos |
| 12 pm | Begin descent |
| 4 pm | Return to the starting point |
Itinerary 3:
- On Green Lakes Trail #17
- 2 day, 1 night trip
| Day 1 | |
| 11 am | Begin climb |
| 2 pm | Reach Green Lakes Camp overnight |
| Day 2 | |
| 6 am | Begin climb towards South Sister |
| 9 am | Reach the summit |
| 9 am to 9.30 am | Take photos |
| 9.30 am to 12.30 pm | Return to Green Lakes |
| 12.30 pm to 2 pm | Pack up + lunch |
| 2 pm | Begin descent |
| 5 pm | Return to the starting point |
Alternatively, you can also start early and complete South Sister on Day 1. Then you can camp overnight at Green Lakes and climb to Broken Top on Day 2.
Do You Need A Permit? Are There Any Fees?
Here’s what you need:
Wilderness Permit
from Memorial Day to October 31, you will need a Wilderness Permit. This is for entering the Three Sisters Wilderness area. If you are found to be climbing without a permit, you can be fined $200.
They are used to track usage and help in search and rescue operations.
This permit is free. You can fill them up at the trailheads. Return the original to the box provided and keep a copy of the permit on you.
Recreation Day Use Fees
You need recreation passes for the Devil Lake and Green Lakes trailheads.
If you are using other trailheads or other recreation sites, check if you needed passes here.
There are day use passes, annual passes and other discount passes. You can check them out and buy them online here.
What To Wear
- Hat/ cap: You will be spending a lot of time directly under the sun with no trees for shelter.
- Sunglasses
- Inner layer
- Sweat-wicking shirt
- Trek pants or gym pants
- Insulating layer
- A jacket for keeping warm — can be fleece or down etc
- If you like to keep your leg warms, you can also consider bringing another layer
- Waterproof layer
- The weather is unpredictable in the mountains. Always pack a set of waterproof jacket and pants for your climb.
| Insider tip: Find out how to choose the right layers for your climb here. |
- Hiking socks
- Gaitors: These are super useful to prevent small rocks or snow from getting into your boots. There are a lot of small rocks on the trails.
- Hiking boots: This is NOT a trail that you should climb with trail runners. Trail runners will provide enough traction and support for the rocky terrains. A mid-height hiking boot is preferred here. This is a job for my trusty Merrell Moab 2 — check out my review here.
| Insider tips: – You may not need your insulating or waterproof layers at the start of your climb. Pack them at the top of your backpack for easy access when you need them. Keep them in waterproof bags in case of rain. – Keep an extra set of clothes in your car. You can change out of your wet or sweaty clothes after your climb. |
If you are climbing outside of the July to September period, you will expect more snow in the mountains. Depending on the actual conditions, you will also need:
- Insulated footwear: You need boots with proper insulation for the weather
- Microspikes or crampons: Depending on the conditions, you will need either of these for winter climbing. Find out which one you need and check out my personal favourites here.
Packing List And What To Bring
- Backpack: You will need a 25L to 30L backpack. Use a proper hiking backpack with a hip belt and padding on the shoulder straps. This will make your hike a much more comfortable one. You can see a review of my favorite 30L backpack here.
- Extra set of clothes (you can leave them in the car)
- Hiking stick: Useful when you are coming down from the summit. Helps with your balance and reduce the impact on your knees. Check out these tips on climbing with painful or injured knees.
- Headlamp: For climbing in the dark. Do not rely on a torchlight or your phone. You should keep your hands free during the climb.
- Water: Depending on your needs, I recommend at least 0.5 to 0.8 gallons (2 to 3 liters) of water per day.
- Food: Depending on the duration of your climb, you will need to pack some snacks or even a proper meal or two. Get some ideas on what food and snacks you can pack for your trip. You need to bring more food if you are climbing in winter.
- First aid supplies: I always have these items with me
- Plasters
- Eyedrops: In case sand or debris get into your eyes
- Medication for headaches, nausea, stomach upset, altitude sickness etc
- Insect repellent, ointments for insect bites
- Nail clippers: For some reason, my fingernails tend to chip or crack in the mountains
- Trash bags: There are no trash bins in the mountains. Everything that you carry in with you has to come out with you.
- Camera: You don’t want to be climbing to the top of Colorado and not have something to capture the amazing views! This is my favorite camera that’s easy to bring on a trail.
- Miscellaneous
- Sunblock
- Lip balm
- Tissue, napkins, toilet paper
- Hand sanitizer
- Whistle: Useful for an emergency, especially if you are climbing alone.
- Hand and foot warmers: Useful if you do not do well in cold temperatures.
If you are camping overnight, you will also need:
- Sleeping bag: Make sure it is sufficiently insulated for the weather.
- Sleeping aids: If you are a light sleeper, it helps to wear an eye mask or earplugs when you sleep.
- Pocketknife: Useful for general camping needs.
For winter climbs, you will need:
- Ice axe: Ice axe is required when crossing snowfields. They are used to cut steps in hard snow or ice. They are also used for self-arrest (i.e. stopping your fall). Learn more about self-arrests and check out my favorite ice axe here.
- Avalanche safety gear such as snow shovel and snow probe.
| Insider tips: – To protect your stuff from the rain, pack them in small waterproof bags in your backpack. At a minimum, make sure you waterproof your electronics such as phones and cameras. I like to use ziplock bags for this. – Ziplock bags also double up as spill proof trash bags. These are perfect for storing food or other messy waste. |
How To Get To The Trailhead?
Devils Lake Trailhead
This trailhead is for Climber Trail #36.
There is a paved road leading up to the trailhead. This can be accessed by all cars.
On the Cascade Lakes Highway, you will see a sign for the Devils Lake Trailhead at this location:
44°02’01.3″N 121°46’02.5″W
44.033693, -121.767359
Turn into the parking area. The trailhead is in the parking area.
Green Lakes Trailhead
This trailhead is for Green Lakes Trail #17.
There is a paved road leading up to the trailhead. This can be accessed by all cars.
On the Cascade Lakes Highway, you will see a sign for the Green Lakes Trailhead at this location:
44°01’44.9″N 121°44’07.2″W
44.029132, -121.735320
Turn into the parking area. The trailhead is in the parking area.
| Insider tips: – If you are using Google Maps or other navigation on your phone, download an offline map. This is in case you lose cell reception. – Cascade Lakes Highway is closed in the winter. |
Locations Of Parking Lots
The Recreation Pass will allow you to park at the Devils Lake and Green Lakes Trailheads.
Devils Lake Trailhead Parking
There are 2 parking areas for the Devils Lake Trailhead.
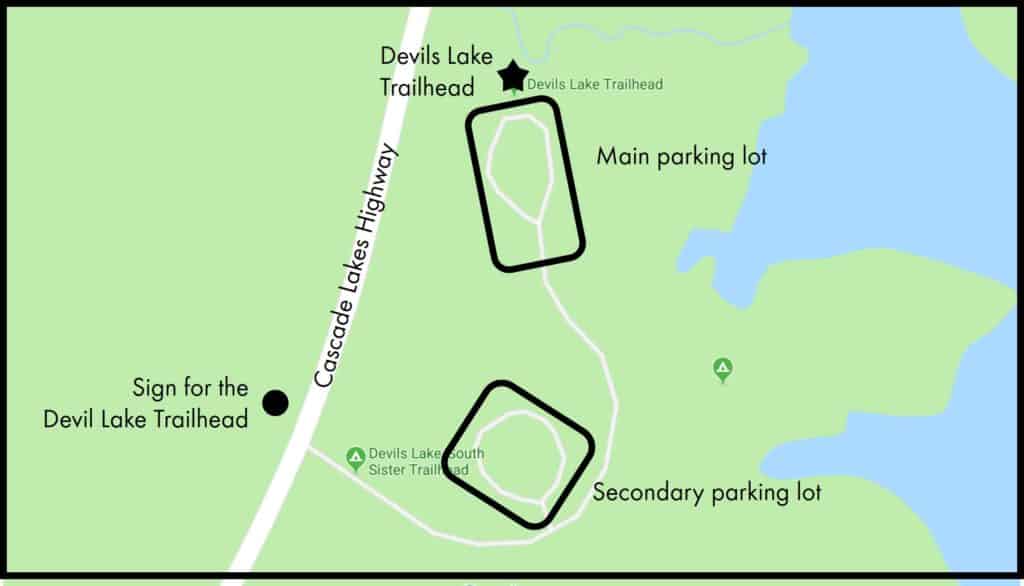
The main parking lot can fit about 60 to 70 cars. The parking area also has a men’s and women’s bathrooms.
Parking lot coordinates:
44°02’06.5″N 121°45’56.1″W
44.035134, -121.765584
No roadside parking is allowed.
Green Lakes Trailhead Parking
There are 2 parking areas for the Green Lakes Trailhead.
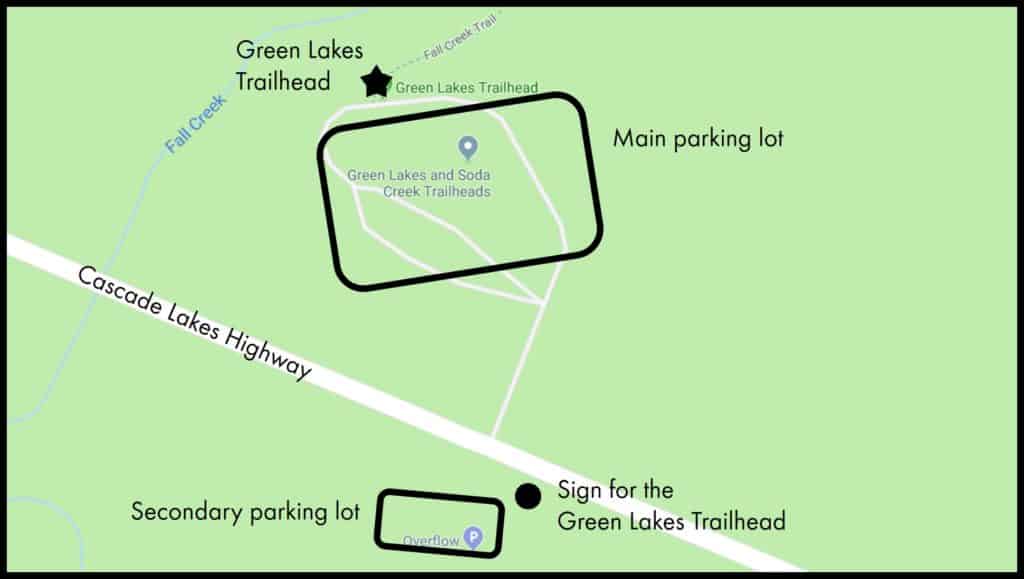
The main parking lot can fit about 60 cars. The parking area also has a men’s and women’s bathrooms.
Parking lot location coordinates:
44°01’49.2″N 121°44’09.1″W
44.030325, -121.735850
There is also an overflow parking about across the Cascade Lakes Highway.
This parking lot can fit about 15 cars.
Parking lot location coordinates:
44°01’43.3″N 121°44’08.4″W
44.028699, -121.735672
No roadside parking is allowed.
Camping And Accomodation
You can only camp at designated campsites.
These are the campgrounds found along the trails.
Devils Lake Campground
This is for climbers taking Climber Trail #36.
There are 10 designated campsites. They are on a first-come-first-served basis.
You can see the map and the campsite rules here.
Moraine Lake Campground
This is for climbers taking Climber Trail #36.
There are 22 designated campsites marked with a post. They are on a first-come-first-served basis.
You can see the map and the campsite rules here.
Green Lake Campground
This is for climbers taking Green Lakes Trail #17.
There are 28 designated campsites marked with a post. They are on a first-come-first-served basis.
You can see the map and the cmapsite rules here.
Climbing South Sister In Winter: A Recap And Important Things to Note
Always check the latest alerts and notices from the Deschutes National Forest.
- Avalanches are possible. Check the latest forecast here.
- Winter climbing is suited for more experienced climbers. If you are a beginner, make sure you are familiar with the winter gear you need to use. Also, make sure you climb with someone more experienced.
- Expect longer climb times in the winter.
- Make sure you have additional insulating layers for your climb.
- You need winter gear such as gaiters, microspikes/ crampons, and even an ice axe.
- You may also need avalanche safety gear such as a snow shovel and snow probe. Learn how to use these pieces of equipment properly before your climb.
- You need to bring extra food.
- If you are camping, make sure your sleeping bag has sufficient insulation.
- The daylight hours are shorter in winter. Make sure you bring along your headlamps to avoid getting stuck in the dark.
- The trails may be hidden by the snow or ice. Make sure you are familiar with route finding (i.e. how to read a map and use a compass or GPS).
- There are fewer climbers in winter. Do not expect to bump into other climbers if you are lost or need assistance.
What Are The Dangers Of Climbing South Sister?
This is not a simple hike. There are many dangers and risks when climbing South Sister:
- Make sure you have additional insulating layers for your climb.
- You need winter gear such as gaiters, microspikes/ crampons, and even an ice axe.
- You may also need avalanche safety gear such as a snow shovel and snow probe. Learn how to use these pieces of equipment properly before your climb.
- Falls: A high risk on South Sister. Being a volcanic mountain, many parts of the trails have loose rocks on steep terrains. There are snow and ice even in summer. Hiking over loose rocks and snowfields greatly increase your chances of falling.
- Hypothermia: A serious risk in winter and even in the summer if you are not adequately dressed!
- Getting lost: A bigger risk when the trails are covered by snow or ice.
- Dehydration: It is a long day climb. Do not underestimate how much water you need.
- Avalanches: A risk in winter.
These are just a few of the hazards you may encounter. To find out more about these dangers and how to prevent them, check out this article.
Other Important Information
- You can only have a maximum of 12 people in one hiking group.
- Dogs are allowed on the trails. But they have to be kept leashed from July 15 through September 15.
This is Part 5 of 6 of the Mountains To Climb In The US Mini-series:
Part 1: Highest Mountains To Climb In The US For Beginners
Part 2: Ultimate Guide To Climbing Mount Elbert
Part 3: Ultimate Guide To Climbing Mount Katahdin
Part 4: Ultimate Guide To Climbing Mount Bierstadt
Part 5: Ultimate Guide To Climbing South Sister
Part 6: Ultimate Guide To Climbing Mount Borah
Save to Pinterest and add this to your bucket list!