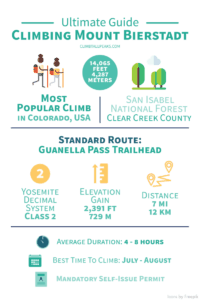
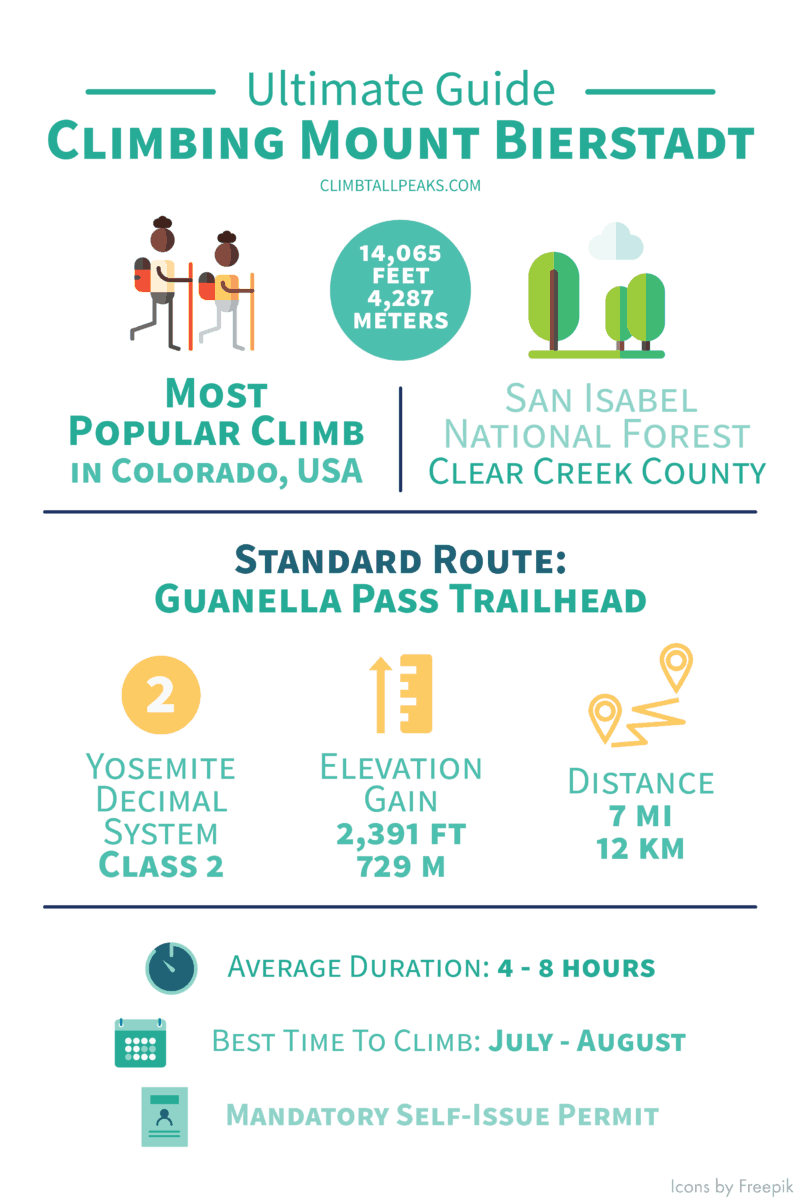
Thinking of climbing Mount Bierstadt? Mount Bierstadt is the most popular climb in Colorado, USA. It sees about 35,000 to 40,000 climbers every year! Out of the 53 14ers in Colorado, Mount Bierstadt is ranked 38th in height. Being a short drive away from Denver, and a short day hike, it’s no wonder people are flocking to this summit.
- Where Is Mount Bierstadt?
- How Are The Views On Mount Bierstadt?
- When Is The Best Time To Climb Mount Bierstadt?
- What Are The Temperatures On Mount Bierstadt?
- How Long Does It Take To Climb Mount Bierstadt?
- How Many Trails Are There?
- How Do You Choose Which Trail To Take?
- What To Expect On The Guanella Pass Trailhead
- What Time Should You Start Climbing (Itineraries)
- Do You Need A Permit? Are There Any Fees?
- What To Wear
- Packing List And What To Bring
- How To Get To The Trailhead?
- Locations Of Parking Lots
- Camping And Accommodation
- Climbing Mount Bierstadt In Winter: A Recap And Important Things to Note
- What Are The Dangers Of Climbing Mount Bierstadt?
- Other important information
Here is some quick information about the climb at a glance:
| Elevation (feet) | 14,065 |
| Elevation (meters) | 4,287 |
| Popular Route | Guanella Pass Trailhead (West Slopes) |
| YDS Class | Class 2 |
| Route Type | Loop |
| Climbing Season | All year |
| Best Time To Climb | Jun — Sep |
| Snow And/ Or Ice | Winter (some snow or ice may be seen at the summit even in the summer) |
| Permit Requirement | No (but a free self-issuing permit is needed for the Mount Evans Wilderness area) |
This is Part 4 of 6 of the Mountains To Climb In The US Mini-series:
Part 1: Highest Mountains To Climb In The US For Beginners
Part 2: Ultimate Guide To Climbing Mount Elbert
Part 3: Ultimate Guide To Climbing Mount Katahdin
Part 4: Ultimate Guide To Climbing Mount Bierstadt
Part 5: Ultimate Guide To Climbing South Sister
Part 6: Ultimate Guide To Climbing Mount Borah
Where Is Mount Bierstadt?
Mount Bierstadt is located in the San Isabel National Forest.
Here’s a map giving you a quick orientation of the area around Mount Bierstadt:
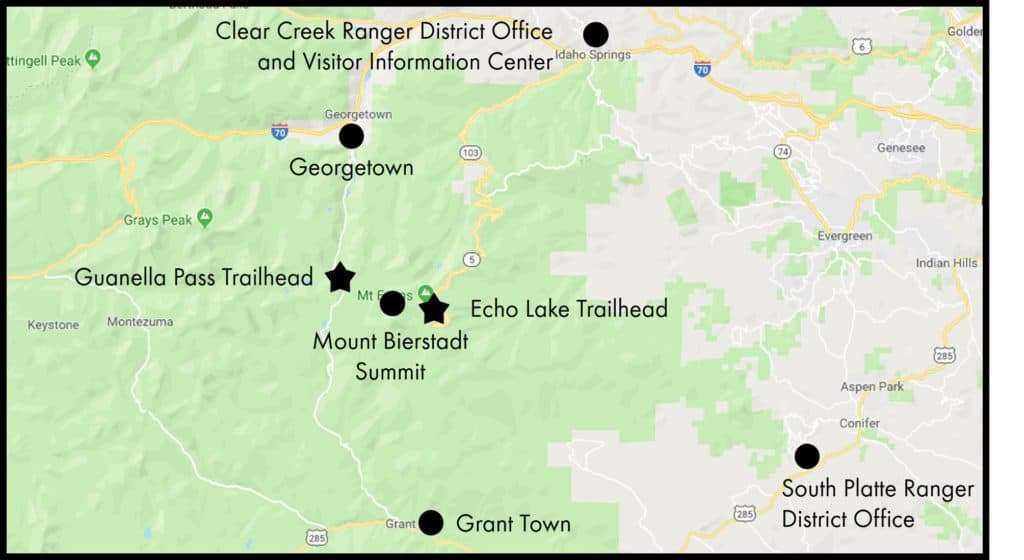
The most popular (and easiest) route for climbing Mount Bierstadt starts at the Guanella Pass Trailhead. It ascends via the west slopes.
There are 2 towns near to the Guanella Pass Trailhead — Georgetown to its north and Grant to its south.
If you would like to visit the visitor center or ranger’s office before your climb, they can be found in Idaho Springs or King Valley. Both are a distance away from the trailhead but Idaho Springs is closer.
Clear Creek Ranger District and Visitor Information
Address: 2060 Miner Street, Idaho Springs, CO 80452
Phone: 303 567 4382
Operating hours: Monday — Sunday, 9 am to 5 pm
South Platte Ranger District
Address: 30403 Kings Valley Drive, Suite 2-115, Conifer, CO 80433
Phone: 303 275 5610
Fax: 303 275 5642
Operating hours: Monday — Friday, 8 am to 4.30 pm; Closed on Federal holidays and weekends
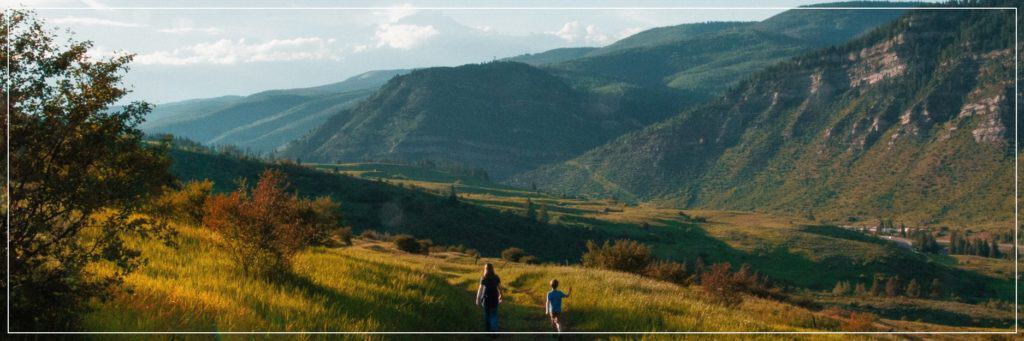
How Are The Views On Mount Bierstadt?
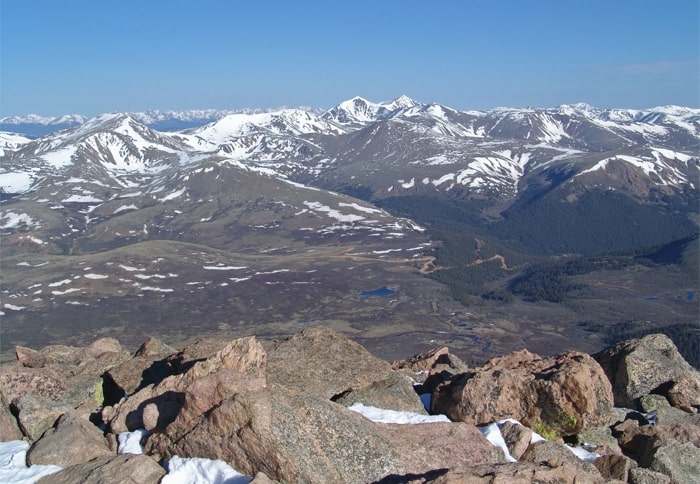
Magnificent views are the best reward for climbing Mount Bierstadt.
On the summit, you can see fellow 14ers Grays and Torreys Peaks to the west.
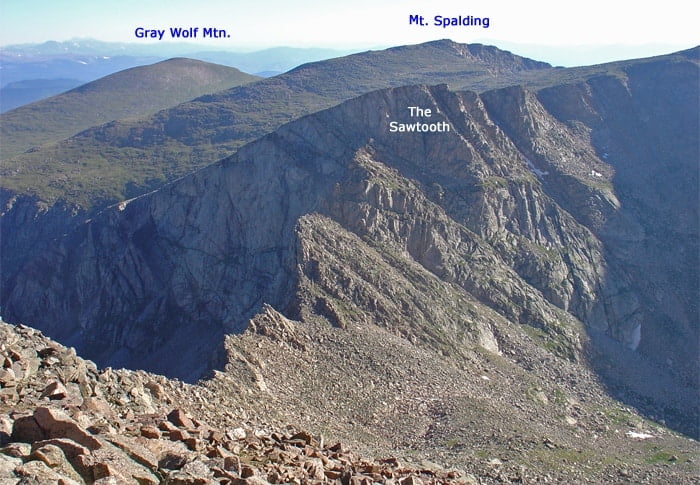
To the north is the famous Sawtooth. This is the transverse ridge that you can take over to the summit Mount Evans. However, this transverse is a Class 3 route and not suitable for beginners.
Beyond the Sawtooth, you can also see 13ers Gray Wolf Mountain and Mount Spalding in the distance.
When Is The Best Time To Climb Mount Bierstadt?
Mount Bierstadt can be climbed all year round.
The best time to climb Mount Bierstadt will be in July and August. This is also the peak season where you will see more climbers.
The weather varies from year to year. If the temperatures are warm enough, climbing in June or September may also be possible.
But even in the summer, do not expect fair weather. Afternoon thunderstorms are common from as early as 1 pm. It is recommended to start climbing very early in the morning to avoid getting caught in the rain.
From October to May, you will find more snow and ice in the mountains. You will have to be prepared for winter climbing if you plan to go during this period. Climbing Mount Bierstadt in winter is more suited for experienced climbers. Mount Bierstadt is a popular winter climb as the Guanella Pass Trailhead remains fairly accessible. This route also has minimal avalanche danger. There is more information on winter climbs in the section below.
Here’s a comparison of the conditions in summer and winter:
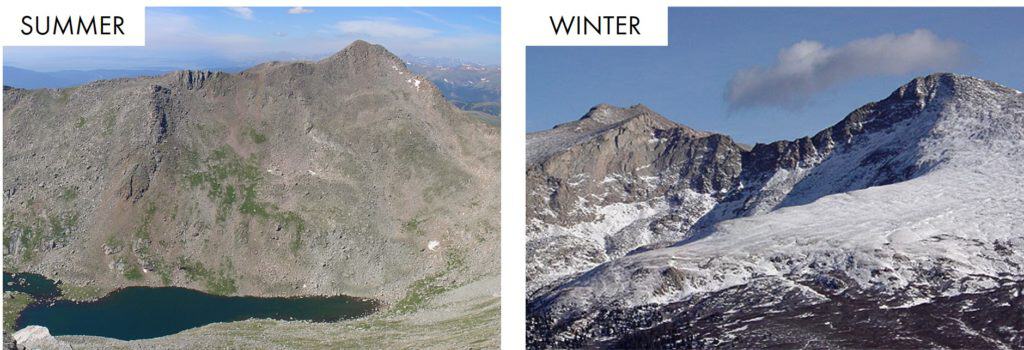
* The conditions and temperatures vary year to year. Make sure you check the latest forecast before your climb.
Save to Pinterest and add this to your bucket list!
What Are The Temperatures On Mount Bierstadt?
.
These are the average monthly temperatures on Mount Bierstadt.
| Low/ High (Fahrenheit) | Low/ High (Celsius) | |
| January | -4 / 18 | -20 / -8 |
| February | -3 / 19 | -20 /-7 |
| March | 1 / 24 | -17 / -5 |
| April | 7 / 29 | -14 / -1 |
| May | 16 / 39 | -9 / 4 |
| June | 24 / 51 | -4 / 10 |
| July | 29 / 55 | -1 / 13 |
| August | 28 / 53 | -2 / 12 |
| September | 22 / 47 | -6 / 8 |
| October | 13 / 36 | -11 / 2 |
| November | 3/ 25 | -16 / -4 |
| December | -3 / 18 | -19 / -8 |
Do note that the temperature drops as you go higher up the mountain.
The elevation gain from the trailheads to the summit is about 2,500 feet. The temperature drop will not be very significant from the trailheads to the summit. But the strong winds on the summit might make it feel a lot colder.
How Long Does It Take To Climb Mount Bierstadt?
The timings provided below are for climbing Mount Bierstadt in summer. Expect longer climbs in the winter.
The average time for a round trip up and down Mount Bierstadt is about 4 to 6 hours from the Guanella Pass Trailhead (west slopes). This goes up to the summit via the west slopes.
Experienced climbers might even complete the route in 2 hours.
Here are some factors to consider when estimating the time you need:
- Health and fitness levels: If you are experienced climber who has completed a number of 14ers, you are likely to complete this climb in less than 4 hours. If you have not been exercising in a while, you might even need more than 6 hours.
- Altitude sickness: If you are prone to altitude sickness, you may experience headaches or breathlessness during the climb. Taking frequent breaks and climbing at a slower pace can help alleviate the symptoms. Altitude sickness often has nothing to do with your fitness levels.
- Confidence: Going up Mount Bierstadt is tiring, but going down has its own set of challenges. The slopes close to the summit may appear steeper on the descent. The fear of falling may slow you down considerably.
How Many Trails Are There?
There are 2 main trails for climbing Mount Bierstadt.
- Guanella Pass Trailhead: Leads to the summit via the west slopes. This is also the standard route for winter climbs.
- Echo Lake Trailhead: Leads to the summit via the east ridge.
- Combination Climb with Sawtooth and Mount Evans: If Mount Bierstadt is not enough for you, how about bagging another 14er on the way?
- On the summit of Mount Bierstadt, you will see a transverse ridge known as the Sawtooth. Crossing this ridge is a Class 3 scramble and not for the fainthearted. Crossing the ridge will bring you over to the trail towards the summit of Mount Evans.
- Mount Evans is higher than Mount Bierstadt. It stands at a height of 14,271 feet (4,350 meters), making it the 14th highest 14er in Colorado.
How Do You Choose Which Trail To Take?
Between the 2, the Guanella Pass Trailhead is the easier route for climbing Mount Bierstadt. So it’s no surprise that it is also the most popular route. The route is rated Class 2 under the Yosemite Decimal System (YDS). Read more about YDS here.
The trail is well used. Most of the route is well-defined and you shouldn’t have a problem finding your way.
The climb is rated Class 2 due to a small section of steep slopes close to the summit. Most of the trail is fairly straightforward with fairly gentle inclination.
The Echo Lake Trailhead takes you on a tougher Class 3 climb. There is no well-defined trail and you have to cross over rocks and boulders. Expect to go up and down steeper slopes. You will need to scramble with your hands and feet in certain areas.
The Echo Lake Trailhead is not suitable for beginners or people climbing with children or dogs.
A comparison of the Guanella Pass Trailhead and Echo Lake Trailhead:
| Guanella Pass Trailhead | Echo Lake Trailhead | Combo Route (Mount Bierstadt & Mount Evans) | |
| Trailhead location (GPS coordinates) | 39°35’46.3″N 105°42’36.6″W 39.596205, -105.710171 | 39°34’45.3″N 105°38’15.5″W 39.579256, -105.637645 | 39°35’46.3″N 105°42’36.6″W 39.596205, -105.710171 |
| Trailhead elevation | 11,669 feet (3,557 meters) | 13,300 feet (4,054 meters) | 11,669 feet (3,557 meters) |
| Elevation gain | 2,391 feet (729 meters) | 760 feet (232 meters) | 2,595 feet (791 meters) |
| Round trip distance | 7 miles (11 kilometers) | 5 miles (8 kilometers) | 10.25 miles (16.5 kilometers) |
| Estimated completion time | 4 to 6 hours | 5 to 7 hours | 7 to 10 hours |
| YDS rating | Class 2 | Class 3 | Class 3 |
| Parking | 2 parking lots and roadside parking. Fit about 200 cars. | Small parking lot. Fit about 5 to 8 cars. | 2 parking lots and roadside parking. Fit about 200 cars. |
What To Expect On The Guanella Pass Trailhead
The following images are retrieved from 14ers.com. Full credits to them.
The Guanella Pass Trailhead is a loop. You take the same trail up and down.
The trail is well-maintained and you should not have a problem following the trail.
Head towards the end of the parking lot. You will see a bathroom. Just beside the bathroom is a dirt path. You will see a trail kiosk or signboard with the trail information along the dirt path. This is the Guanella Pass Trailhead.
Distance: 0 mi/ 0 km
Elevation: 11,669 ft/ 3,557 m
After about 1,000 feet, the dirt road is replaced by an elevated wooden boardwalk. The boardwalk was built to reduce the impact of human traffic on the environment. It also helps climbers get over the wet and muddy zone quickly.
Distance: 1,000 ft / 305 m
Elevation: 11,669 ft/ 3,557 m
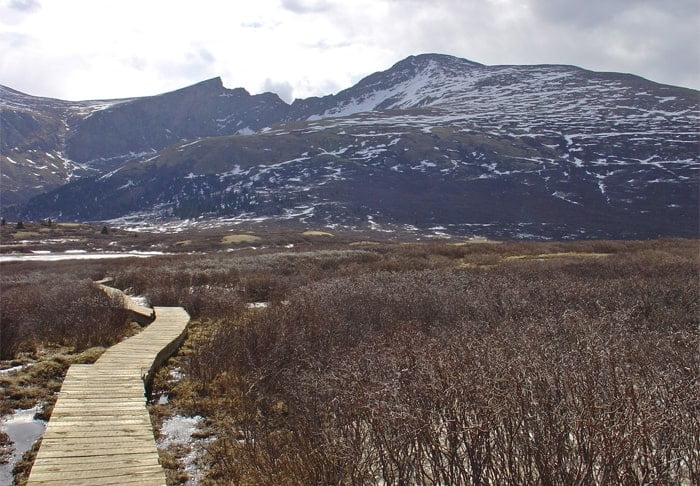
The boardwalk continues for another 1,000 feet before the trail returns to a dirt path.
Distance: 2,000 ft/ 610 m
Elevation: 11,669 ft/ 3,557 m
After another 1,000 feet for dirt, you will reach the last section of the boardwalk. It covers only about another 100 feet.
Distance: 3,000 ft / 914 m
Elevation: 11,669 ft/ 3,557 m
From there, go for another 700 feet and you will reach the Scott Gomer Creek. I’m not sure why there isn’t a boardwalk over this stream. There are rocks that you can step on to cross the stream.
Distance: 3,700 ft / 1,128 km
Elevation: 11,470 ft/ 3,496 m
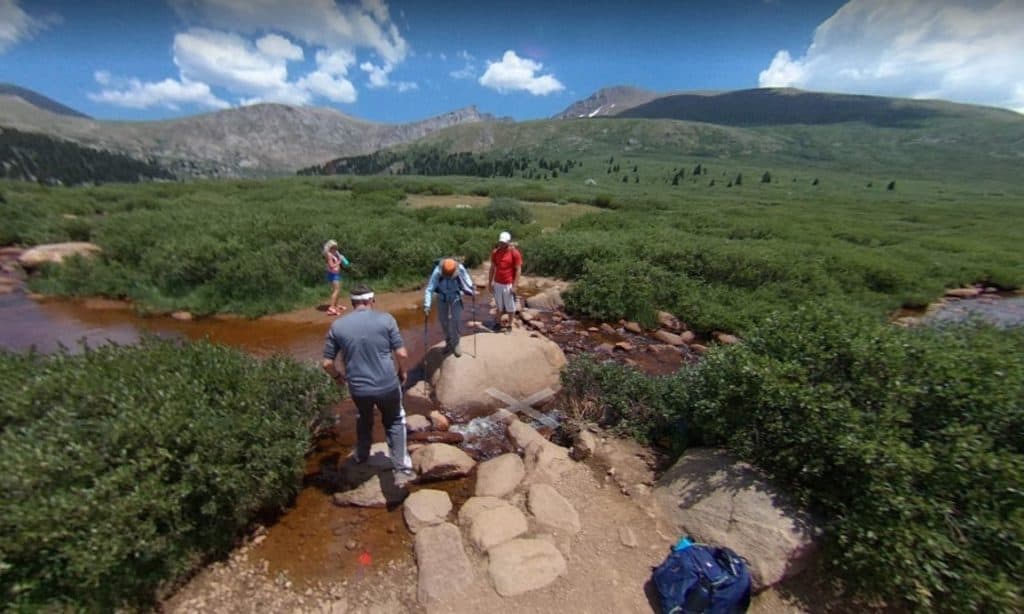
I read reports that it’s not possible to cross the stream at certain times without getting wet. Even at the shallow sections, the water can come up to your knees.
| Insider tips: – In case you have to cross the stream through the water, remove your shoes and socks. – Wear pants that you can easily roll up to your knees. – Bring a small towel to dry off your legs and feet. |
After crossing the stream, the dirt trail continues.
At the 2.75 mile mark, the trail becomes steeper.
Distance: 2.75 mi/ 4.4 km
Elevation: 13,000 ft/ 3,962 m
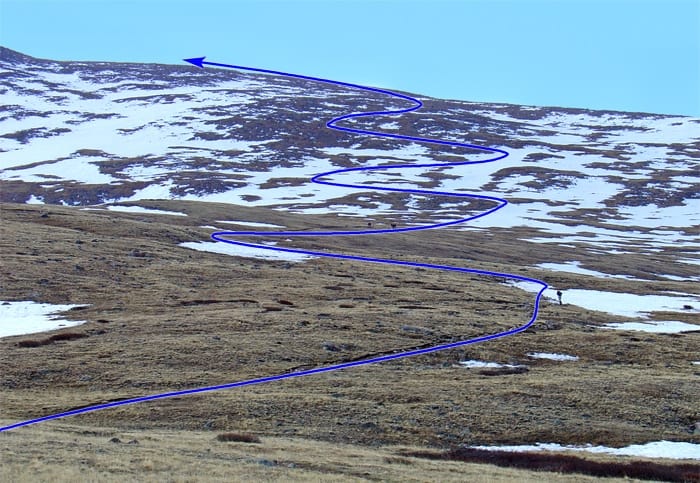
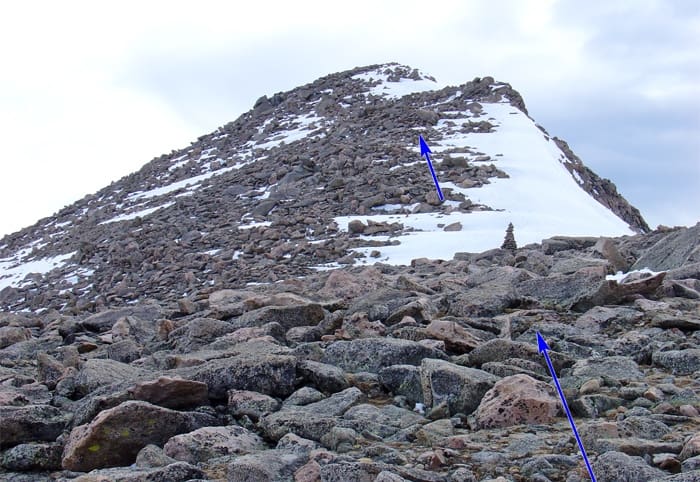
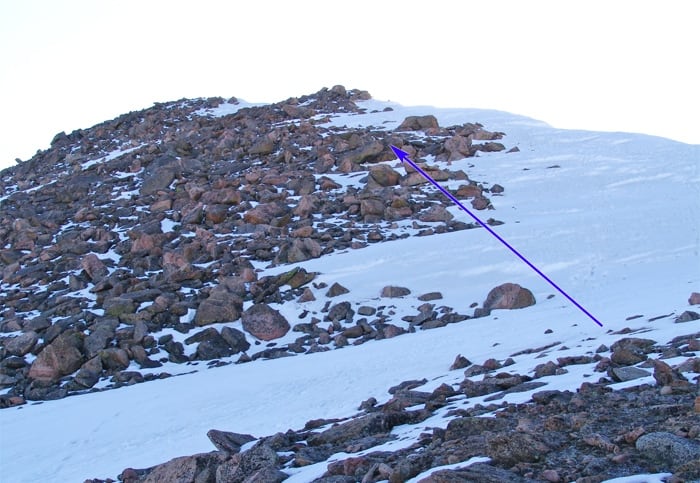
At an elevation of 13,800 feet, you have reached the steepest and toughest part of the trail. This is the Class 2 section of the route. You have to cross through boulders and rocks to reach the summit. There is no clear trail or path to follow.
Distance: 3.3 mi/ 5.3 km
Elevation: 13,800 ft/ 4,206 m
The summit!
Distance: 3.5 mi/ 5.6 km
Elevation: 14,065 ft/ 4,287 m
What Time Should You Start Climbing (Itineraries)
As mentioned earlier, afternoon thunderstorms are common when climbing Mount Bierstadt in summer. The storms can be quite violent. The entire trail is exposed without any trees for shelter. You won’t get any relief once the thunderstorm hits!
And because of that, most climbers will start off very early in the morning. You should target to reach the summit latest by 10 am. This will give you enough time to reach the forested areas before the thunderstorm hits.
Some climbers want to catch the sunrise on the summit. They will start off in the wee morning.
Another thing to consider will be the availability of parking. Although the parking lots are huge, they fill up quickly during the peak season. Try to arrive before 8 am or expect to be parking along the street.
Here are some proposed itineraries:
Itinerary 1:
- To avoid the afternoon thunderstorms
- Assuming a 5 hour round trip
| 7.30 am | Begin climb |
| 10 am | Reach the summit |
| 10.30 am | Begin descent |
| 1 pm | Reach the starting point, thunderstorm starts |
Itinerary 2:
- To catch the sunrise
- Assuming a 5 hour round trip
| 2.30 am to 3.30 am | Begin climb |
| 5 am to 6 am | Reach the summit |
| June: 5.35 am to 5.40 am July: 5.35 am to 6.05 am Aug: 6.00 am to 6.30 am Sep: 6.30 am to 7 am | Sunrise |
| 6 am — 7.30 am | Begin descent |
| 8.30 am — 10 am | Return to the starting point |
| 1 pm | Thunderstorm starts |
Do You Need A Permit? Are There Any Fees?
You don’t need to get a permit or pay any fees to climb Mount Bierstadt.
However, the trail leads into the Mount Evans Wilderness area. The area requires a mandatory self-issuing permit. The permit is free and does not limit the number of climbers. It just records the numbers of climbers for data collection purposes.
You can find the permits at the trailheads. They are usually in a box next to the trail kiosk or signboard. You can contact the Ranger’s Offices listed above for more information.
What To Wear
Here’s what to wear when climbing Mount Bierstadt:
- Hat/ cap: You will be spending a lot of time directly under the sun with no trees for shelter.
- Sunglasses
- Inner layer
- Sweat-wicking shirt
- Trek pants or gym pants
- Insulating layer
- A jacket for keeping warm — can be fleece or down etc
- If you like to keep your leg warms, you can also consider bringing another layer
- Waterproof layer
- The weather is unpredictable in the mountains. Always pack a set of waterproof jacket and pants for your climb.
| Insider tip: Find out how to choose the right layers for your climb here. |
- Hiking socks
- Hiking boots: It is common to see people climbing with trail runners. Trail runners might be slippery if you are stepping on wet rocks to cross the stream. The trails are rocky at the top and there might be snow or ice at some sections. I prefer to climb with my hiking boots. Check out my review of my favorite hiking boots here.
| Insider tips: – You may not need your insulating or waterproof layers at the start of your climb. Pack them at the top of your backpack for easy access when you need them. Keep them in waterproof bags in case of rain. – Keep an extra set of clothes in your car. You can change out of your wet or sweaty clothes after your climb. |
If you are climbing outside of the June to September period, you will expect more snow in the mountains. Depending on the actual conditions, you will also need:
- Insulated footwear: You need boots with proper insulation for the weather
- Gaitors: These prevent snow or ice from getting into your boots.
- Snowshoes: You are likely to need snowshoes from the start of the trail to the top of the treeline. You may even need them all the way to the summit if the snow is soft or slushy.
- Crampons: These are usually not needed.
Packing List And What To Bring
Here’s what to bring for climbing Mount Bierstadt:
- Backpack: You will need a 25L to 30L backpack. Use a proper hiking backpack with a hip belt and padding on the shoulder straps. This will make your hike a much more comfortable one. You can see a review of my favorite 30L backpack here.
- Small towel and a spare pair of socks: Useful if you need to cross the stream through the water.
- Extra set of clothes (you can leave them in the car)
- Hiking stick: Useful when you are coming down from the summit. Helps with your balance and reduce the impact on your knees. Check out these tips on climbing with painful or injured knees.
- Headlamp: For climbing in the dark. Do not rely on a torchlight or your phone. You should keep your hands free during the climb.
- Water: Depending on your needs, I recommend at least 0.5 to 0.8 gallons (2 to 3 liters) of water.
- Food: Depending on the duration of your climb, you will need to pack some snacks or even a proper meal or two. Get some ideas on what food and snacks you can pack for your trip. You need to bring more food if you are climbing in winter.
- First aid supplies: I always have these items with me
- Plasters
- Eyedrops: In case sand or debris get into your eyes
- Medication for headaches, nausea, stomach upset, altitude sickness etc
- Insect repellent, ointments for insect bites
- Nail clippers: For some reason, my fingernails tend to chip or crack in the mountains
- Trash bags: There are no trash bins in the mountains. Everything that you carry in with you has to come out with you.
- Camera: You don’t want to be climbing to the top of Colorado and not have something to capture the amazing views! This is my favorite camera that’s easy to bring on a trail.
- Miscellaneous
- Sunblock
- Lip balm
- Tissue, napkins, toilet paper
- Hand sanitizer
- Whistle: Useful for an emergency, especially if you are climbing alone.
- Hand and foot warmers: Useful if you do not do well in cold temperatures.
If you are camping overnight, you will also need:
- Shelter: This can be a tent or bivy sack or tarp. Find out which is suitable for you here.
- Sleeping bag: Make sure it is sufficiently insulated for the weather.
- Sleeping aids: If you are a light sleeper, it helps to wear an eye mask or earplugs when you sleep.
- Bear canister: This is to keep food away from bears and other wildlife. You will need to hang the canister food from tree limbs 12 feet off the ground, 6 feet from the tree’s trunk, and 6 feet below the supporting limb.
- Pocketknife: Useful to cut ropes for hanging the bear canisters or for other camping needs.
For winter climbs, you will need:
- Ice axe: Ice axe is required when crossing snowfields. They are used to cut steps in hard snow or ice. They are also used for self-arrest (i.e. stopping your fall). Learn more about self-arrests and check out my favorite ice axe here.
- Avalanche safety gear such as snow shovel and snow probe.
| Inside tips: – To protect your stuff from the rain, pack them in small waterproof bags in your backpack. At a minimum, make sure you waterproof your electronics such as phones and cameras. I like to use ziplock bags for this. – Ziplock bags also double up as spill proof trash bags. These are perfect for storing food or other messy waste. |
How To Get To The Trailhead?
Guanella Pass Trailhead
There is a paved road leading up to the Guanella Pass Trailhead. This can be accessed by all cars.
You can check the latest update on the road conditions here.
Echo Lake Trailhead
There is a paved road leading up to the Echo Lake Trailhead. This can be accessed by all cars.
You can check the latest update on the road conditions here.
| Insider tips: – The Guanella Pass Road is partially closed in the winter. You can check the latest status on the US Forest Service website or call the Ranger’s Offices listed above. – The road closure usually adds 1.5 miles (2.4 kilometers) from the closure point to the Guanella Pass Trailhead. This adds 3 miles (4.8 kilometers) to the round trip. |
Locations Of Parking Lots
There is free parking next to the Guanella Pass Trailhead and Echo Lake Trailhead.
| Insider tips: – The parking lots fill up by 6 am to 7 am during the busy periods. Get there early to secure a spot! – If you are using Google Maps or other navigation on your phone, download an offline map. This is in case you lose cell reception. |
Guanella Pass Trailhead
There are 2 large parking lots at the Guanella Pass Trailhead.
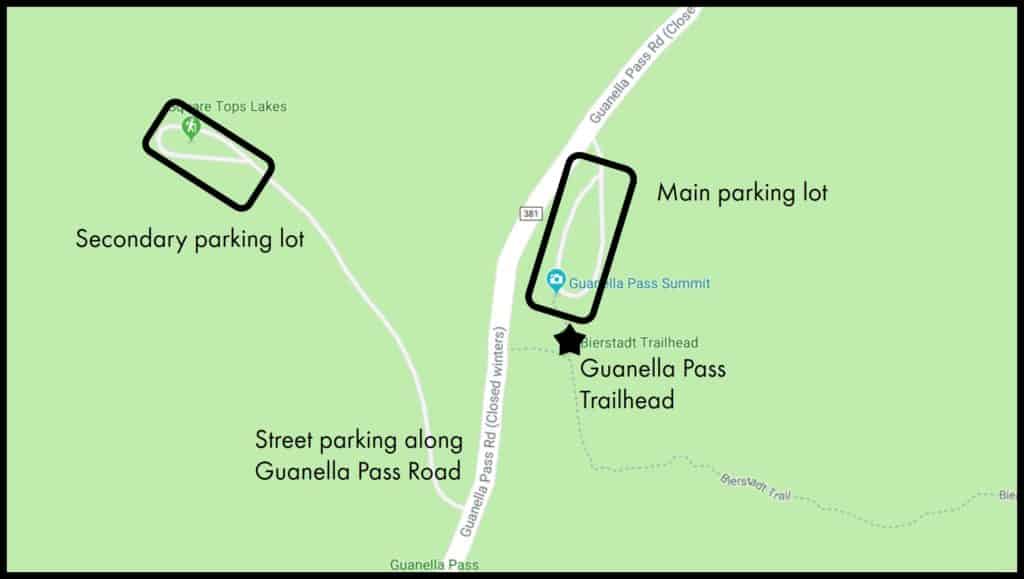
It is quite common for cars to also park on the side of the Guanella Pass Road when the lots are full. The 2 lots can probably accommodate up to 150 cars. The main parking lot also has a men’s and women’s bathrooms.
| Insider tip: The wait for the bathrooms might be very long during the busy periods. And most of the trail is exposed. Try to visit a bathroom before making your way to the trailhead. |
Main Parking Lot coordinates:
39°35’50.1″N 105°42’35.9″W
39.597262, -105.709981
Secondary Parking Lot coordinates:
39°35’48.3″N 105°42’42.8″W
39.596741, -105.711874
Echo Lake Trailhead
The Echo Lake Trailhead has a small parking area for about 5 to 8 cars. It is just a small area at one of the sharp bends along Mount Evans Road.
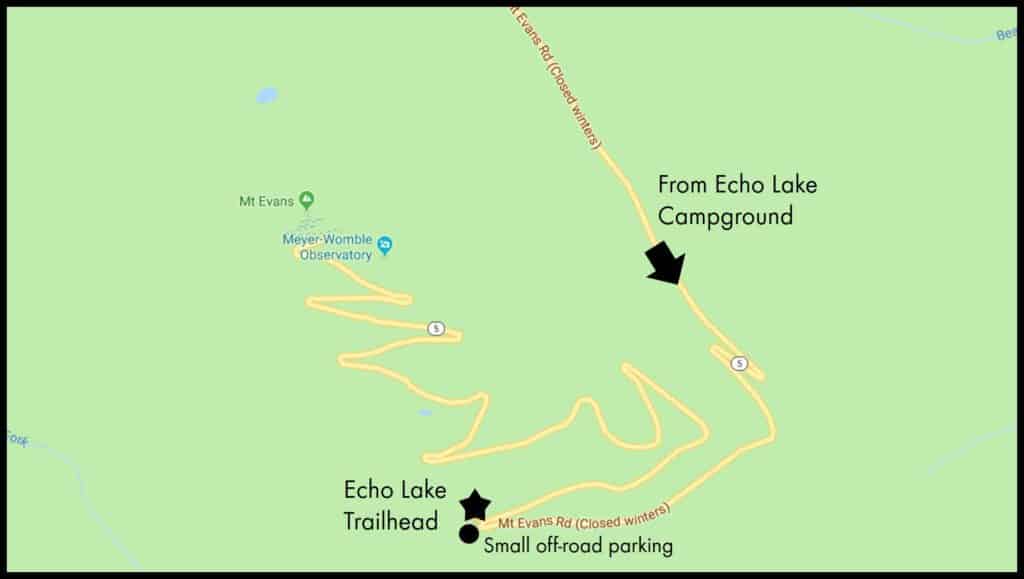
There are no bathrooms and signboards at this parking lot.
Coordinates:
39°34’45.6″N 105°38’15.1″W
39.579320, -105.637538
Camping And Accommodation
Primitive camping is allowed in the forest. However, Mount Bierstadt is within the Mount Evans Wilderness area. Wilderness areas have special regulations and restrictions about camping which you can read about here.
For your safety, avoid camping at parking lots or dirt roads. Climbers are driving in and out in the middle of the night with minimal lighting. Also, avoid camping next to the trailheads or along the trail which may be noisy.
If primitive camping is not for you, there are developed campgrounds, RV campgrounds and cabins at several locations:
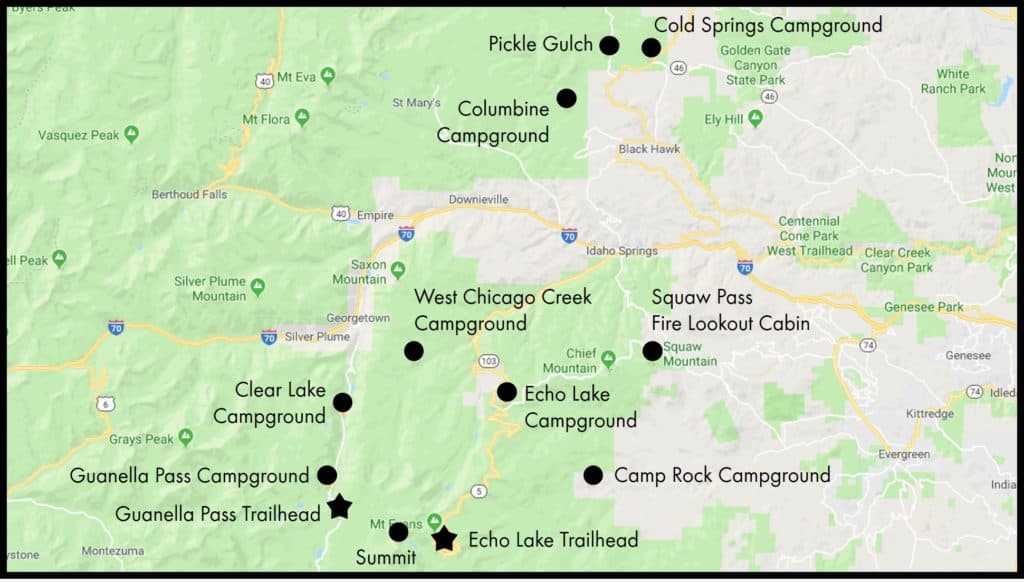
Campgrounds Close To Guanella Pass Trailhead
- Clear Lake Campground
- Guanella Pass Campground
- West Chicago Creek Campground
You can check the fees and reservations here.
Campgrounds Close To Echo Lake Trailhead
- Echo Lake Campground
- Camprock Trailhead Campground
- West Chicago Creek Campground
You can check the fees and reservations here.
Campgrounds To The North Of Idaho Springs
- Cold Springs Campground
- Pickle Gulch Campground
You can check the fees and reservations here.
Cabin To The South Of Idaho Springs
This is the only cabin in the area.
- Squaw Pass Fire Lookout
You can check the fees and reservations here.
RV Campground To The West Of Boulder (Further Up North)
The nearest RV campground is next to Boulder.
You can check the fees and reservations here.
Climbing Mount Bierstadt In Winter: A Recap And Important Things to Note
- Avalanches are possible. Check the latest forecast here.
- Climbing Mount Bierstadt in winter is suited for more experienced climbers. If you are a beginner, make sure you are familiar with the winter gear you need to use. Also, make sure you climb with someone more experienced.
- The Guanella Pass Trailhead is the standard route for winter climbing. However, Guanella Pass Road is partially closed in winter. You will need to hike the additional 1.5 miles (2.4 kilometers) each way from the road closure point to the trailhead.
- You will need to wear additional insulating layers for your climb. Your boots should also be insulated.
- You will need gaiters, snowshoes and even an ice axe. You may also need avalanche safety gear such as a snow shovel and snow probe. Learn how to use these pieces of equipment properly before your climb.
- You need to bring extra food.
- If you are camping, make sure your sleeping bag has sufficient insulation.
- The daylight hours are shorter in winter. Make sure you bring along your headlamps to avoid getting stuck in the dark.
- The trails may be hidden by the snow or ice. Make sure you are familiar with route finding (i.e. how to read a map and use a compass or GPS).
- There are a lot fewer climbers in winter. Do not expect to bump into other climbers if you are lost or need assistance.
What Are The Dangers Of Climbing Mount Bierstadt?
Although Mount Bierstadt is a relatively short and easy climb, there are still some dangers and risks:
- Altitude sickness
- Hypothermia: A serious risk in winter or if you get caught in the afternoon thunderstorms!
- Dehydration: It is a long day climb. Do not underestimate how much water you need.
- Getting lost: A bigger risk on the less popular routes where the trails are less obvious.
- Avalanches: A risk in winter.
These are just a few of the hazards you may encounter. To find out more about these dangers and how to prevent them, check out this article.
Other important information
- There is no potable water at the trailheads or along the trail. There is a creek along the trail about 3,700 feet (1.1 kilometers) from the Guanella Pass Trailhead. You will need to treat the water before drinking. The easiest way is to use water purifying tablets. Learn more about them here.
- Dogs are allowed on the trails. They are supposed to be kept leashed but you may see many unleashed dogs.
This is Part 4 of 6 of the Mountains To Climb In The US Mini-series:
Part 1: Highest Mountains To Climb In The US For Beginners
Part 2: Ultimate Guide To Climbing Mount Elbert
Part 3: Ultimate Guide To Climbing Mount Katahdin
Part 4: Ultimate Guide To Climbing Mount Bierstadt
Part 5: Ultimate Guide To Climbing South Sister
Part 6: Ultimate Guide To Climbing Mount Borah
Save to Pinterest and add this to your bucket list!